The 2.5 m Telescope of the Sloan Digital Sky Survey
Abstract
We describe the design, construction, and performance of the Sloan Digital Sky Survey Telescope located at Apache Point Observatory. The telescope is a modified two-corrector Ritchey-Chrétien design which has a 2.5-m, /2.25 primary, a 1.08-m secondary, a Gascoigne astigmatism corrector, and one of a pair of interchangeable highly aspheric correctors near the focal plane, one for imaging and the other for spectroscopy. The final focal ratio is /5. The telescope is instrumented by a wide-area, multiband CCD camera and a pair of fiber-fed double spectrographs. Novel features of the telescope include: (1) A 3∘ diameter (0.65 m) focal plane that has excellent image quality and small geometrical distortions over a wide wavelength range (3000 Å to 10,600 Å) in the imaging mode, and good image quality combined with very small lateral and longitudinal color errors in the spectroscopic mode. The unusual requirement of very low distortion is set by the demands of time-delay-and-integrate (TDI) imaging. (2) Very high precision motion to support open loop TDI observations; and (3) A unique wind baffle/enclosure construction to maximize image quality and minimize construction costs. The telescope had first light in May 1998 and began regular survey operations in 2000.
1 Introduction
The planning for the enterprise that would evolve into the Sloan Digital Sky Survey (SDSS; York et al. 2000) began in the mid-1980s, when the marriage of rapid advances in solid-state detectors and the explosive increase in computational processing and instrument control capabilities suggested that it would be possible to carry out a wide-area digital optical sky survey. Digital surveys covering tens of square degrees had indicated the potential power of operating CCDs in the time-delay-and-integrate (TDI) or “scanning” mode. (see, e.g., Schmidt et al. 1986 for early scientific results and a description of the technique.) This mode combines extremely high observational efficiencies (the time spent gathering data often exceeds 90% of the available observing time) and excellent calibration of pixel-to-pixel sensitivity variations (the “flat field”) with the high quantum efficiency, noise properties, and linearity of CCDs.
To execute a wide-area, multi-band imaging survey of a substantial part of the celestial sphere, and to create spectroscopic galaxy and quasar samples that exceed existing ones by an order of magnitude, required a number of significant innovations:
-
•
(1) A large optically, mechanically, and electronically complex camera to gather the imaging data and provide suitable astrometric calibration. The SDSS camera, which consists of 30 2048 2048 SITe/Tektronix CCDs and 24 2048 400 CCDs, is described by Gunn et al. (1998).
-
•
(2) A spectroscopic system that can simultaneously obtain 640 spectra with broad wavelength coverage (3800-9200Å) and can be efficiently configured to each field in the sky. The SDSS uses two fiber-fed double spectrographs (Uomoto et al. 1999); the first SDSS spectroscopic observations are presented by Castander et al. (2001).
-
•
(3) A data acquisition system which can reliably store the incoming data and provide a modicum of real-time analysis for quality control, focus, etc.
-
•
(4) A data processing system that can automatically and rapidly calibrate the observations, identify objects, and measure their properties from the tens of gigabytes of data produced in a typical night of imaging observations, so that spectroscopic targets can be selected within a short time of the acquisition of the imaging data. The photometric calibration and object detection and characterization software, called Photo, is described by Lupton et al. (2001, 2002), and (in preparation) Lupton (2006); its outputs and their use are described in the SDSS data release papers (Stoughton et al. 2002, Abazajian et al. 2003, 2004, 2005, Finkbeiner et al. 2004). The target selection code which selects objects from the photometric catalogs for spectroscopic observation is described in Strauss et. al 2002, Richards et al. 2002, Eisenstein et al. 2001, and in the data release papers. The outputs of the spectroscopic pipeline, which reduces the two-dimensional CCD frames to one-dimensional spectrophotometrically calibrated spectra and then analyzes the spectra for morphology and radial velocity are described in the data release papers; there is not yet a published description of the algorithmic structure of the pipeline. The astrometric calibration is described by Pier et al. (2003).
-
•
(5) A telescope that possesses a wide angle, extraordinarily low-distortion focal plane and extremely accurate drives, and allows for rapid changes between imaging and spectroscopic modes in order to adapt to changing weather/seeing conditions.
The requirements of TDI imaging present challenging hurdles for any optical/mechanical design. First, if the sky is to be surveyed in an acceptably short time, the size of the field must be quite large, for the SDSS camera. That means that if the instrument is to operate in TDI mode anywhere but the celestial equator it cannot observe as a transit device but must scan along great circles. The telescope drive system must be able to maintain precise rates and direction without guiding information from celestial objects. Second, the optics must not only provide excellent image quality over a large field in the entire wavelength band covered by CCDs, but also constrain geometric distortions in order to assure that the star images traverse the CCDs accurately along their columns and at a rate which is constant over the whole field.
To accomplish these goals, the SDSS team designed and constructed a dedicated wide-field 2.5 m telescope. This telescope, its instruments, the 0.5 m photometric telescope which provides the photometric calibrations for SDSS (Hogg et al. 2001, Tucker 2005) and the support facilities are located at Apache Point Observatory (APO), New Mexico (Figure 1). APO is 1 km south of the Sacramento Peak site of the National Solar Observatory and is at an elevation of 2800 m.
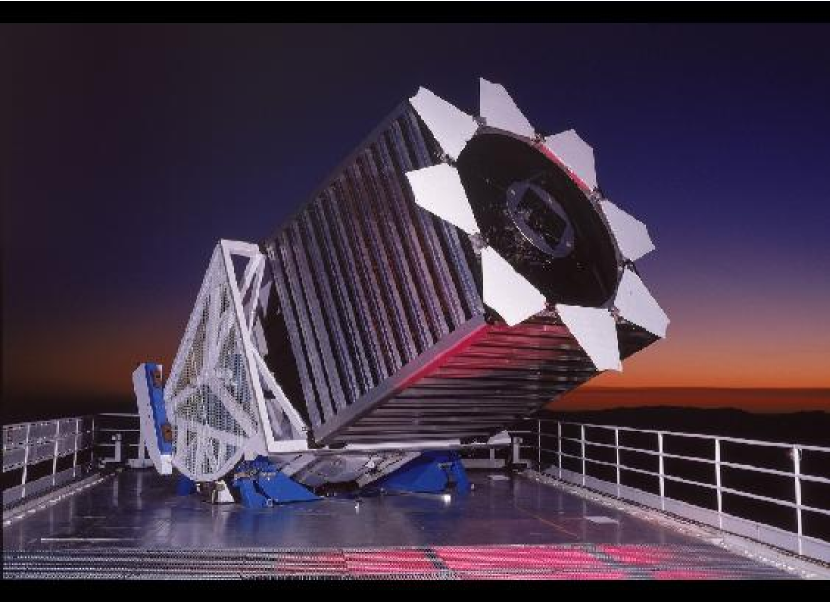
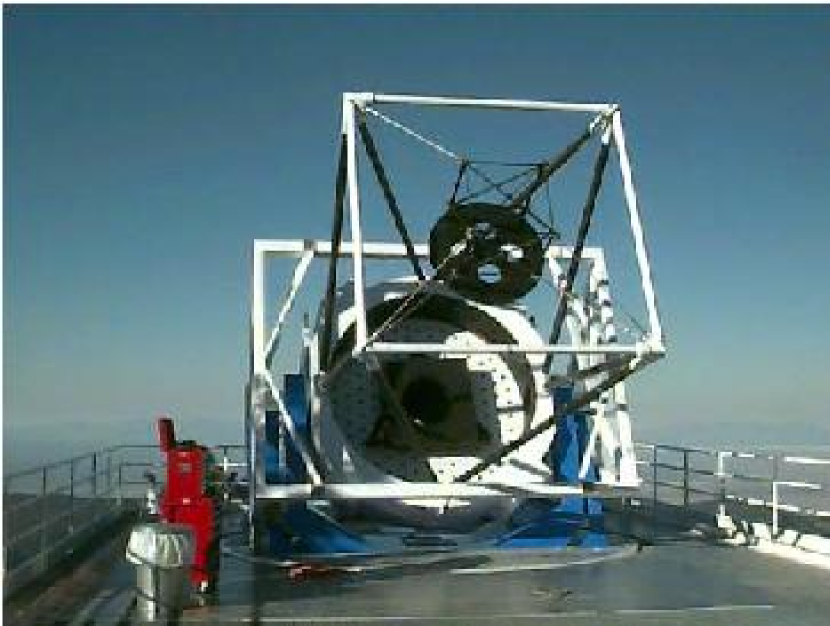
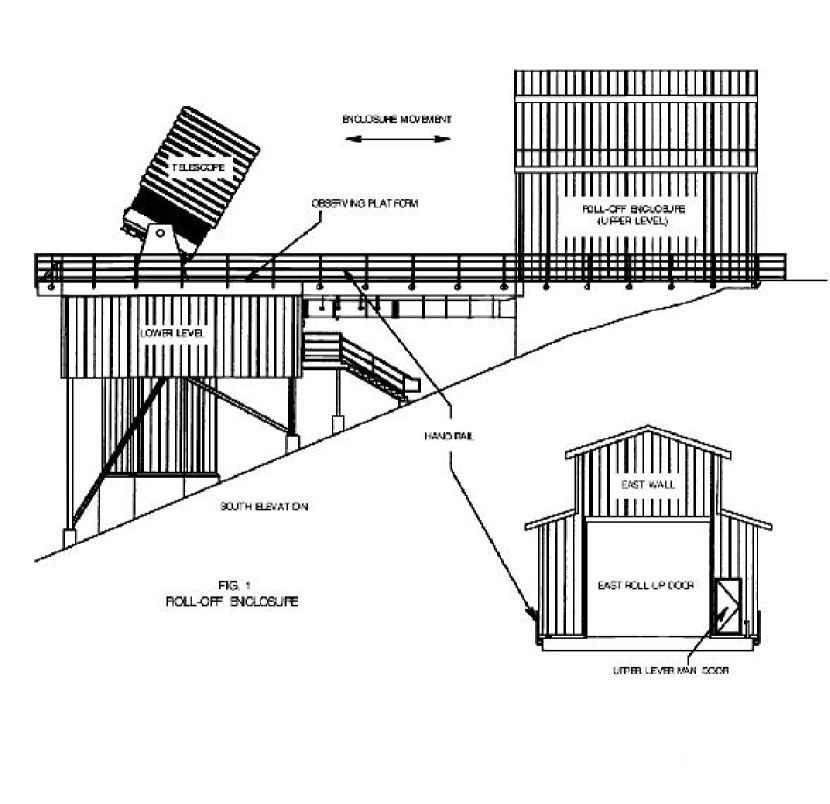
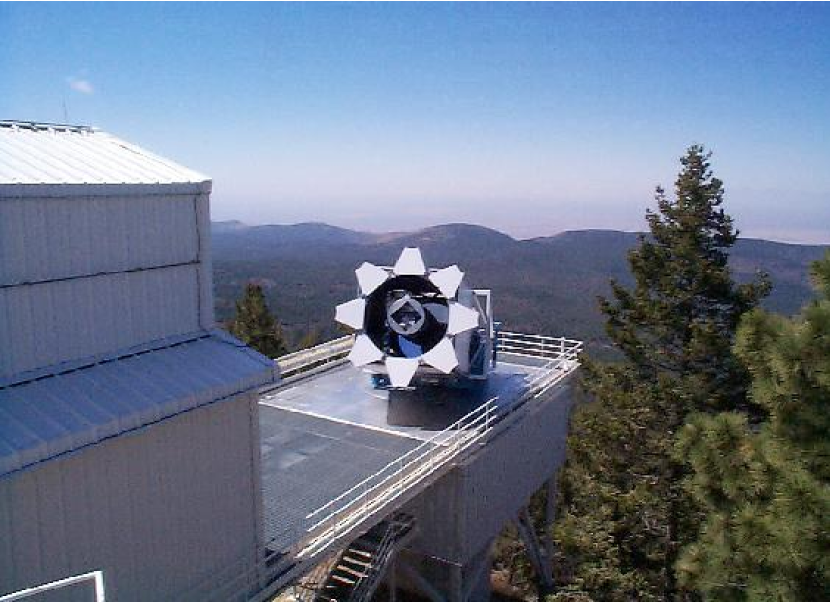
The SDSS telescope carries out both imaging and multi-object spectroscopic observations, scheduled and interleaved depending on the quality of the weather. Thus the telescope must be able not only to support these observing modes, but to allow rapid change between imaging and spectroscopy. The many innovative and unique features of the SDSS telescope design (and some of the associated pitfalls) are the subject of this paper. Figure 2 presents an image of the telescope. Some of the unusual aspects of the design are obvious at first glance: the entire telescope enclosure is a retractable structure, and the telescope’s wind and light baffling is accomplished by a complex structure surrounding the telescope but mechanically isolated from it.
The next section describes the optical design of the telescope, while §3 discusses the engineering and mechanical design. The wind and light baffles are described in §4, and the telescope enclosure in §5. A brief history of the construction, installation, commissioning and operations of the telescope is given in §6, where the future of the telescope is also discussed. Some of the material in this paper has been presented in part in (and is sometimes taken word-for-word from) the SDSS Project Book and technical papers by Hull, Limmongkol & Siegmund (1994), McCall & Siegmund (1994), Siegmund et al. (1998), Waddell et al. (1998), Carey et al. (2002), Long (2002), and Leger et al. (2003a,b).
2 Optical Design
2.1 General Considerations
Initial desiderata for the project which was to become the SDSS included the acquisition of order a million redshifts in a spatially contiguous volume as nearly spherical as possible, with photometry in several bands covering the wavelength region accessible from the ground with silicon CCDs ( 3000-10000Å). Crude optimization parameters such as telescope aperture, available field with acceptable image quality, available optical fibers, and available (or soon-to-be available) CCDs led to a telescope of approximately 2.5 meters aperture and focal ratio approximately /5, which provides a good match both to fibers for spectroscopy (180 m 3 arcsec) and to the imaging CCDs (pixel size 24 m 0.4 arcsec). It was desired for several reasons to conduct the TDI imaging at sidereal rate, and this instrument with a 20482 CCD yields an effective integration time of about 54 seconds and a limiting magnitude of about 23. The optimum extragalactic survey area for an observatory at moderate northern latitudes is the north galactic cap. This gives a survey volume whose width and depth are comparable for any magnitude limit, and avoids galactic obscuration to the extent possible. The desired million redshifts dictates a spectroscopic limit of about r=18 (York et al. 2000; Eisenstein et al. 2001; Strauss et al. 2002). Spectra of sources at this brightness of sufficient quality should be obtainable from this telescope in of order one hour with efficient spectrographs. Since at a given aperture the time to complete a survey of given solid angle is inversely proportional to the field area, it is clear that the telescope should have a field which is as large as practicable, and must lend itself to the use of fiber-fed spectrographs. It was with these simple considerations that we began to seek a satisfactory system design.
While wide-field optical designs exist (the Baker-Paul three-mirror design, for example, and more recent variants, and the Schmidt, of course) they all suffer from either excessive length for a 2.5-m aperture or an inaccessible focal plane, which would render the fiber spectroscopy difficult. Early design efforts revealed some promise that a more-or-less conventional Ritchey-Chrétien-like optical system would deliver the requisite performance at /5. At the time the system was designed and built the detectors of choice were the SITe/Tektronix TK2048E CCDs, and these chips were used both in the SDSS camera (Gunn et al. 1998), and in the spectrographs. With 24 m pixels, these CCDs provide excellent focal plane image sampling at about /5 with the SDSS image quality requirement of about 1′′ full width at half maximum (FWHM). This combination yields an image scale of 0.40′′ pixel-1, about 2.5 pixels per FWHM, and about 1% total power in a Gaussian star image beyond the Nyquist frequency.
Efficient fibers are available in diameters of 100 to 600 m which preserve focal ratios faster than about /7, and which suffer hardly any degradation at focal ratios around /5. Fibers which subtend about 3′′ are needed to cover the bright parts of galaxies in the brightness range of interest; smaller fibers would not only degrade the expected signal-to-noise ratio (S/N) for galaxy spectra, but would introduce stringent requirements on the astrometric accuracy and mechanical placement of the fibers. At the scale at /5, 60.6 m arcsecond-1, the 3′′ angular size corresponds to 180 m diameter fibers; these fibers have excellent optical performance if handled and terminated properly and also yield good sampling for the 24 m pixels of the large Tektronix/SITe imaging arrays at the demagnified focus of the spectrographs. The overall focal ratio of the optical system, therefore, was fixed at /5.0, and for both imaging and spectroscopy the instrument point spread functions (PSFs) are required to be across the entire field.
The final optical design achieved for the SDSS 2.5 m telescope and described below is simple and yields excellent performance, with a focal plane well-matched to the TDI imaging requirements. The ray trace image sizes for the imaging final corrector are less than 0.6′′ rms over the entire 3∘ diameter field at the design wavelength, and are less than 0.7′′ rms in any of the five SDSS filter passbands (; see Fukugita et al. 1996) which have central wavelengths that cover the wavelength range of 3500 to 9300 Å. Geometric distortion is less than 12 m over the whole field, and lateral and longitudinal color errors have little effect on the image quality. The lateral color using the spectroscopic final corrector is very small, of order 6 m (0.1′′) over the entire field over the spectroscopic wavelength range of 3800 to 9200 Å. The dominant aberration in the spectroscopic mode (with its demand for wideband image quality) is longitudinal color. In the final SDSS telescope design, this creates images larger than 1′′ rms (to be compared to the 3′′ diameter fibers) only at extreme field angles at the ends of the spectrum.
As pointed out in the design report for the Swope and Irenee DuPont telescopes at Las Campanas by Bowen & Vaughan (1973), it is possible to design a Ritchey-Chrétien telescope with a flat field by making the curvatures of the primary and secondary mirrors the same, which yields zero Petzval curvature in the focal plane. Since a Gascoigne astigmatism corrector is required, and since this element introduces a bit of positive field curvature, the design needs to deviate a little from this prescription, but only slightly. This approach results in a final focal ratio of just under twice the primary ratio, depending a little on the back focal distance, and requires a very large secondary, about half the primary diameter for the field sizes obtainable with /4 primaries (about 3∘). For large telescopes, one would like to circumvent the limitation of slow primaries and large secondaries. These desiderata were met in the design of the 2.5-meter DuPont telescope with the introduction of only moderate field curvature.
2.2 The Design
The instrument described here uses the same philosophy as that of the DuPont telescope, taken to even faster primary and overall /ratio. Our requirements are rather unusual for an astronomical instrument, since we must accomplish TDI imaging over a large field. This requires that field distortion be carefully controlled, since either a change of scale or a differential deviation from conformality of the mapping of the sky onto the focal plane across a CCD translates immediately into image degradation. It is in fact the case that for large enough fields, there is no satisfactory circularly symmetric optical design for a flat focal plane, since the requirement that parallels of latitude map into straight lines, so stars travel along the straight columns of the CCDs, and the condition of constant scale along those lines so that the tracking rate across the device be constant each determine a unique map and they are different. For our 3∘ field, such troubles with mapping a sphere onto the focal plane cause image degradation of the order of 0.15′′; although this value is negligible even with 0.5′′ images, the errors grow as the square of the field diameter. The desired map (onto a flat focal plane) is one which creates a Mercator-like projection of the sky onto the focal plane, can be achieved with anamorphic optics; we did not investigate this option, but the technology of generating and figuring complex optical elements is such now that this route would be quite feasible. The errors for a compromise circularly symmetric design are in any case not excessive with our field. Conventional Ritchey-Chrétien designs have two orders of magnitude too much distortion for this application.
In addition, conventional fast Ritchey-Chrétien designs with single-element Gascoigne correctors have unacceptably large lateral color, both for this imaging application and (especially) for fiber spectroscopy.
We were therefore compelled to adopt a somewhat more complex system, and have evolved a design with a two-element refracting corrector which has excellent performance. It makes use of the fact that the astigmatism correction of a Gascoigne plate increases as the square of the distance from the focal plane for a given strength, while the lateral color and distortion only rise linearly. Thus a pair of lenses, one of the usual form and of weak power placed some distance from the focal plane, and another the negative of the usual form with times the strength of the first placed 1/ the distance of the first from the focus, can correct astigmatism while introducing no lateral color or geometric distortion. Since the final corrector is part of the structure of the camera (Gunn et al 1998), a second lens had to be made for the spectrograph in any case, and the two were optimized somewhat differently–for distortion in the case of the camera, and lateral color in the case of the spectrograph.
Geometric distortion remains at a level (12 m over the field of the SDSS camera) set by the order of the aspheric used for the second corrector element and can in principle be removed (or specified) exactly. The lateral color for the spectrographic configuration is less than 10 m peak-to-peak over the entire field throughout the spectral range of the spectrograph, and is a negligible contribution to the image diameter for any filter or field location in the camera.
The final design has almost zero distortion in the sense that the radius in the focal plane is proportional, to high accuracy, to the field angle (not its sine or tangent); zero distortion for most wide-field imaging is defined for the condition that the radius in the focal plane is proportional to the tangent of that angle, which results in faithful representations of figures on planes, but we wish as faithfully as possible to image figures on a sphere onto a surface which is almost planar. For this case a compromise is necessary between the wishes for constant scale in the sense that meridians have constant linear separation in the focal plane, and the desire that parallels of latitude do likewise. The optimum case depends somewhat on the aspect ratio of the field and lies somewhere between the designs where the radius in the focal plane increases as the sine and the tangent of the input angle. For a square focal plane, which is close to the situation at hand, the case where the radius is approximately proportional to the angle itself is best. The errors can be minimized by clocking different CCDs at different rates to correspond to the local scale along the columns, but we have chosen, for reasons of noise reduction and simplicity in the data system, to clock all CCDs synchronously (Gunn et al. 1998). Our design for the best compromise tracking rate results in worst-case image smearing along the columns of 0.06′′, 3 m, or 0.14 pixels over the imaging array. Points on the sky do not quite follow straight trajectories in the focal plane, but this error is compensated for by a slight rotation of the CCDs (0.006∘) near the corners of the field, and introduces an error of only 0.24 pixel if uncompensated.
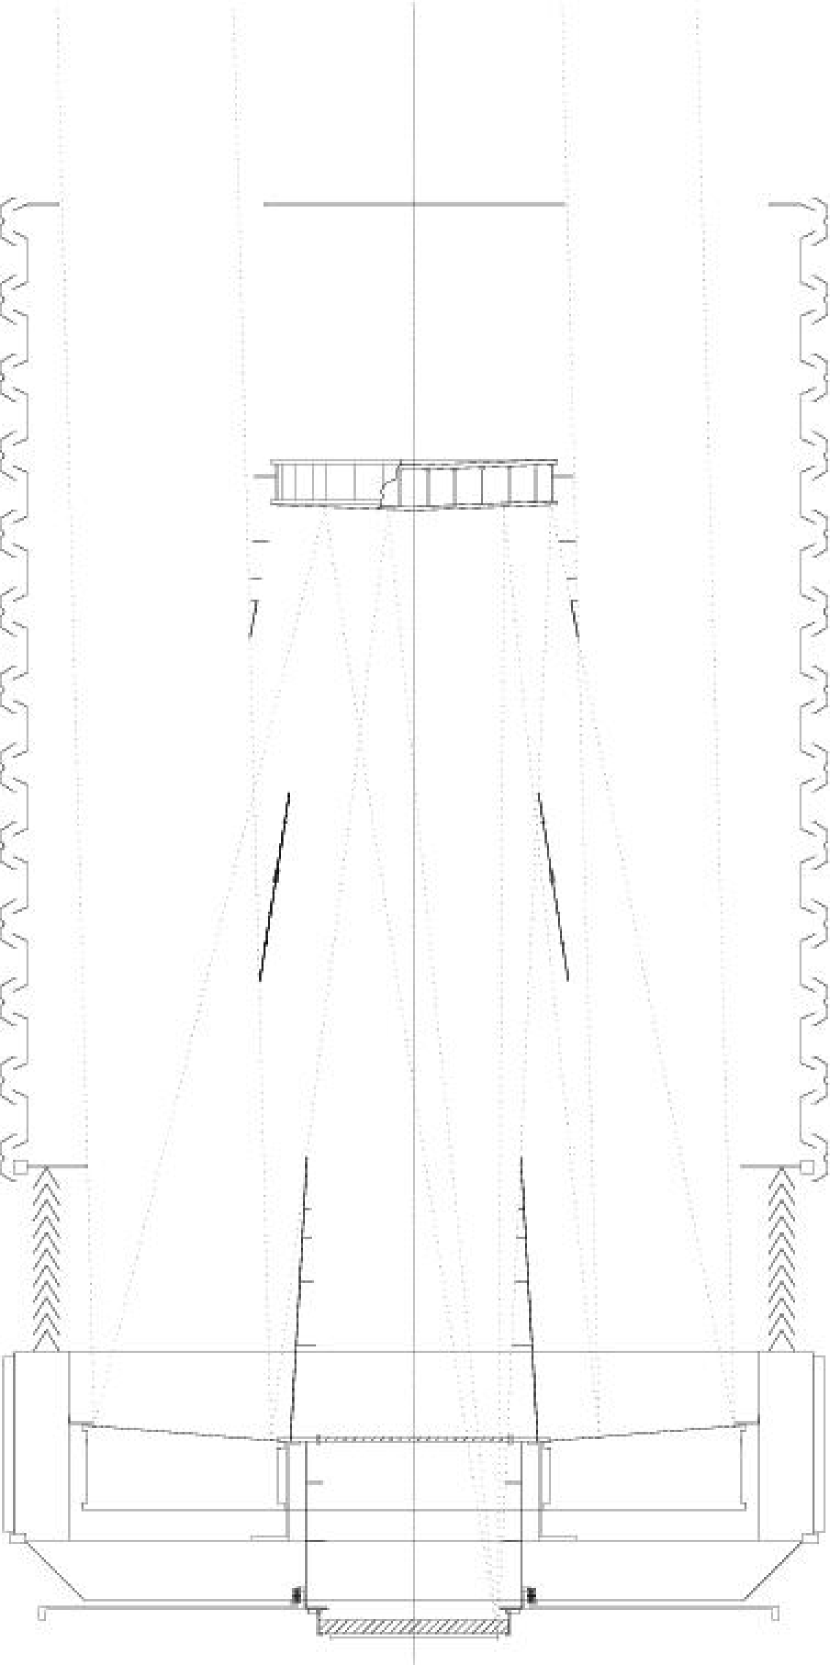
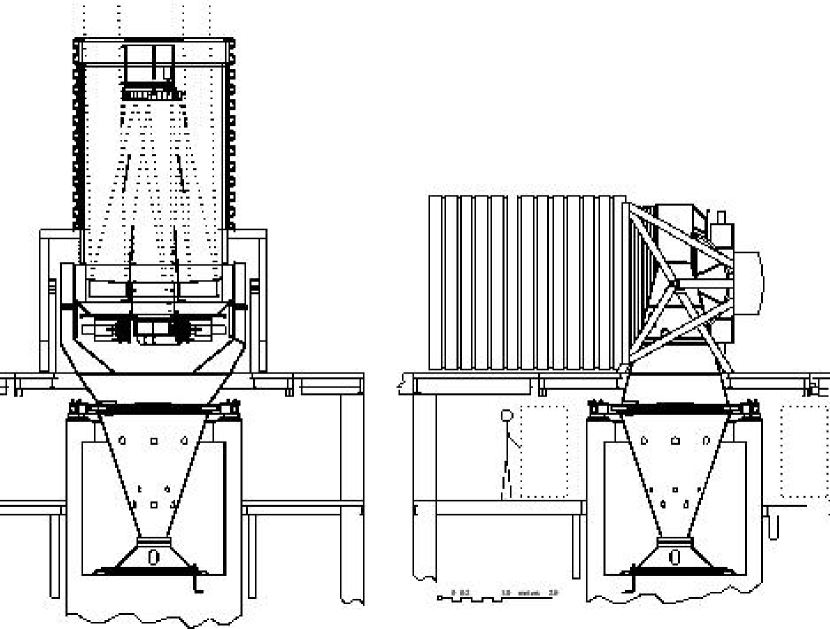
The design uses a 2.5-m /2.25 primary with a 1.08-m secondary, which, with its baffles (1.30 m diameter), obscures 27% of the incoming beam. The central hole in the primary is 1.17 m in diameter; its baffle is slightly larger, 1.20 m. Cassegrain telescopes with fields this large are notoriously difficult to baffle, but a simplified variant on the “Venetian blind” baffling system used in the DuPont design works well (see §4). The optical layout, showing the baffles and a set of rays from the field edge at 1.5∘ is shown in Figure 3. The output /ratio is 5.0, and the focal plane is 0.76 m behind the vertex of the primary in order to clear the primary mirror support cell and allow space for the instruments. The telescope is quite short-coupled, with the secondary only 3.6 m in front of the primary. The corrector consists of two aspheric fused quartz elements, as discussed above. The first (“Gascoigne”) element is approximately coincident with the vertex of the primary mirror. There are two interchangeable rear correctors, a thick one associated with the camera (and in fact an intimate part of its mechanical design — see Gunn et al. 1998), and a much thinner one for use with the spectrographs. The top surface of the second element in the camera configuration is just 58 mm from the focus, and for the camera element the back surface of the filters, which are cemented to the corrector, is 8 mm from the focus. The spectrographic configuration has 34 mm of working space behind the second corrector. The 3∘ field is 0.65 m in diameter; over this field, the focal surface of the camera configuration is described to reasonable accuracy as a simple quartic in the radius; it is flat to within about 0.2 mm over the inner 0.5 m, and rises rapidly to about 2 mm at the edge.
The CCDs for the imaging camera are mounted to conform to the focal surface, which requires a tilt of just under a degree at the edge of the field. There is one further complication in the design, namely that the CCDs as produced are slightly convex, with a reasonably well controlled radius of about 2.2 meters. The best fit plane results in focus errors of about 100m rms, which at f/5 corresponds to an image degradation of about 20m. We have chosen not to live with this, but instead to correct this curvature individually for each CCD with weak field flatteners cemented to the rear face of the corrector. This is more to attempt to keep the point- spread-functions reasonably constant over a chip than a fundamental discomfort with global focus errors this large, but for some CCDs in the array there are unavoidable significant variations (Gunn et al. 1998).
The spectroscopic optical configuration is similar to that of the imaging camera; the two share the primary, secondary, and Gascoigne corrector, but the final corrector is substantially different. The spectroscopic corrector is much thinner (which substantially reduces longitudinal color), quite strongly curved, and a bit farther from the focal plane. Its design was optimized for lateral color, which is better than 4 m rms over the entire field, while maintaining polychromatic images better than 1′′ rms diameter. The primary-secondary spacing is also slightly different for the two instruments; the required difference lies well within the secondary focus range. The spectroscopic design violates the “telecentric” condition that the focal plane be perpendicular to the central ray in each image. This choice means that for optimum performance the fibers cannot be placed perpendicular to the focal plane. Since the SDSS uses drilled plug-plates for the fibers, the most straightforward way to deal with the lack of telecentricity is to drill the plug-plates for the fibers while the plates are deformed slightly (Owen et al. 1994). This has proven very straightforward and successful.
The camera design has been optimized for the chosen distribution of filters over the focal plane. The overall scale is 60.4 microns/arcsecond; one pixel is 0.403 arcseconds = 24 m. There are a total of six glass-air surfaces, the pupil radius is 1250.00 mm with a 625 mm central obscuration, taken (not quite correctly) at the primary, and the first conjugate is at infinity. The telescope’s optical designs for the camera and the spectrograph configurations are given in Table 1 and Table 2 respectively. In these tables, are the curvatures, positive if concave right, and the s are the conic constants ( is a sphere, a paraboloid, a hyperboloid, a prolate ellipsoid, and an oblate ellipsoid; generally, ). The column labelled “Space” lists the spacings in millimeters from the previous surface, positive if to the right. The material following the surface is given in the column labelled “Glass”. The sign of “glass” changes for reflections and is positive for rightward-moving rays, negative for left. The quantities , , , and are the aspheric coefficients for polynomial aspherics, where the general form of the surface is
where is the solution to the conic surface equation
The index of refraction for fused quartz (fq in the tables) is 1.46415 at 4700 Å.
The primary is almost hyperbolic, with about a wave and a half of 6th and 8th order flattening at the edge; the secondary is likewise, with about two waves of 6th order steepening.
2.3 The Performance of the Imaging Design
The discussion of the theoretical optical performance of the camera configuration design is a bit complicated both because of the complexity of the focal plane, with different filters and field flatteners in different locations, and because of the effect of distortion on the final TDI image quality. A series of simple monochromatic traces of the camera system without the individual field flatteners is presented in Table 3. Here the focus (distance behind the dummy surface 8, which is the nominal 8 mm back focal distance behind the last (filter) element) , the image height at that focus, and the rms image diameter are tabulated for each of eight field angles from the center to the edge of the imaging field (which is somewhat smaller than the whole spectroscopic field) for the effective wavelengths of the five SDSS filters. The last four field angles correspond to the outer corners of the outermost CCD in some row, and angles which are not actually reached at a given color with the camera are prefixed with a ‘’. The images are degraded somewhat at the very edge, where the radial field curvature is maximum, by the finite (flat) area of the chips. This effect has been evaluated in detail along with TDI and polychromatic effects in Gunn et al. (1998), where there is also presented a greyscale ‘spot diagram’ like that shown in Figure 5 in this paper for the spectroscopic configuration.
The form of the focal surface at 4760 Å is presented in Table 4. The quantity is the total longitudinal focal deviation from a plane at the indicated angle, ht the height in the focal surface, and lindev the deviation from a best-fit strict linear proportionality between the input angle and the height. These deviations (maximum of about 4m) simply reflect the maximum order of the surface of the corrector; it is clear that the distortion is controlled by the local slope of this surface, and can be made to vanish (or take on any reasonable form) exactly. The corrector is sufficiently close to the focus that there is little repercussion for the image quality or the lateral color when it is modified slightly.
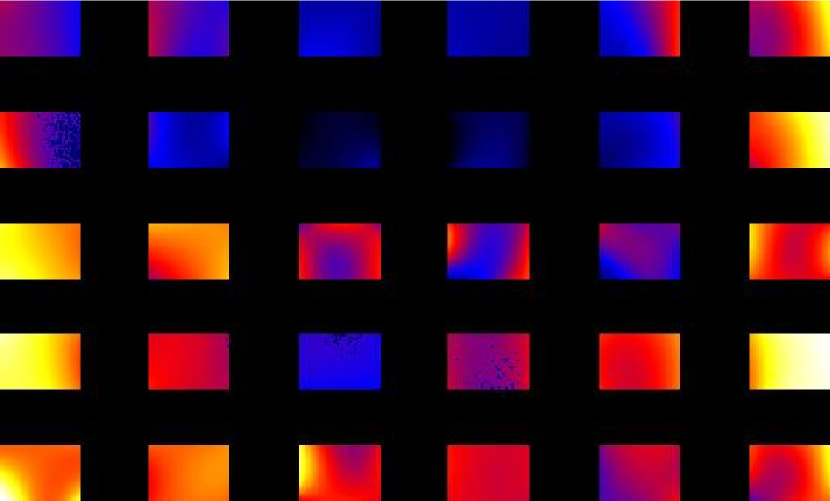
The final calculated images produced by the optics and convolved with 0.8 arcsecond FWHM Gaussian seeing (rather optimistic, as it turns out; see below) are described by Gunn et al. (1998). Optical distortions cause the instrumental PSF to vary across the field, with the quality degrading away from the optical axis - it is for this reason that the filters form the central row in the SDSS camera. At the edge of the field, the FWHM of the instrumental PSF can vary by up to 15% from one side of the CCD to the other. Further, the atmospheric contribution to the PSF is not constant over the camera array, and significant differences are seen in the scan direction because of the short exposure time, 54 seconds for a given point on the sky in TDI mode. As a result, the PSF is a complex and varying function of both the “x” and “y” position in the focal plane and within an individual CCD image, and must be dynamically modeled during photometric data reduction using images of bright stars (see Lupton et al. 2001 and in preparation). Examples of the PSF variation observed across the camera in excellent seeing are shown in Figure 4.
2.4 The Performance of the Spectrographic Design
Table 5 presents data which are relevant to the spectrographic mode design. At each of seven field angles from the center to the extreme edge, the focal properties are given on a surface which represents the average focal surface over the spectrograph wavelength range of 3900 Å to 9200 Å. The entries for the third column for wavelength 5300 Å, which roughly centers the range of index variations for the spectrograph, give the height of the focus. For the other four wavelengths, the third column lists the height differences (in the sense of the height at the given wavelength minus the height at 5300 Å), thus represent lateral color, which is seen to be 10 m total, m, or less over the whole field, and are even somewhat smaller at the edges where the images are larger. The s are longitudinal deviations from best focus at that wavelength, and the s are rms image diameters at the compromise focus. It is only at the wavelength extremes and at the extreme edge of the field that the rms diameters of the compromise images exceed 1 arcsecond; the best focus images there are substantially less than 1 arcsecond (45 and 40 m at 4000 Å and 9000 Å, respectively, at 90′ radius), and the increase is due solely to longitudinal color. The 72 micron worst-case rms diameter is still much smaller than the 180 micron fibers, however, and the effect on throughput is not large; we discuss the issue more fully below. The details of the average focal surface are presented next: the sagitta of the focal surface, the mean height (here just the average of the 4000 Å height and the 9000 Å one, and presumably where one drills the fiber hole), the deviation from a linear relation with the field angle (it is seen here that the different final corrector form, chosen to yield the best polychromatic images, results in quite serious distortion, but this is of no importance for the spectrograph), the direction cosine of the central ray measured from the direction of the axis, and the difference between this angle and the angle which the normal to the focal surface makes with the axis. This last entry is the angle with which the fiber hole must be drilled into a plate which conforms to the focal surface. The maximum value is about 2.0 degrees, compared to the 5.7 degree half-angle input cone at /5. The losses, even into the /4 input beam of the spectrograph, are large enough to be important, and we compensate for it by drilling the holes into a deformed plate.
As discussed by York et al. (2000), the highest quality conditions (photometric, good seeing) are devoted to imaging, while other workable time is given to fiber spectroscopy; the average seeing for the latter is typically 1.5′′–1.7′′. Differential refraction at the ends of the spectrum at the maximum zenith angle allowed for survey observations (55∘) is just under from the central wavelength image at the altitude of the site. With 1.5′′ Gaussian seeing, a 3′′ fiber at the field edge collects 95% and 92% of the light at 4000 Å and 9000 Å from a point source, respectively, when centered on the image, and at worst 65% and 67% when decentered by 1′′. This is not substantially worse than the situation in the center of the field at the central wavelength, where the centered number is 98% and the 1′′ offset number is 72%. A smaller fraction of the light is collected for extended objects, of course, but the differential effect between the center and edge is smaller.
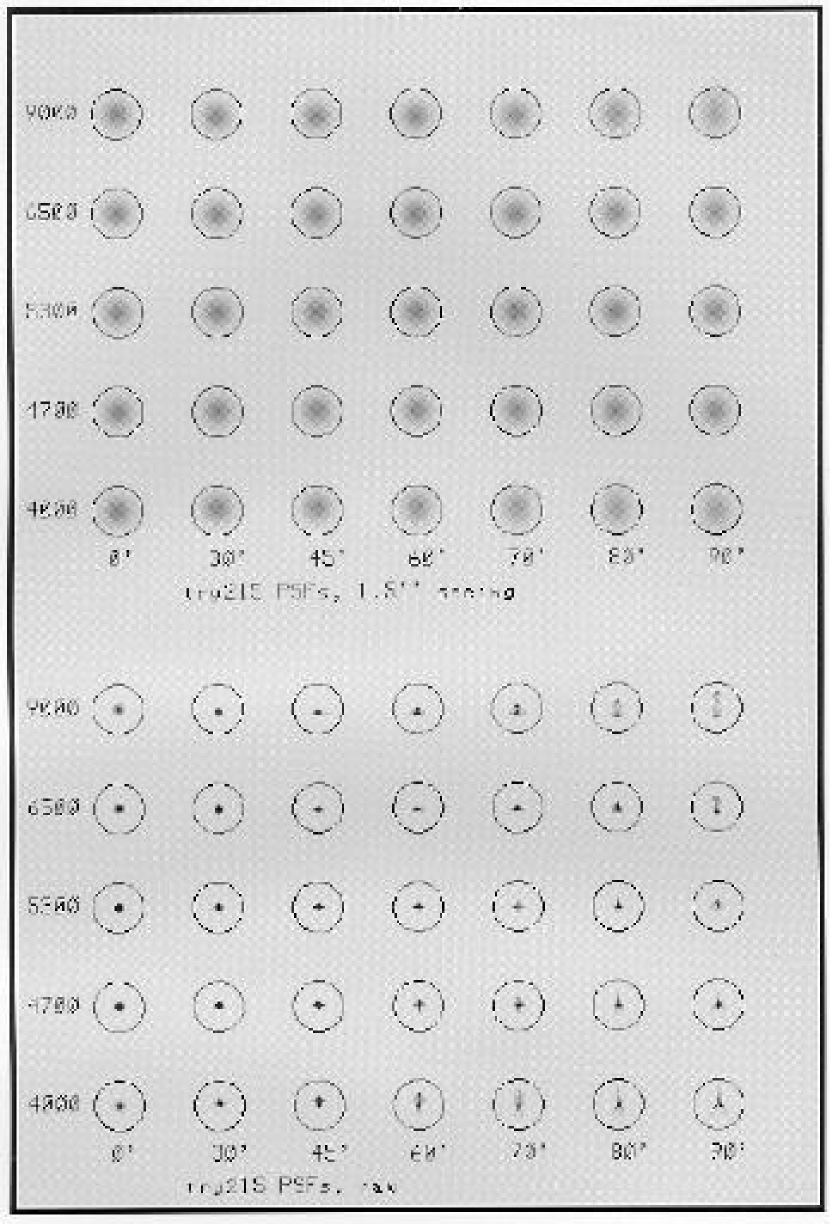
The point spread function, convolved with 1.5′′ Gaussian seeing, for the field angles in Table 5 are shown in Figure 5. The images are separated by 6′′ in the mosaic, and the circles are 3′′ in diameter, the input diameter of the fibers.
2.5 The Optical Elements
2.5.1 The Primary Mirror
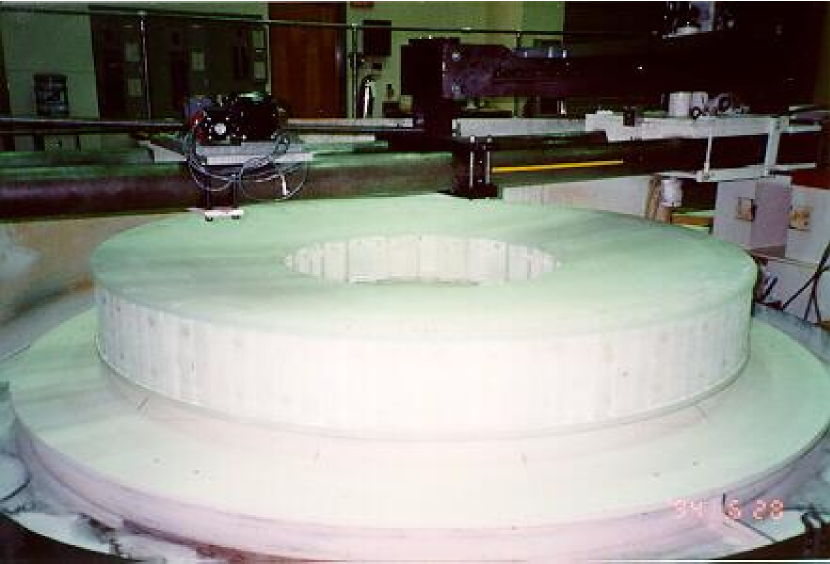
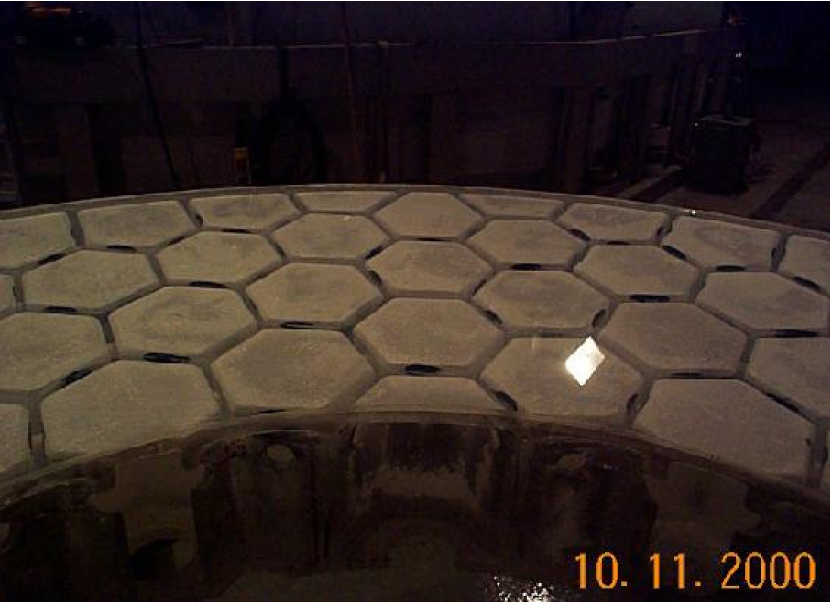
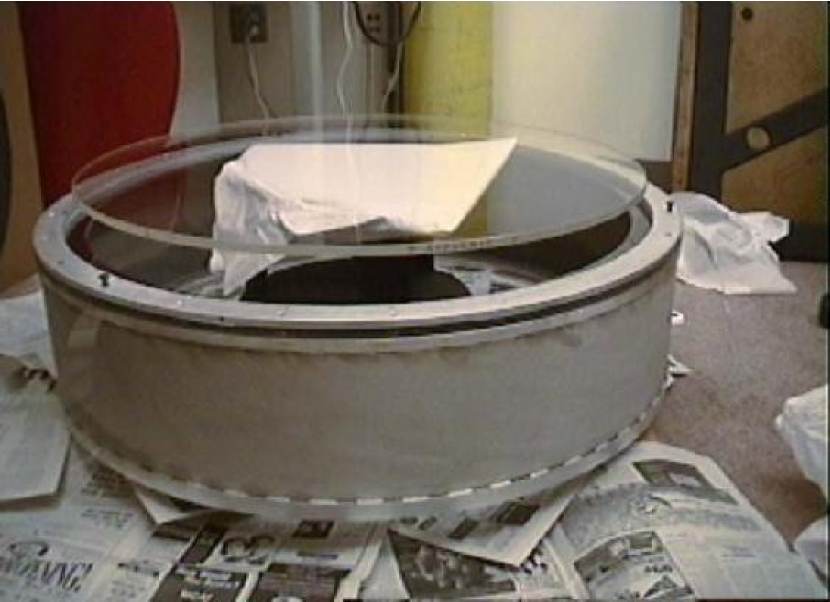
The primary mirror borosilicate honeycomb blank was cast by Hextek Corporation, Tucson, AZ, with final cooling accomplished in Spring, 1993. The casting technique is similar to that developed at the University of Arizona Mirror Lab (Angel & Hill, 1982). For a mirror of this size and focal ratio, it was not necessary to rotate the furnace during casting. The generation of the front plate was carried out by Arizona Technologies and completed at the Optical Sciences Center (OSC) of the University of Arizona, where the final figuring and polishing was also carried out. The testing during the figuring and polishing phases was accomplished with the use of null lenses which were fabricated by OSC and verified using a computer generated hologram (Burge et al. 1994), and high-speed phase retrieval testing techniques (Dettmann & Modisett 1997). Figure 6 shows the mirror blank at OSC, while Figure 7 shows part of the mirror faceplate, showing the lightweight, very strong honeycomb structure. The fabrication tolerance specification for the mirror figure is in terms of a Kolmogorov seeing-like structure function and requires that the contribution of the primary mirror to the image size be FWHM 0.2 arcseconds. The mirror figure passed this specification on small scales, but the final figure produced degraded performance at large separations due to about 230 nm of astigmatism. It is necessary while figuring mirrors of this type with thin faceplates to pressurize the cells in order to prevent ‘print-through’ from the pressure of the polishing tool. It is believed that the astigmatism arose because one or more of the seals associated with the pressure system exerted excessive nonaxisymmetric forces on the mirror, and it sprang slightly when they were removed. Simple calculations demonstrated that this could be corrected with the application of forces of 20-40 N by the primary mirror mount, resulting in wavefront errors of less than 100 nm across the entire primary (see Waddell et al. 1998), and a simple pneumatic system to accomplish this was implemented. The primary mirror support system and the astigmatism corrector will be described in §3.4.2.
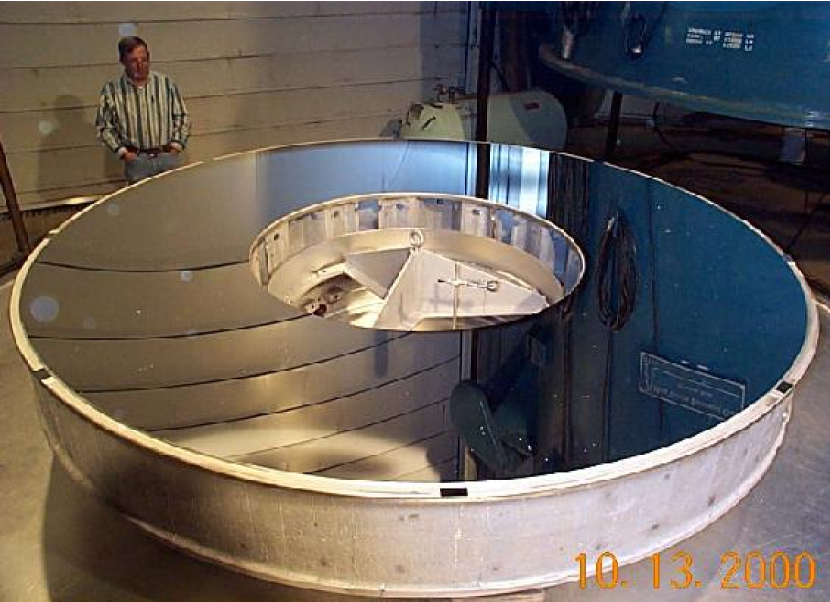
The mirror was aluminized at NOAO’s Kitt Peak 4 m telescope aluminizing facility (where it has been regularly re-aluminized annually over the lifetime of the project). Figure 8 shows the primary mirror after aluminization and coating.
2.5.2 The Secondary Mirror
The SDSS secondary is of diameter 1.1m, almost half that of the primary, necessary for an unvignetted large focal plane. The borosilicate secondary mirror blank was also made by Hextek corporation using hot gas fusion. The blank was generated to a sphere by Astronomically Xenogenic Enterprises (AXE) of Tuscon, Arizona, and the hole drilling, optical generation and edging were completed at HexTek. The resulting radius, 7331 6 mm, was well within the specified radius of 7334 25 mm.
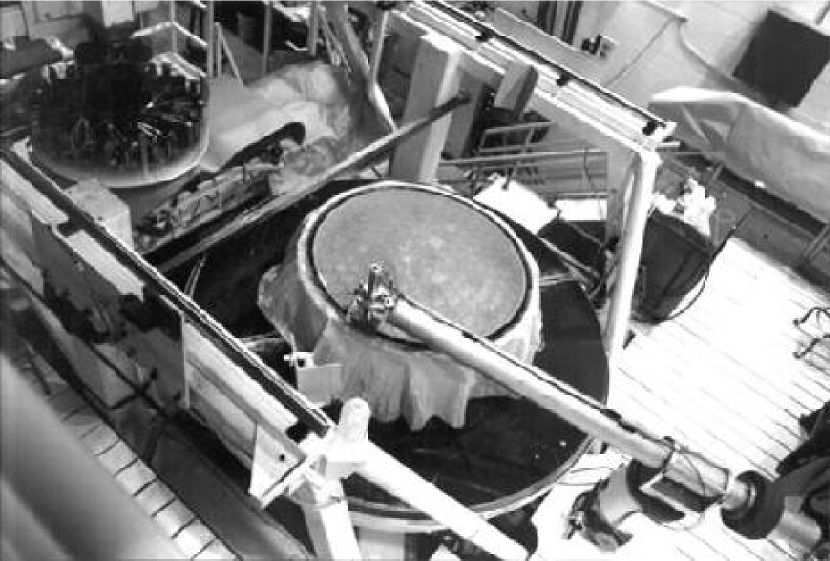
The secondary was then delivered to Steward Observatories Mirror Lab (SOML) for figuring, polishing, and testing. It was the first such optic fabricated at a new facility developed by SOML for large secondary optics (Andersen et al. 1994), and several innovative techniques were employed. The mirror was figured using stressed-lap tooling, and the testing was first done with a swing-arm profilometer (Andersen & Burge 1995), which resulted in the control of errors to of the order of one wave. The secondary mirror at this stage is shown in Figure 9. The surface accuracy of order 100 nm over the full aperture required more accurate testing methods, and this mirror was the first figured using the computer-generated hologram technique (Burge, 1997), which refers the convex surface to an easily made accurate spherical concave reference. This technique is enormously simpler, inherently more accurate, and less expensive than conventional Hindle sphere testing, and requires only optics the size of the secondary under test. The technique was very successful for our mirror.
The polishing cell for the secondary was designed to support the mirror in two orientations. During testing, the mirror faces down towards the test optics. During polishing, the mirror faces up, and a mass the same as that of the mirror pulls down on the mirror mount attachment pads. In this way, deformations which would be induced by the mirror supports are polished out.
The fabrication tolerance specification for the secondary mirror figure is the same as that for the primary - a wavefront structure function for 0.2 arcseconds FWHM seeing. Again, the rms wavefront difference was less than 100 nm across the entire mirror. The secondary mirror was aluminized at the nearby facilities of the National Solar Observatory, Sunspot NM, and delivered in 1996.
2.5.3 The Common Corrector
The third optical element, the Gascoigne corrector, is the last one common to both spectroscopic and imaging modes and is therefore called the common corrector. It was manufactured of Corning 7940 fused silica (grade 5F) and figured and polished by Contraves, Inc. of Pittsburgh, PA. The lens is 802 mm in diameter and is about 12 mm thick. Optical testing by Contraves showed that the lens has a turned edge over a roughly 45∘ angular sector. It proved possible to avoid use of most of this region during imaging by installing the lens in its cell in the telescope (see Figure 10) with a preferential orientation relative to the camera CCD array (the corrector rotates with the image rotator carrying the camera), but the degraded image quality in the upper right of the array in Figure 4, which is a persistent feature of the system, may well be an artifact of this problem.
Subsequent to polishing, the lens was anti-reflection coated by QSP Optical Technology, Inc., Santa Ana, CA (now Infinite Optics, Inc., but hereinafter simply QSP). The requirements for these coatings was that the average reflectance across the 3200 Å to 11000 Å optical bandpass should be less than 1.5% per side with peak reflectance 2% per side. This level of performance was achieved with a 12-layer coating which is both durable and easily removed. Fabrication of the common corrector was completed with its mounting in an elastomeric bonding ring at the University of Washington, and the lens was delivered to APO in November 1997.
2.5.4 The Final Correctors
The imaging corrector is a very complex thick lens (45 mm central thickness with almost a centimeter asphere on its front surface; the rear surface is planar) which forms the structural element of the SDSS camera upon which the detectors are mechanically mounted. It is thus an integral part of, and is mounted and dismounted with, the camera (see Gunn et al. 1998, which also discusses the complex coating on this element). We would therefore have had to make two correctors in any case, and this gave us the opportunity to optimize the spectroscopic lens for its application.
The spectroscopic corrector is also made of Corning 7940 fused silica, grade 5F. It was figured and polished by Tinsley Laboratories Inc. (Richmond, CA) using proprietary computer control techniques and is 727 mm in diameter. It is quite strongly curved, in contrast to the imaging corrector, and much thinner, 10 mm thick in the center.
The figuring requirements were for peak-to-valley slope errors to be less than 150 microradians for spatial frequencies less than 160 mm over 95% of the clear aperture, with linear increase in slope errors allowed for larger spatial scales up to 600 microradians. The small spatial scale errors are required to be less than 250 microradians peak-to-valley across the entire face of the lens. As delivered by Tinsley, the aspheric side of the lens has slope errors of less than 50 microradians peak-to-valley over spatial frequencies below 160 mm and less than 10 microradians for larger spatial scales. Slope errors for the spherical face are about ten times better than this.
The smoothness over small areas was measured using a 250 mm diameter check plate positioned on the corrector. Microroughness at very small scales (1 and 5 mm) was measured to be less than 11 Å rms using a Chapman MP-2000 microscope with a Nomarski objective.
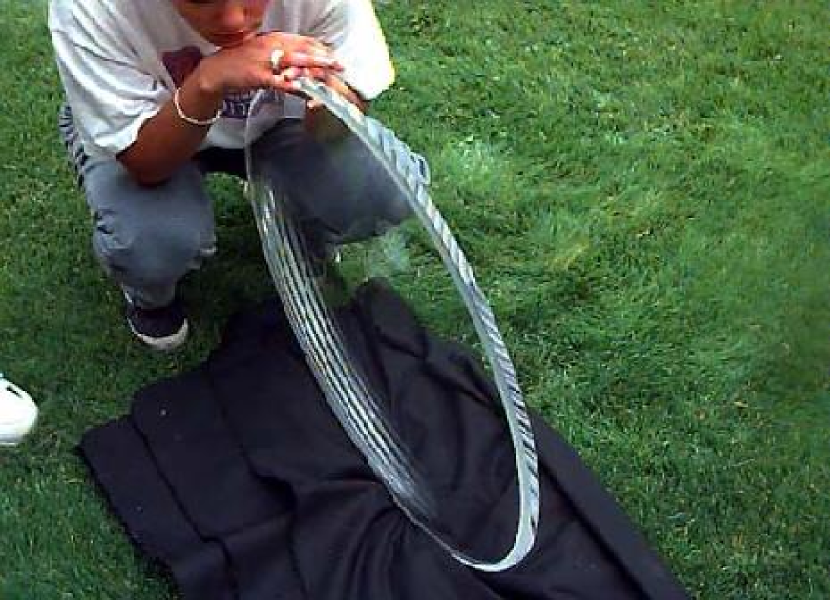
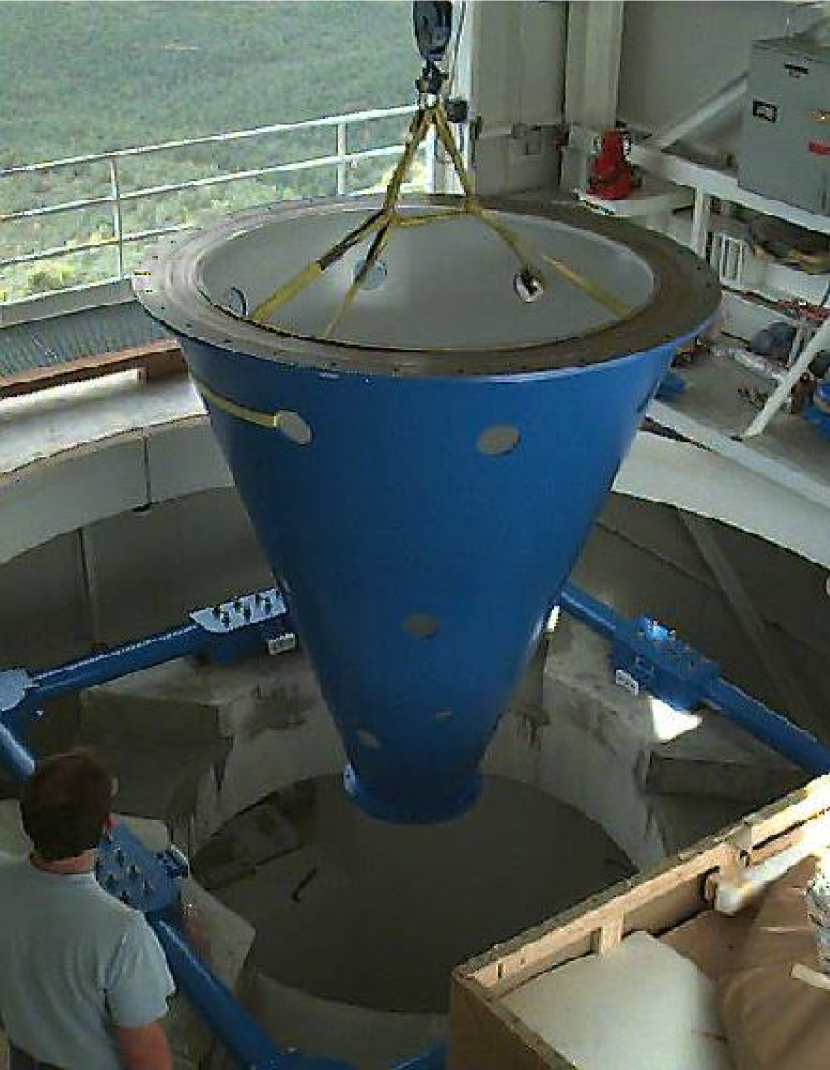
The lens was then AR-coated. The average reflectance per side across the 3900 Å to 9100 Å spectroscopic bandpass was required to be less than 0.8% with peak reflectance less than 1.4 %. This level of performance was achieved with a durable 12-layer coating designed and applied by QSP. The finished lens is shown in Figure 11.
The history of the installation of the 2.5 m optics, and their performance, is summarized in §6.
3 Mechanical Design
3.1 General Considerations
The mechanical design of the telescope was driven by the desire to obtain the highest quality images possible and the requirement of highly accurate and stable motion. The telescope is an altitude-azimuth design similar to the Apache Point Observatory (APO) and Wisconsin, Indiana, Yale, NOAO (WIYN) 3.5 m telescopes (Mannery et al. 1986a,b, Gunnels 1990a, Johns & Pilachowski 1990). As discussed in numerous places in this chapter, the 2.5 m design is strongly influenced by that of the 3.5 m. This design takes full advantage of lightweight mirror technology resulting in a telescope with low inertia, low friction, and mechanical simplicity.
We elected both for cost reasons and for thermal performance to use a roll-away enclosure (§5). During observations of course, this design greatly increases the telescope’s exposure to both wind buffeting and stray light contamination compared with the conventional dome configuration. This problem is dealt with by protecting the telescope from the wind and stray light by means of an independently mounted and driven baffle which is coaxial with and encloses the telescope (§4).
3.2 Structure
The telescope optics support structure (OSS) consists of the primary support structure (PSS) and the secondary truss (Figures 12 and 13). The PSS is a steel weldment that supports the primary mirror and couples the OSS to the fork. The one-piece construction of the PSS has a higher stiffness-to-weight ratio and is lower in cost than the more traditional detachable mirror cell. The secondary space truss controls five of the degrees of freedom of the secondary mirror directly. With adequate tension in the secondary vanes (see Figure 13), the rotation mode of the secondary about its optical axis can be kept above 10 Hz. The square secondary frame is efficient at resisting this tension.
The eight metering elements of the secondary truss are graphite fiber reinforced epoxy tubes. This material has about 2.3 times the stiffness to mass ratio of steel. This confers the following benefits:
-
•
A substantial amount of mass is removed from the truss without degrading its static deflection or lowest natural frequency.
-
•
The reduced moment of inertia reduces the susceptibility of the telescope to wind-induced tracking errors.
-
•
The diameters of the truss elements are reduced without lowering their natural frequency. This, in turn, decreases the wind loads on the truss.
-
•
The reduced mass of the truss moves the center of gravity of the OSS forward. This allows the altitude bearings to be located lower on the OSS and increased the clearance for instruments mounted behind the PSS.
Tubes and other linear structural shapes of graphite fiber reinforced epoxy have a much lower coefficient of thermal expansion than steel in the long direction, resulting in another benefit of improved metering of the primary/secondary separation with temperature changes.
The telescope was constructed by L&F Industries, Huntingdon Park, CA. The largest pieces of the structure, and their masses, are: primary mirror support with pillow block (5215 kg); fork assembly (4308 kg); rotating floor framing (3084 kg); and secondary truss with cage assembly (499 kg). The moment of inertia about the azimuth axis is 33855 at zenith and 34594 at the horizon, while the moment of inertia of the optics support structure (OSS) about the altitude axis is 10405 . These quantities are important for the telescope control system.
3.3 Bearings and Drives
The moving mass of the SDSS 2.5-m telescope is 15,500 kg, which is light enough that exotic bearing technology is not required. We have chosen to use precision rolling-element bearings and friction drives throughout.
A pair of 2.54-m diameter, hardened and ground drive segments are mounted on the sides of the PSS next to the fork. The measured high frequency (greater than eight cycles/revolution) runout of the drive segments is less than 100 nm rms. Motor driven capstans, friction-coupled to each disk, provide balanced altitude drive torques and minimize drive torque-induced distortions of the PSS (Gunnels 1990b).
The telescope azimuth structure consists of the fork and the azimuth cone. At the apex of the azimuth cone is a spherical roller bearing that supports the weight of the telescope. At the upper end of the cone is a 2.54 m diameter disk, with a hardened and ground outer surface. Its high frequency runout is 220 nm rms. This disk is guided by four roller assemblies, two of which are motor driven. These rollers, with the bearing at the cone apex, define the telescope azimuth axis.
Rolling element bearings are used for each axis. These bearings require little maintenance, are low in friction, and generate negligible heat during operation. The measured high frequency radial run-out of the spherical roller bearing used as the lower azimuth bearing for the SDSS 2.5-m telescope is less than 310 nm rms. This corresponds to a contribution of 23 milliarcsecond to the rms tracking error for the telescope. The high frequency radial run-out of the altitude bearings is 51 nm rms. They are estimated to contribute less than 6 milliarcsecond rms tracking error. In addition, the frequencies of these errors during normal tracking are small enough that they are completely dominated by atmospheric effects, so the astrometric effects are small and the effect on image quality completely negligible.
The telescope drive assemblies are pushed against their respective drive disks by radial links. The contact force must be large enough to transfer the necessary drive torque to the telescope via friction without slipping, which would certainly damage the drive surface, but must be less than the force that would permanently deform the disk or roller. In the case of the azimuth axis, the radial link must limit the contact force during seismic accelerations, and the links must provide an extremely stiff link between the azimuth drive housings and the telescope pier to allow high control system bandwidths and resist wind-induced tracking error.
The azimuth drives are preloaded against the azimuth disk drive through a series of springs: the material of the frame itself, a set of soft springs and a set of hard springs. The soft springs are Belleville washers which provide a preload for the initial assembly, producing up to 2600 lb of force on the azimuth drive housings. The hard springs are also Belleville washers and produce up to 12000 lb of force. The system is so configured that it does not float; the preloads are taken up by the elasticity of the frame itself, but large forces such as might result from seismic activity or accidents can be absorbed by the springs if the forces are large enough to unseat them.
Incremental encoders are friction coupled to the large disks. Readily available Heidenhain encoders (type ROD 800) with a reduction ratio of roughly 25:1 and reliable interpolation produce 14 milliarcsecond resolution on the sky and allow slew rates higher than 4. Absolute axis encoding is provided by a series of optical tape encoder segments, also from Heidenhain, for which only the fiducial signals are used. These fiducials provide a reasonably stable angular reference frame to keep the absolute zeros and scale of the high-accuracy incremental encoders over the interval from one pointing model on the sky to the next, typically a month or two. The instrument rotator uses a friction drive identical to the telescope axes, but its position is measured with a continuous Heidenhain optical tape. Each axis (and the rotator) is controlled by a digital PID servo control (Schier 1990), which is more fully discussed below in §3.8.
3.4 Optics: Support, Motion Control and Thermal Control
3.4.1 High Level Mirror Control
The support and position controls for both the primary and secondary mirrors allow the mirrors up to 12 mm of precisely positioned axial motion as well as limited tilt and transverse motion. The secondary position controls are necessary to maintain focus and collimation as the telescope moves across the sky and as the temperature changes. The collimation changes as a function of zenith angle are determined annually and applied open-loop with completely satisfactory performance. The large axial motion of the primary is necessary to change the image scale at the focal surface in spectroscopic mode to compensate for thermal expansion or contraction of the aluminum fiber plug plates and to compensate partially for observing with a plate at a different airmass from the one for which it was designed.
In order to control the image scale of the telescope, it is necessary to monitor the distance from the focal plane to the vertex of the primary mirror very accurately (25 microns). The load path connecting these locations is very stiff and we have excellent control of the temperature uniformity of this material as part of the primary mirror temperature control system.
Position control commands to both the primary and secondary motion controllers are supplied by the telescope control computer (§3.8), which automatically adjusts the secondary mirror position for collimation and focus based on the current pointing altitude. The position of the primary mirror does not change significantly with altitude. and only the secondary mirror requires this automatic adjustment procedure. The corrections are applied every few seconds.
The imager operating software incorporates a focus loop. This takes advantage of the fact that the imaging camera is always used in drift-scan mode, so new star image size data from the dedicated focus CCDs are constantly available. These produce images symmetrically placed in focus inside and outside of the nominal focus for the camera array; a detailed description of how they are used to generate the control signals can be found in Gunn et al. (1998), but no details were given in that paper of the as-delivered performance of the servo system, since there was at that time no data.
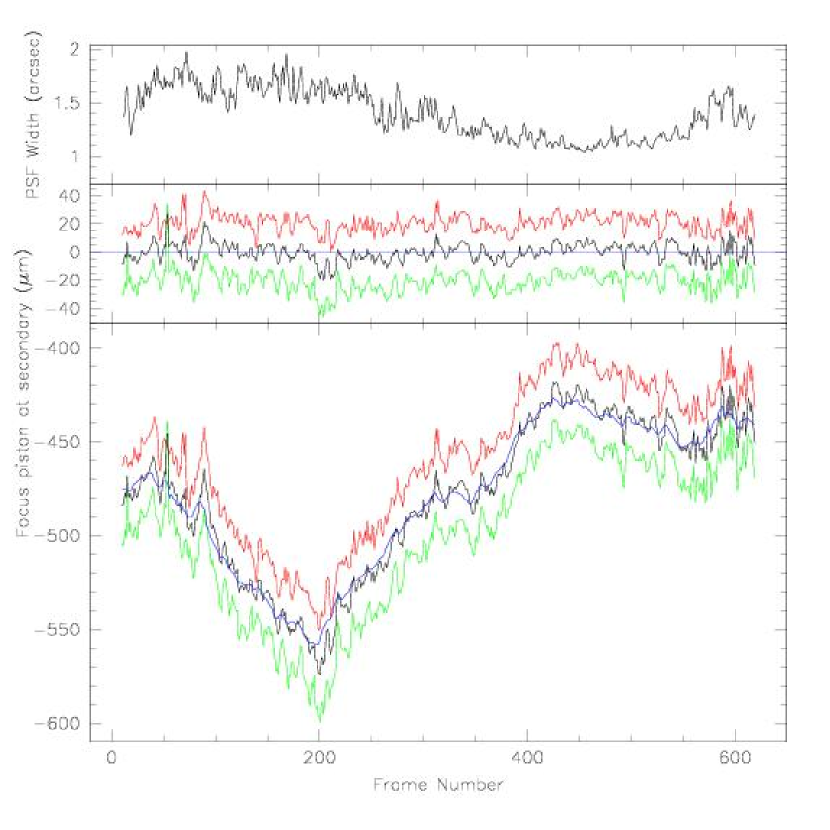
Figure 14 shows the performance of the focus servo for a typical run. We estimate the error in the focus position from both the leading- and trailing- focus CCDs; the mean of these two estimates has been adjusted to lie very close to the focal position of the main array. The telescope’s secondary is adjusted, via a classical P(roportional)I(ntegral)D(erivative), hereinafter simply PID, servo loop, to follow the error signal. The loop has very low gain and is very slow as it must be stable even in fields of low stellar density when the error signal is updated only infrequently; since the focus changes only very slowly in response to thermal variations in the optics and structure and to differential deflections during tracking, this is quite satisfactory. It should be noted that the variable time delay in the error signal actually makes this a rather non-classical servo loop, but it appears to work well in practice. Careful inspection will show that the telescope focus slightly lags the estimated true focus, a result of the small value of the integral gain. The contribution to the image quality as measured on the main imaging array from focus errors is negligible (at most arcsec added in quadrature, and usually much less).
In spectroscopic mode, we use aluminum plug-plates to position the optical fibers for the multifiber spectrograph, and the plates are drilled for the predicted temperature of use. However, since the ambient temperature may not have the predicted value, the image scale is matched to the fibers just before each spectroscopic observation, using the observed focal plane positions of the multiple guide stars on each spectroscopic plate (see §3.8). This is done by translating the primary axially and refocusing the secondary. A 10∘C temperature mismatch can be corrected by translations of 2.4 mm and 2.0 mm for the primary and secondary respectively. The focus itself is not automated in spectroscopic mode, but is monitored and adjusted by the observers. It is not nearly so critical for spectroscopy, of course, because loss of critical focus only introduces small inefficiencies in data collection, not serious degradation of data quality. In addition, exploration of focus during an exposure is possible and in fact is routinely done using the guide star images. The guide images are archived, so one has in principle a record of the seeing through each exposure.
As the telescope changes elevation from zenith to horizon, the secondary will sag about 600 m with respect to the primary optical axis. This decollimation is corrected by actively translating the secondary so that its vertex remains on the optical axis of the primary and correcting the tilt of the secondary as necessary, both according to an annual calibration of these deflections.
3.4.2 Primary Mirror Support and Control
The primary mirror (Figure 6) is supported on air pistons using elastomeric, low-friction rolling diaphragm air cylinders manufactured by Marsh Bellofram for both axial and transverse supports. There are 48 such cylinders distributed on the back surface of the mirror for the axial supports. Three stiff load cells serve as axial hard-points. Simple servo systems act to control the pressure provided to those air pistons in the 120∘ sector associated with each load cell (each of which is supported by sixteen cylinders with all cylinders pressurized by a single pneumatic servo-controlled valve), so that the unsupported mirror weight applied to the load cell is less than 10 N. Each axial hard-point is positioned axially with a motor driven lead screw. This allows control of primary piston and tilt. In the transverse direction, the mirror is supported by 16 air cylinders all plumbed in parallel. The cylinders are mounted on posts, each of which extends through a hole in the mirror backplate into a mirror cell (cf. Figure 7). This allows the transverse loading on the mirror to be applied between the front and back face at approximately the center of gravity. To accomodate the 12 mm axial motion of the primary, these cylinders are fitted with rollers which bear on stainless steel spreader plates. These plates in turn transfer the load into the webbing of the cell near the front and back surfaces of the mirror.
Each of the three axial cylinder arrays, as well as the transverse cylinder array, is controlled by a fast-response pneumatic servo control system. Each servo-control loop is closed around a load cell which provides the control signal to modulate pressure in the respective cylinder array. The load cell is part of a stiff, stepper motor driven, linear actuator assembly, and is actually used as a very high-resolution position sensor. Each of the assemblies is hard-mounted to the primary support structure and contacts the mirror surface, three axially on the back surface and one transversely on the outer radius. The system is designed for a nominal 7N force from the mirror. The servo is a two-level system consisting of a very fast ( 500Hz) inner pressure loop which keeps the system pressure at its commanded level via a fast Data Instruments SA-series pressure sensor and a fast continuous-flow three port (pressure, vacuum, and output) Dy-Val PC-2 proportional valve (both with 1 kHz bandwidth), and an outer position loop, which is closed around the load cell and has a bandwidth of approximately 1 Hz. The inner loop needs to be fast because the natural frequency of the mirror on the belloframs is about 10 Hz, and this must be stabilized.
The primary’s lateral position and rotation about the z-axis are controlled by two lateral links attached to the back surface of the mirror near the top and bottom. The links are oriented horizontally to prevent their carrying any of the mirror’s weight independent of telescope orientation, and the other end of each link is attached to a stepper-motor driven linear actuator.
The linear actuators incorporate a 40 thread/inch actuator rod threaded through the axis of a 200 step/revolution Eastern Air Devices stepper motor, giving a linear displacement of 2.5 m per step. The motors are driven by a six-channel programmable motion controller manufactured by Galil Motion Control Inc., and microstepping motor drivers (Intelligent Motion Systems Inc.), Microstepping is used for smoothness of motion, but the move always ends on an integral step so that the motors can be powered off after each move to reduce heat generation (especially necessary because of their close vicinity to the primary mirror and the optical path). Each actuator has an associated Mitotoyu linear encoder which independently monitors the position of the primary relative to the primary support structure to a resolution of about 1 m.
The E6 borosilicate glass used in the primary mirror is a low thermal expansion material with an expansion coefficient of C . To prevent thermal distortion of the mirror and mirror seeing from significantly degrading image quality, the temperature of the mirror must be uniform to 0.2∘/C. This figure is larger than that established for other telescope using similar mirrors because the required image quality of this wide-field optical system is only moderate. In addition, the front surface of the mirror must be maintained within a few tenths of a degree of the ambient air temperature. Several active temperature control systems have been developed to perform these tasks (Johns and Pilachowski 1990; Siegmund et al. 1990; Lloyd-Hart 1990). We use a variant of the rather simple system that is implemented on the ARC 3.5-m mirror (Hull, Siegmund & Long 1994). Ambient air from above the primary mirror is used for ventilation. This ventilating air is drawn down through the central hole of the primary mirror and from around its periphery into a plenum behind the mirror before being drawn up into the hexagonal interior voids (Figure 7) of the mirror through holes in the back plate. There, it is drawn upward to the back of the face plate and radially inward through a small gap between the perimeter of a hexagonal air baffle and the back of the face plate, across the back of the face plate to the center of the air baffle and down an exhaust tube to the interior of the mirror platform. It was intended originally that the suction required to establish this flow be established by a large axial blower which exhausts the room beneath the telescope, but this proved to be inadequate, and has been replaced by a pair of low-vibration centrifugal blowers mounted in the lower part of the telescope fork.
We have installed in the primary and secondary mirrors and on the telescope and support structure a temperature measurement system based on individually calibrated National Semiconductor LM234 temperature sensors. These devices act as current sources with nominal currents of 1 a per K, and can be calibrated to and are stable to about 0.1C. There are 115 such sensors in all, 40 on the primary, 20 on the secondary, and the remainder on the telescope structure, wind baffle, and at various critical places in the enclosure. The signals from these are multiplexed, digitized to 12 bits, and stored by the Telescope Performance Monitor (TPM) computers, which also monitor and archive telemetry from all the other telescope systems (see §3.8).
Temperature changes and, most dramatically, temperature differences between the face and back plate of a mirror, affect its curvature. This is most strongly felt in focus, but it also causes a scale change at the focal surface which contributes to astrometric error if not corrected in the analysis of the image data. No attempt is made to vary the ventilation, and the temperature sensing system has been most valuable not as an element of the control system but to inform us about the many original inadequacies in the thermal environment and ventilation of the telescope and optics, and thus to focus our attention on what we needed to improve.
As described in §2.5.1, the primary is inherently astigmatic. Rather than re-generate and polish the mirror, its figure is recovered and the astigmatism corrected by applying small forces the outer edge of the mirror. This is accomplished by small double acting air cylinders, 12 in all, mounted every on the back surface near the outer radius. These air cylinder are independently able to apply an axial load of up to 40 N on the mirror, and the adjustment is done manually. To minimize hysteresis during the adjustment and piston movement of the primary, ultra-low-hysteresis Airpot Corporation “Airpel” cylinders are used. These devices use a loosely-fitting graphite piston inside a glass cylinder with no elastomeric seals, are essentially frictionless, and perform very well.
3.4.3 Secondary Mirror Support and Control
The 2.5-meter secondary support borrows its general philosophy and much of its detailed design from that of the ARC 3.5-meter telescope. No cell in the classical sense is used, the notion being that a lightweight mirror should be supported in as lightweight a manner as possible to maintain the advantage of low mass on the thermal and mechanical properties of the telescope. The mirror is protected by a lightweight baffle system (§4.4.3 below) but is attached directly to a cubical spaceframe structure via its position actuators and central support.
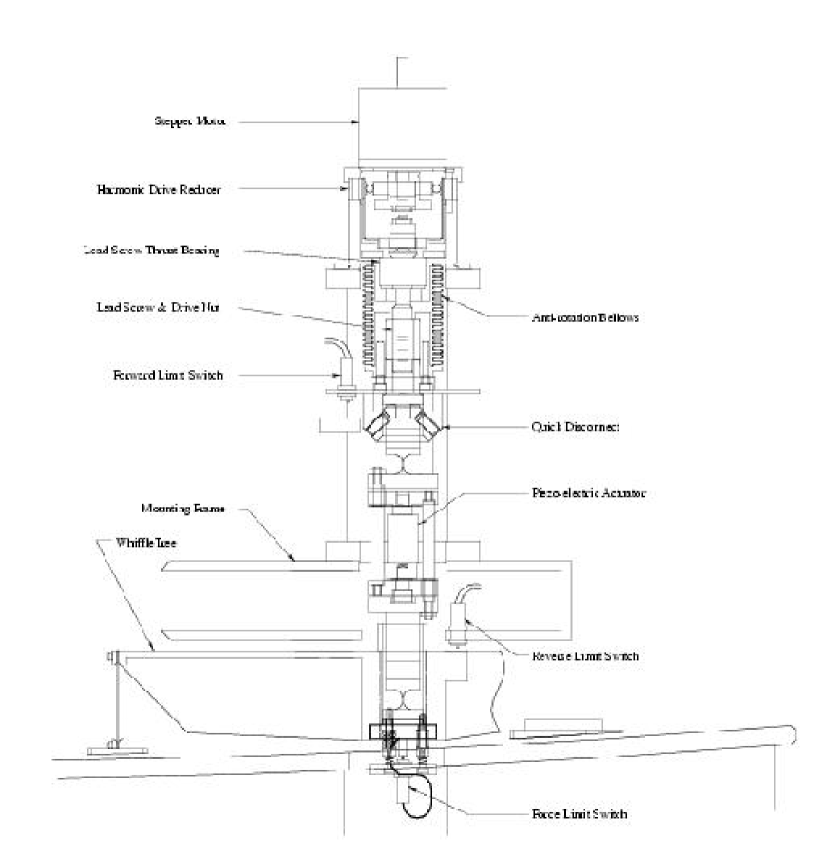
Three linear actuator assemblies mounted in parallel and positioned at separation provide the axial support plus axial and tip/tilt position control for the secondary mirror. The assemblies are attached to a space frame supported by tension rods attached to the square frame affixed to the telescope’s carbon fiber truss (Figure 13). Each actuator assembly consists of a stepper motor mounted to an 80:1 harmonic drive speed reducer which drives a 40 thread/inch high precision drive screw. The axial step size is 53 nm, which gives a resolution of 7.8 milliarcseconds on the focal plane. The lead screw/bearing assembly is specified to have an accuracy of 250 nm. In practice, changing loads and direction reversals lead to occasional errors of the order of 500-700 nm. To correct these, a piezo-electric subassembly is mounted in series with the mechanical actuator, incorporated into a flexure element which allows for the transverse motion of the mirror relative to the frame on which the actuators are mounted. At telescope operating angles above altitude , all three actuators are subjected to tensile loading. Since piezo-electric actuators function best under compressive loading, the piezo electric actuators are mounted in a cage assembly that reverses the direction of the load vector. The piezo actuators, low- voltage devices from Physik Instrumente GmbH, have a total range of m. The position of the secondary is controlled by a two-level servo loop, the outer, coarse level controlling the screws and the inner, fine level the piezos. Monitoring is via three linear Heidenhain encoders with a resolution of about 5 nm. The secondary mirror is supported from these actuators by three aluminum whiffletrees, which spread the load from each actuator to three flexural attachment locations on the back face of the mirror. A spring-actuated load limit mechanism was (belatedly, see §6.1) incorporated into the connection between the actuator assemblies and the whiffles to protect the mirror from the possibility of an actuator overload. The secondary mirror actuator assembly is shown in Figure 15.
Transverse support and motion control of the secondary are handled by a central shaft mounted through a spherical bearing mounted on the space frame. One end of the shaft extends through the back face of the mirror into another spherical bearing mounted in its center cell, while the other end extends through the frame to the opposite side, where it is attached through flexures to a pair of stepper-motor driven linear actuators mounted at 45 degrees to the vertical in the x-y plane. To accomodate the secondary’s required 12 mm of axial motion, a precision linear ball bearing is mounted into the inside diameter of the mirror’s spherical bearing. This system was intended as a quick interim solution to replace the original mechanically inadequate flexure-based system while a new robust flexure system was designed, but lack of time and resources prevented the new system from being implemented. While the performance of the present system is adequate most of the time, there are serious problems with hysteresis and stick-slip in the spherical bearings when the direction of motion is reversed, which cause isolated astrometric anomalies. The position of the mirror is monitored by 4 (3 piston, 1 transverse) Mitotoyu linear gauges similar to the ones used for the primary. A single horizontally oriented lateral link between the mirror and the frame prevents rotation of the mirror about the z-axis.
The temperature control requirement for the secondary mirror to avoid degrading image quality also corresponds to a uniformity of 0.2∘C, and this has proven difficult to achieve. A free convection scheme using tubes into the secondary was planned but never implemented. Since it has no cell, the mirror is essentially in free air, and originally with its back free to radiate to the sky. Since there are electronics in the secondary support cube, the radiative environment was different in the center of the mirror from the edges, and overcooling of the back at the edges was initially a serious problem. This has since been brought under control by aluminizing the back of the mirror and installing a radiation shield which interferes very little with the airflow over the back of the mirror; the performance is now satisfactory, but the thermal time constants are still larger than we would like. The original plan was to use a lightweighted low-expansion (Zerodur or ULE) mirror, which was abandoned due to its higher price. It is clear, however, that the borosilicate compromise was not a good one and quite possibly in the end not even economically favorable.
3.5 The Instrument Rotator and Collimation
3.5.1 The Rotator
All altitude-azimuth telescopes require an instrument rotator. The SDSS instrument rotator covers the back of the mirror cell and is mounted to the primary support structure. The spectrographs, camera and fiber plug-plate cartridges mount to this rotator. Since the spectrographs corotate with the plug-plates, this eliminates most of the flexing of the fibers that might occur during an integration and results in much better sky subtraction. Also, as the fibers are less than 2 meters long, additional benefits include reduction of light loss and materials cost. The rotator is slightly over 2.7 meters in diameter and weighs approximately 550 kg. The spectrographs, each weighing 270 kg, are permanently mounted to the rotator. During spectroscopic operations, the rotator carries an additional 145 kg (the spectroscopic fiber cartridge and plug plate) and during imaging the additional 450 kg of the imaging camera. The rotator design incorporates an outer and inner ring structure (the inner ring holds the imaging camera) to minimize the communication of radial forces to the instruments. It depends on the primary support structure for structural integrity.
The angular accuracy required for the rotator is reduced from that needed for the axes by the ratio of the telescope focal length to the field radius, a factor of 34. This degree of accuracy () is quite straightforward to achieve, but is by no means a negligible task. The bearing is a Rotek four-point contact ball bearing. Its high frequency (greater than eight cycles/revolution) lateral runout was measured at about 170 nm rms per axis at an altitude of . The encoder and friction drive for the rotator are similar to those used for the axes. The drive disk for the rotator is about 2.80 meters in diameter and its high frequency runout is 1.0 m rms. Position accuracy and feedback is provided by a Heidenhain optical tape and read-head system.
3.5.2 Collimation
Collimation for fast, wide-field telescopes is critical to their performance, and this is certainly true for the SDSS telescope. The problem is complicated by the fact that the telescope has moving optical elements and detectors. A little thought will demonstrate that it is the axis of the instrument rotator which must define the optical axis, and this simple notion makes the whole collimation process relatively simple. When the telescope was assembled, and each time it is reassembled after the primary mirror has been removed for aluminizing, the mirror is centered according to the information about the optical center provided by OSC. The tilt of the mirror is determined by demanding that the reading of a depth micrometer carried by a radial arm affixed rigidly to the image rotator and touching the face of the mirror near its edge does not change as the rotator is swung through 360∘. It is henceforth assumed that the primary’s vertex is orthogonal to the optical axis, and adjustments to the primary’s x and y position are always accompanied by appropriate changes in tilt to make this remain true. When the truss and secondary are installed, a mark on the optical center of the secondary is centered using the length adjustment on the secondary support vanes for coarse adjustment and the centering motors on the secondary central support for fine. An alignment telescope mounted on the rotator at the focus and itself adjusted by rotating the rotator is utilized to make this measurement. The deflection in secondary centration and tilt as a function of telescope elevation is measured using this setup and recorded; it is compensated for by the control system in such a fashion as to keep the secondary centered and normal to the optical axis during observations.
With these precautions the only adjustment made in normal operations is to refine the centering of the primary to remove residual coma, always doing so keeping the surface at the vertex normal to the optical axis. This has worked well in practice, though really only very well after getting the primary mirror thermal problems under control.
For a telescope operating in TDI mode, adjustments fully as important as collimation are those required to ensure that the stars track accurately along the CCD columns and that the tracking rate is consistent with the vertical charge transfer rate. After some experimentation, a simple scheme was evolved to accomplish this. At some arbitrary point in a scan, the vertical clocks in the CCD are turned off for a precise short time interval and then turned back on. This results in double images for each star on any of the arrays at the time this was done. Centroids for those images are obtained. If the camera is properly rotationally aligned, the two will lie exactly in the same column, and if the tracking rate is correct, the displacement will be exactly the number of vertical clock cycles skipped. Seeing effects are large enough that the results of many star images must be averaged to obtain meaningful results. When this is done, the crossing positions and time differences in the leading and trailing astrometric CCD arrays can be calibrated, and it is through these data that the rotation and scale are monitored in normal operation (§3.8)
3.6 Tracking
The wind baffle (§4) reduces wind loading on the telescope OSS by a factor of ten. With care taken in the design of drive and encoding systems, bearings, and the structure, the result is a telescope with very low wind-induced tracking error that performs at the level necessary to achieve our goals for image quality and astrometric accuracy.
Crude Komogorov turbulence calculations indicate that we should be able to achieve of order 30 milliarcsec (mas) astrometric accuracy if limited by the atmosphere alone. The primary mechanical limit to the accuracy of pointing and tracking is the runout of the encoder rollers, which is of the same order, 30-35 mas. The wind loading is of very minimal importance nearly all the time; the wind-induced servo errors averaged over the effective exposure time are less than 1 encoder unit, about 14 mas on both elevation and azimuth. Comparison with the UCAC catalog (Zacharias et al. 2004), to which we tie our astrometry over most of the survey area, indicates end-to-end absolute astrometric accuracy of about 70 mas most of the time (Pier et al. 2003). We know that the system stability, and in particular that of the camera focal plane, are negligible contributors to this error, and it seems likely that most of it is due to the so-called “anomalous refraction” effects arising presumably from long-wavelength pressure disturbances in the atmosphere. There is some evidence that the accuracy can be improved substantially by more sophisticated processing which makes explicit use of the observed correlation structure in the atmosphere, the known error spectrum of the encoders, and existing archived telemetry information which can exclude egregious hysteresis events in the secondary support, but there are no plans at the moment to pursue this.
3.7 Instrument Change
It is necessary in the operation of the survey to be able to change the fiber cartridges on the spectrograph quickly and be able to switch back and forth from spectroscopy to imaging, which involves the removal/installation of the spectroscopic corrector lens and installation/removal of the camera, both quickly and with minimal danger to the instruments.
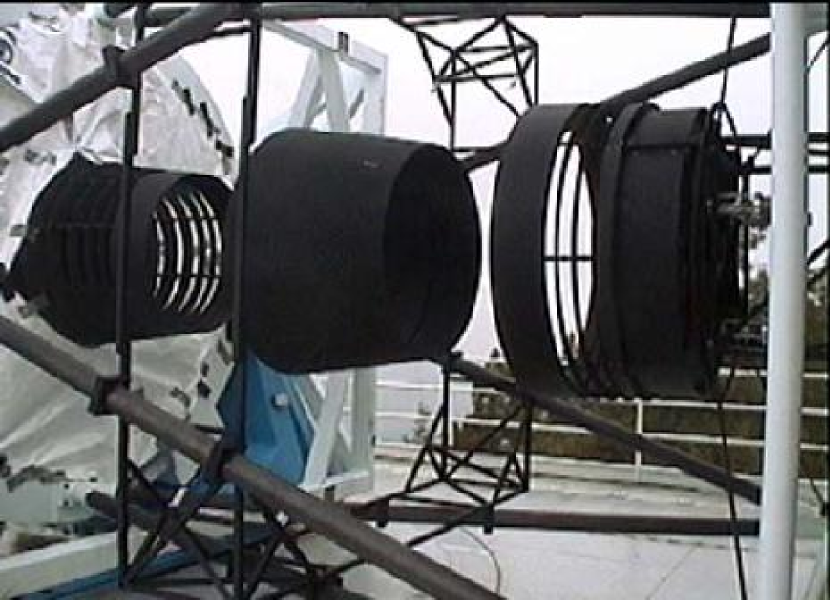
The camera lives when it is off the telescope in the “doghouse”, an enclosure permanently mounted to the rotating floor (see §5). It sits upon a cart with flanged wheels on rails, and can easily be rolled under the telescope. A hydraulic lift then picks the camera and its cart up and presses it against a set of trefoil kinematic mounts on the instrument rotator. It is held in place by a set of three over-center pneumatic latches which are disabled as soon as the camera is mounted. An additional three identical safety latches are latched at the same time; these provide almost no support but are present for safety. An additional pair of “paranoia” latches is provided which engage automatically as the cart lowers away. The empty cart is stored in the doghouse during imaging operations.
When the camera is removed for spectroscopic operations, the spectroscopic corrector, normally stored in the “cathouse”, an enclosure which is built into the roll-off building, again on its special cart, is wheeled under the telescope, lifted into place with the lift, and latched with three of the six pneumatic latches. There are also automatic paranoia latches for the corrector.
The spectroscopic fiber cartridges are installed using a special cart which can carry two, one position for the ‘spent’ one just completed and one for the new one. This cart can be placed under the telescope accurately in either position. Again the lift is used to install the cartridge and the other set of latches used to latch it into place. The same set of kinematic mounts which serve the camera are used for the cartridges. Yet another set of pneumatic latches built into the spectrographs latch the fiber slit assemblies, built into but only attached via springs and guides to the cartridge, against a set of kinematic mounts in the spectrographs.
The instrument latches were built with quite severe space constraints and require higher pressures than are provided by the observatory compressed air system; this is provided by a pneumatic booster pump in the enclosure.
Instrument change is an operation which is performed very often, performed at night with very subdued lighting, must be done quickly, and is intrinsically dangerous to a set of quite expensive and difficult (or impossible) to replace equipment. There is a sophisticated interlock system (see §3.8) one of whose main functions is to attempt to prevent egregious errors (such as attempting to drop something or ramming the camera through the spectroscopic corrector) in this process, but we depend as much or more on the conscienciousness, care, and training of the observers as on any such system.
3.8 Telescope Control Software and Hardware
Software has been at least as big a challenge for SDSS as is the hardware. All SDSS software - the observing software briefly discussed here, the data acquisition software, and the data reduction and archiving software - is managed by the open source package CVS (Concurrent Versioning System), an invaluable utility which is one of the truly vital components of the system. Problems and bugs are handled by by the public-domain GNATS problem reporting data base system, where the description, analysis, correction and resolution of every problem, requests for enhanced capability and software failures are tracked and archived. (The same problem reporting system is used for all aspects of the projects, not just the software.)
At the lowest level the telescope motion is controlled by an MEI V6U/DSP 16-bit digital PID servo system, which accepts a stream of real-time quintuplets of position, velocity, acceleration, jerk, and time at 20 Hz, position feedback information from the incremental axis encoders, and absolute fiducials from the tape segments. The output from the MEI is amplified by a set of modified and repackaged Glentec GA4552-1 linear power amplifiers, which supply current to the DC axis servo motors; these act as torque transducers to the telescope and rotator. There are five channels, two each for the altitude and azimuth axes and one for the rotator. The redundant channels on the telescope axes are used simply to detect encoder errors; the system is wired so that the pairs of motors on the axes deliver identical torques (or at any rate are delivered identical currents) in response to servo errors derived from the primary encoders. The five motors are all identical, and are Danaher/Kollmorgan QT-7801 48 ft-lb DC servo motors driving the 100 mm diameter drive capstans directly.
The SDSS telescope is also equipped with an interlock system of considerable complexity, built around an Allen-Bradley SLC504 industrial programmable logic control (PLC) system. This system monitors and sets limits on almost all telescope functions, including allowable movement of the telescope in the enclosure, soft limits on telescope motion in the open, velocity limits, drive current limits, various conditions on the hydraulic instrument lift, the instrument latches, and instrument and telescope configuration during instrument change, contact between the telescope and wind baffle, slip detection on the friction axis drives, emergency stop switches, etc. Most of the interfaces with mechanisms on the telescope are done with PLC modules. The PLC system is autonomous in its basic functions, as it must be for safety, but communicates with the rest of the control system.
At the next level up are two processors which handle motion control and general telemetry/monitoring, the MCP (Motion Control Processor) and the TPM (Telescope Performance Monitor), both implemented via Motorola MVE162 VME processors. Their tasks are very much as suggested by their names: The MCP generates the real-time control data required by the MEI servo system, integrates the fiducial information into the data stream from the incremental axis encoders to produce absolute axis positions, institutes its own notion of velocity and acceleration limits and a few other complex interlock issues, serves as a interface between the interlocks and higher-level control software, and controls (via the PLC) many auxiliary devices such as the flat-field screen, the flat-field lamps, etc.
The TPM is a real-time and archival performance monitoring system (McGehee et al. 2002) using two MVE162 processor cards, which receives data from the interlock system, the axis servos, and independently from many other subsystems. The first processor, which shares a VME crate with the MCP, monitors the MCP and PLC data via a shared-memory interface with the MCP, status of the LN2 pressure system, the primary mirror support servo, the drive amplifiers, wind speed and direction, and the drive slip detection hardware. The second monitors all serial communications, including the thermometer network, the scales which monitor the weight of the 180-liter LN2 supply dewars, and the mirror support actuator Galil controller. The TPM runs the Experimental Physics and Industrial Control System (EPICS) control/monitoring software system and can be queried for the state of any of the subsystems which it monitors in real time, and in addition writes data to disk which are permanently archived. The archives can be accessed in much the same way as the real-time displays are generated.
The telescope control computer (TCC), a DEC Alpha system running VMS, is the astronomical part of the control system; it is essentially identical with its counterpart for the 3.5-meter telescope, even though all of the lower-level hardware is completely different. It handles all of the interface between telescope motion and the observers, keeps a telescope pointing model, takes care of all the tedious (and complex) coordinate and tracking issues, etc. Since the SDSS telescope images in TDI mode, one of the things it must do, and does, exquisitely well is to track along an arbitrary great circle on the celestial sphere at constant apparent rate. It computes and feeds (position, velocity, time) triplets to the MCP, which interpolates in this set and feeds the servo hardware. It accepts offsets in any one of a number of coordinate systems to move the telescope differentially for pointing corrections. This facility is used for target acquisition and automatic guiding in spectroscopic mode.
At the highest level is a Unix machine called sdsshost, running control interface operations software mostly coded in Tcl/TK. The main control interface is called IOP (for imaging operations) and is supplemented by SOP (spectroscopic operations), a set of tasks specific to observing in spectroscopic mode. These programs communicate with the data acquisition computers specific to the instruments and to the TCC, MCP, and TPM. Tasks include data archiving, guiding (for spectroscopy), record keeping, general instrument control, calibrations, running and keeping the system log via a logging package called murmur developed at Fermilab, running a routine called Watcher which gathers data from all the subsystems and warns of dangerous and general out-of-spec conditions on all the monitored subsystems, and an interface to the interlock system which allows the observers to find quickly where in the complex interlock tree a condition exists which has triggered an interlock. This host machine is currently a Silicon Graphics Challenge, chosen many years ago because of its ability to interface more-or-less directly with the VME instrument computers. The entire data acquisition system (including sdsshost), which has become something of a maintenance liability, will be replaced in the summer of 2005 with more modern machines.
Several software routines work with the data stream to provide instantaneous feedback on the data quality. Since the SDSS imaging along great circles runs “open loop” - that is, the tracking rate of the telescope and the TDI readout rate of the imaging camera must be the same but are not connected by feedback loops - the rates of the tracking and image rotator must be precisely monitored and recorded. The SDSS accomplishes this during imaging mode by examining the imaging data as they are taken. The SDSS imaging camera contains two arrays of CCDs - as well as the imaging CCDs, a leading and trailing set of shorter exposure CCDs acquires band data over the dynamic range straddling the imaging camera saturation threshold of about 14th magnitude and that of the astrometric catalogues, thereby providing astrometric calibration of the SDSS imaging. During imaging observations, an astrometric routine compares position information from the astrometric arrays, both leading and trailing, with the on-line astrometric catalogues FASST and UCAC (Zacharias et al. 2004; see also Pier et al. 2003 and Gunn et al. 1998), thereby measuring the tracking rate and the lateral position of the imaging camera with respect to the predefined scan path, and the image rotator offset. A second routine compares the positions of all stars seen in the leading and trailing astrometric arrays (not just the stars in the astrometric catalogues), providing better measures of the tracking rate (via the time it takes a given star to cross the imaging array and be detected in the trailing astrometric array) and of the field rotation (measured by whether a star crossed the same CCD column in the leading and trailing astrometric chips).
The variation of the imaging PSF is also monitored by measuring the Gaussian widths of stars detected by the data acquisition system. This diagnostic gives information on whether the telescope is in focus, but more importantly monitors the seeing. SDSS imaging is done in pristine weather with good seeing, while spectroscopy uses any usable conditions, so it is important to closely monitor the image quality during imaging observations. It is also important, of course, to know when it is appropriate to switch to imaging; these decisions are made partly on the basis of measured image diameters of the spectroscopic guide stars, but heavily supplemented by images from an all-sky 10 micron camera which is very sensitive to cloud cover (Hogg et al. 2001) and a differential image motion monitor (DIMM) which continuously monitors the seeing.
During spectroscopic observations (typically three 15 minute pointed observations for each plate) the necessary information on tracking and guiding is provided by real-time analysis of the data from the spectroscopic guider, a small independent CCD camera which images the output of 11 coherent fiber bundles placed on the images of relatively bright guide stars. Information on image smearing and on cloud cover is provided indirectly by monitoring the signal-to-noise ratio of the spectroscopic exposures. The quality of the night itself is provided by the observations taken automatically with the auxiliary 0.5 m Photometric Telescope (Hogg et al. 2001; Tucker at el. 2005), and the aforementioned 10-micron all-sky camera.
4 The Wind and Light Baffles
4.1 General Considerations
The SDSS telescope uses a roll-off enclosure which is very compact and has a low cross-section for wind loading. This greatly reduces both the mass and the cost of the enclosure base. The low mass of the enclosure base in turn greatly reduces thermal differentials between the structure and the ambient air, leading to much-improved near-field seeing performance. The properties of the enclosure will be described in §5 immediately below. However (see Figures 1 and 2), the telescope is completely exposed to the wind and to light sources during observing, and is protected by a set of external and internal light baffles. The requirements for a high-accuracy, wide-field photometric survey telescope are quite stringent and somewhat different from those for normal astronomical telescopes, and was the focus of a quite considerable effort in the design of the project. We thought it therfore worthwhile to go into some detail in the description of the baffle design and implementation.
The baffle sytem was specified to provide effective baffling of the crescent moon at positions of or more from the optical axis and of the lights from the nearby town of Alamogordo, and especially those of Holloman Air Force Base, both of which lie below and to the west of the SDSS site. This translates into a specification for the point source normalized irradiance transmission (PSNIT) - the ratio of the stray light irradiance at the focal surface to the incident irradiance from a point source - of less that 2 for sources more than off-axis. For sources closer to the optical axis, higher values of the PSNIT are permitted, but it is desirable that the focal surface illumination be uniform.
There are two main techniques for tackling the problems of stray and scattered light. The first is to paint all relevant structural surfaces black; suitable aerospace paints, such as the Lord Aeroglaze Z306 which we use, have a hemispherical reflectance of less than 5% for normal incidence, but this rises to over 15% for grazing incidence (Pompea & Breult 1995). The second is to block scattering paths; and here, edge scatter is a concern. In the following discussion, critical objects are those visible from the focal surface either directly or by transmission or reflection by the optical elements. Elimination to the extent possible of critical objects and reducing and lowering the reflectivities of those crucial to the structure which remain is the crucial step of light baffling. In the following Illuminated objects are those illuminated by a light source directly or via the optical elements.
4.2 The Baffle System
The baffles for the SDSS system were designed using the following criteria, which apply for the worse-case combination of component and installation tolerances and flexure for elevations between and :
-
•
All direct rays to the focal surface must be blocked, since even a small amount of direct illumination will cause photometric errors.
-
•
Variable vignetting of the diameter photometric field of view due, for example, to gravity or wind loads, must be much less than 1%.
-
•
Variable vignetting of the diameter astrometric field of view (see Gunn et al. 1998) must be less than 2%.
The SDSS telescope is protected by a wind baffle that closely surrounds the telescope but has a separate low-precision drive system and transfers wind loads to the stationary portion of the telescope building. The wind baffle has a square cross-section that fits closely around the square secondary frame of the telescope, and is constructed to efficiently serve as the external light baffle. In addition, the telescope structure has the usual internal light baffles protecting the secondary and primary mirrors. However, the optical system includes two transmitting elements which must also be baffled. To avoid excessive central obstruction of the entrance pupil, a conical baffle is suspended approximately midway between the primary and secondary mirrors (Siegmund et al. 1998).
The baffle system for the SDSS telescope is shown in Figure 3. The sky-facing end of the wind baffle contains an annular opening formed by a central disk and a panel with a circular opening (both supported by the wind baffle frame). This opening provides clearance for light from the 3∘ field of view to reach the telescope entrance pupil. The wind baffle blocks light rays that would otherwise have to be intercepted by the other baffles and prevents direct illumination of the primary mirror by sources more than 27∘ from the optical axis.
The inner baffles consist of the secondary baffle (in front of the secondary mirror), the primary baffle (extending through the primary center hole), and the conical baffle (suspended between the primary and secondary mirrors). Most conventional two-mirror telscopes have no analog of the conical baffle, but a similar arrangement has been used at the Meyer 1.5 meter telescope at Palomar and a much more complex but analogous design on the 2.5 meter Las Campanas telescope. Extra baffles of this general sort are necessary in fast, wide-field Cassegrain designs with large secondaries, to avoid an unacceptably large central obstruction of the entrance pupil.
The primary and secondary baffles each consist of a stack of annuli. Short struts connect each annulus to the next one in the stack and control spacing and centering. The outer surface of each strut contains a vane to block near-grazing scattered light paths. The annular baffle design facilitates the air circulation near the optics needed to bring them to ambient temperature, is light weight, is easy to fabricate, and has low wind resistance.
The annulus spacing for both mirror baffles is closer further away from the mirror, and each baffle is terminated by a truncated cone (Figure 3). The cone surfaces are vaned to eliminate near-grazing light paths. The conical baffle is also vaned to minimize its cross section and avoid excessive direct light blockage.
Of the two optical configurations, imaging has the more stringent requirements, so the telescope baffle design is optimized for the imaging configuration.
The baffle design was modified after construction of the optics. In the original telescope design, the inner edge of the entrance pupil is defined by the tip of the secondary baffle. However, the inside diameter of the primary mirror as built was larger than designed because of damage incurred during surface generation (see §6.1), and instead the inner edge of the entrance pupil is defined by the 1.20 m outer diameter of the primary baffle annulus nearest the primary mirror, at least for small field angles. At field angles larger than about 38 arcminutes the effective pupil becomes quite complex, as the shadow of the secondary baffle emerges from the central primary baffle. The 2.52 m diameter of the outer aperture stop was chosen to mask the surface of the primary near its outer edge because of a slightly turned edge which occurred during polishing. The stop is located just above the primary mirror and is integrated with the supports for the primary mirror seismic mirror cushions.
The secondary baffle must be large enough to mask the edge of the secondary. It is also desirable that the baffle and secondary supports not be critical objects. The 1.28 m diameter of the secondary mirror baffle tip was minimized consistent with these criteria - if the diameter of the baffle tip were increased, the conical baffle would have to become shorter and moved towards the primary mirror. While this would decrease the central vignetting, the central obstruction dominates such that the total blockage increases, even at the field edge.
4.3 Performance of the 2.5 m Baffle System
Analysis of the entire baffle design using Breault Research’s Advanced System Analysis Package (ASAP) indicates quite satisfactory performance. This design achieves over the whole range of incidence angles greater than about 30∘ off axis ratios of incident flux to flux in the focal plane (PSNIT) better than . This translates, for example, to a scattering contribution to the night sky in the focal plane of about 26.0 mag/arsec2 by a quarter moon 40 degrees off axis. This is 2% of the dark night sky, and less than half a percent of the moonlit night sky.
Stray light analysis of the as-constructed 2.5 m telescope was performed using Breault’s APART analysis program (Breault 1995). For source angles of and less, the most important critical object is the directly-illuminated aperture stop located just above the primary mirror. For angles greater than , the most important critical objects are the interiors of the primary and conical baffles, which are illuminated by light scattered from the interior of the wind baffle. At angles of or more, critical objects are no longer illuminated. The resulting PSNIT is shown in Figure 16.
The fast focal ratio and wide field of view of the SDSS 2.5 m telescope precludes the typical mirror baffling system, in which the primary baffle is contained within the shadow of the secondary baffle - the resulting central obstruction would be more than 50%. The SDSS baffle system produces a much lower central obstruction, at the cost of minor blockage by the conical baffle and some differential vignetting with field angle (which does not occur in the typical mirror baffling system on other telescopes). The resulting total obstruction is 28.6% on-axis and 31.8% at the field edge, resulting in differential vignetting of 3.2%. Most of the obstruction is due to the secondary baffle and most of the differential vignetting to the conical baffle (Figure 17).
4.4 Construction of the Baffles: Details
4.4.1 The Wind and Light Baffle
The requirement for the wind baffle is that it should reduce the wind load on the telescope by a factor of 10.
The sides of the wind baffle (Figure 3), fabricated under contract with CVE Machining, are covered with wind-permeable panels. The panels have 25% equivalent open area, and consist of interlocking “C” cross-section elements. Light paths through the panel require scattering from a minimum of two surfaces. Thus, with suitable coatings, the panel can be made quite light-opaque.
Water tunnel studies indicate that with this 25% porosity, the flow speed around the telescope secondary is reduced to about 1/3 of the free stream flow speed while the flushing time for fluid inside the baffle is still a very rapid 15 to 30 seconds. Flow passing through the channels in the panel diffuses rapidly, i.e. on scales of 0.1 m. No spatially persistent high-velocity jets that might cause wind-induced tracking error are observed.
Centered on the telescope azimuth axis and flush with the telescope enclosure floor and the top of the telescope fork base is a motor-driven circular floor panel that follows the motions of the azimuth axis of the telescope. It supports the wind baffle altitude drive, drives it in azimuth and provides rotating floor space around the telescope for the storage of the camera when the spectroscopic system is on the telescope. This structure is suspended from a ring built into the building and is vibrationally isolated from the telescope pier.
Traditional telescope enclosures act as cavity radiators. The net radiation imbalance with a clear sky is roughly 100 watts/m2 of horizontal projected area. In a well-designed telescope enclosure with low thermal inertia and minimal heat sources, this power (kilowatts for a typical slit size) comes from conduction from the air within the telescope chamber, i.e. via the production of colder than ambient air. This cold air can cause image degradation should it enter the telescope light path.
The wind baffle reduces radiative coupling of the telescope OSS to the sky by minimizing the area of the opening at the end of the telescope. The outer surfaces of the wind baffle are polished aluminum. Wind baffle surfaces which must be black in the visible to absorb scattered light are painted with Lord Aeroglaze Z306; this coating has very high thermal emissivity but the areas involved which are well coupled to the sky are small.
The control system for each of the two axes of the wind baffle is implemented using a Sumitomo SS-6100 AC PID servo system controlling A830-GTMT10 high-power AC servomotors, three on the azimuth axis gear-driving the support wheels for the rotating floor, and one on the elevation driving the wind baffle via a chain drive.
The wind baffle is referenced to the telescope by a pair of Balluff BTL-5-G11 magnetostrictive sensors, which serve to keep the windbaffle centered on the telescope to of order a millimeter. The windbaffle can keep up with the telescope adequately at the maximum accelerations we use, which are 0.1 deg/sec2 in elevation and 0.2 deg/sec2 in azimuth.
Mounted on the sky-facing end of the wind baffle are eight segments made from honeycomb aluminum panels and driven by DC gearmotors which can be opened completely out of the light path or closed to almost completely cover the opening in the baffle. These are coated on their lower (when closed) surfaces with Labsphere’s Duraflect, which provides an accurately Lambertian reflective surface over the entire wavelength range of interest to the SDSS. These are illuminated by projectors mounted in the corners of the wind baffle just above the PSS for spectroscopic flatfield calibration and wavelength calibration. To this end there are four sets of three projectors, the central one of each set a quartz-iodine flatfield lamp, flanked by a mercury-cadmium lamp on one side and a neon lamp on the other. The projectors have a condensing system and an imaging system which projects a pupil segment on the screen to minimize stray paths through the optics. There is in addition a low-power module consisting of a small filtered quartz-iodine lamp and a UV LED on each lamp cluster which are used to produce reference flat fields for the camera. These are used only to monitor changes in the response of the imaging CCDs.
4.4.2 The Primary Baffle
The internal baffles - the conical baffle mandrel and the primary and secondary baffles - were fabricated by Machinists Inc., Seattle, WA.
The tip of the primary baffle (Figure 18) is a machined aluminum truncated cone with vanes. The balance of the baffle consists of progressively larger aluminum annuli with sharp inner and outer edges. The spacing of the annuli increases towards the primary mirror. The outer edges of the annuli are directly illuminated from the sky and by the secondary mirror. The edge bevel faces the secondary. The finished primary baffle assembly weighs 63 kg, and the ellipticity of the upper edge of the primary baffle tip is less than 1 mm. The assembled primary baffle is shown in Figure 19.
The primary mirror aperture stop is located just above the primary mirror and defines the outer edge of the entrance pupil. The edge bevel faces the primary mirror. Integrated with the primary stop are the elastomeric retention cushions which protect the primary mirror during seismic accelerations, particularly when pointed at the horizon (the original intended stow position for the telescope, see Figure 12).
4.4.3 The Secondary Baffle
The design of the secondary baffle is similar to that of the primary baffle, but is inverted and shorter. The baffle tip is a machined aluminum truncated cone with vanes (Figure 20). Its tip is more conical than the rest of the cone and blocks the view of the baffle exterior from the focal surface. The balance of the baffle consists of smaller diameter aluminum annuli with sharp outer and cylindrical inner edges. The spacing of the annuli increases towards the secondary mirror. The outer edges of the annuli are illuminated directly from the sky. The edge bevel faces the sky and is not a critical object. The inner edges of the lower surfaces are illuminated by the converging beam from the primary mirror. The cylindrical inner surface is not illuminated. The finished secondary baffle assembly weighs 25 kg and the maximum diameter of the lower edge of the secondary baffle tip is 1.28m.
4.4.4 The Conical Baffle
The conical baffle design is illustrated in Figure 21. It is the most challenging of the baffles to fabricate: it is supported by small (1.5mm) steel rods from the telescope truss so must be lightweight; to resist tension from the rods, it must have good bending stiffness; to minimize on-axis light blockage, its central thickness must be minimized; to minimize vignetting at the edge of the field of view (Figure 3), the thickness near its lower and upper edges must be minimized; and vanes must be added to the baffle surfaces to interrupt grazing scattered light paths. These constraints lead to a design with a relatively deep central vane that provides the baffle with bending stiffness and anchor points for the supports (Figure 21). Extending above and below the central vane are 1.6 mm thick conical segments with half-angles of and respectively.
The conical baffle was fabricated by Quality Composites Inc. (QCI) of Sandy, Utah. It was the largest part of this sort ever attempted by QCI, and three aspects required development: (1) fabrication of the inside vanes so that the tips were smooth and uniform and so that good adhesion to the cone was achieved: (2) fabrication of the central stiffening vane and installation of the stainless steel inserts to which the support rods attach: and (3) design of the outside vanes. These are 750 micron bare acrylic optical fibers tacked to the surface at 80 mm intervals with superglue (cyanoacrylate adhesive). Subsequently, a fillet of epoxy was applied between the surface and either side of the fiber.
The baffle was formed on a machined aluminum mandrel out of graphite fiber reinforced epoxy. Grooves were machined into the mandrel and formed the vanes on the interior surface. The mandrel was made in three pieces so that it could be collapsed inside the finished baffle and removed. Its weight was minimized, which reduced the thermal inertia and speeded the curing of the epoxy.
The finished conical baffle weighs only 9.8 kg, and all specifications were met or exceeded. In particular, the out-of-roundness was 3 mm or less from both the upper and lower edges of the baffle, the surfaces are smooth and uniform, and the fibers are strongly bonded by the adhesive.
The completed telescope baffles are shown in Figure 22
5 The Enclosure
The SDSS telescope site is about 90 meters (300 feet) south of the existing 3.5-m telescope enclosure at the Apache Point Observatory, about 20 meters (70 feet) west-southwest of the ridge top, i.e. in the prevailing upwind direction, and allows the telescope to be located at the same level as the ridge top and still be above the trees, 9 to 12 meters high (see Figure 1). The telescope is built on a platform constructed out over the slope of the mountain, allowing access to the telescope at ridge ground level and the location of the telescope azimuth support, bearing and drive systems below ridge ground level, thereby greatly reducing the height of the structure. This platform faces west, into the prevailing laminar airflow. A roll-off enclosure covers the telescope when it is not observing and is rolled off downwind of the telescope, eliminating wake turbulence from the enclosure itself. The structure of the SDSS telescope and its platform in this way also allows for adequate storage for the accessories: the camera, spectroscopic plates etc. A support building on the ridge top, near the telescope, is used for plate plugging and the storage of plug-plate cartridges. With the support building level with the telescope, plug-plate cartridges can be wheeled easily between the support building and the telescope. Care must be taken, however, to ensure that warm air generated by the drive mechanisms beneath the telescope is adequately vented and does not degrade the seeing.
The telescope enclosure is a roll-away rectangular frame structure mounted on wheels, seen in Figure 1; a side and end view are shown in Figure 23. During observations, it is rolled 60 feet downwind from the telescope to the top of the ridge. Large doors on either end of the enclosure are opened during this operation to prevent interference with the telescope and to reduce the wind load in the direction of motion.
The SDSS telescope enclosure is designed with several specific needs in mind. During spectroscopic observations, it is necessary to change plug-plates cartridges about once per hour, and the plug-plate cartridges have a mass of about 100 kg. For this, and other reasons, the telescope is mounted so that we have access to it via a level track, yet still have sufficient ground clearance not to degrade the seeing.
A roll-off enclosure has several advantages. The thermal ones have been recognized for some time, but others include:
-
•
The telescope enclosure is considerably smaller and less expensive at than a conventional enclosure since it does not need to accommodate the entire volume swept out by the telescope.
-
•
The telescope enclosure wake is minimal, especially when open. It is important to avoid buildings with large wakes at sites (like APO) with other telescopes, since air overcooled by conduction to the ground is transported throughout the wake volume by turbulence. If the light path to a telescope passes through such a wake, image quality degradation will result.
-
•
The surface area obstruction to the telescope’s field of view is minimized.
-
•
When realuminization of the primary mirror is required, a hoist mounted to the ridge beam serves to lift the primary mirror out of the telescope. The enclosure is used to transport the mirror over the bed of a truck waiting at the ridge top. This eliminates the need to provide a large pathway for the primary mirror within the structure of a conventional enclosure.
-
•
Traditional dome-induced seeing is eliminated. Sources of heat, radiative cooling, and thermal inertia are reduced and the flushing of the volume surrounding the telescope is improved. The enclosure design was studied carefully by water-tunnel experiments on scale models of the SDSS platform, telescope, enclosure and prevailing wind pattern (Forbes et al. 1991; Comfort et al. 1994).
-
•
The visual impact of the building is reduced as compared with a traditional telescope enclosure because of its reduced size.
-
•
The tallest trees at the site are located just below the ridge top and near the telescope site. If the telescope were placed at the ridge top, it would have been downwind of these trees and the turbulence they produce.
-
•
With the enclosure track built up the slope, only the columns near the telescope need be long. Much of the track is near ground level, allowing better access for maintenance.
The SDSS enclosure does have some disadvantages, including:
-
•
The telescope is unprotected if the building cannot be closed. However, the bridge crane components are a mature technology and are very reliable, and in the event of power failure we are backed up both by a sitewide generator facility and a local generator.
-
•
The telescope is not protected from the wind or stray light, and this must be addressed separately. This is done by the very effective and elegant wind baffle solution discussed in the previous section.
-
•
Locating the telescope off the top of the mountain is really only appropriate for sites that have prevailing winds from one general direction and that have broad summits where the windward edge is likely to have the best image quality.
-
•
It was not possible with the initial very low-profile design to move the telescope through its full range of motion with the telescope enclosure closed. In particular it was not possible to point the telescope to the zenith, where one must go to change or more than superficially access the instruments. This is discussed further below, but the short summary is that we were forced to redesign and rebuild the enclosure to address this issue (cf. Figure 12).
-
•
It is much more difficult to seal the moving building against inclement weather and pests than is the case with a conventional dome. This is a problem we have not completely satisfactorily solved at this writing.
The floor surrounding the telescope is well coupled to the night sky and is in the stagnation region behind the leading edge of the floor. Consequently, some attention was paid to minimizing its emissivity to prevent it from cooling too much. As originally constructed, the floor was covered with 6 mm thick, sanded aluminum plate. The subfloor is a composite structure of plywood, rigid foam, and corrugated steel sheet. The thermal performance is satisfactory except in occasional conditions of very low wind speeds.
The enclosure itself is constructed of steel framing sheathed with six inch thick panels made of prestressed steel with rigid foam cores. It is provided with both air conditioning and refrigeration systems to control the daytime indoor temperatures, and a blower system (see below) to control temperatures during nighttime operation.
Storage for tools, equipment, and cryogens is always a problem near a telescope. It is undesirable that such items be in the telescope chamber since they store heat and interrupt air flow. However, it is inconvenient if they are too far from the telescope. The roll-off enclosure provides a good solution. A storage platform is located on the north wall of the enclosure. Items stored on this platform are located conveniently to the telescope when the enclosure is closed, but away from the telescope for operation. A special cart for the spectroscopic corrector is housed in the structure for this platform as well.
There is a room underneath the telescope the primary purpose of which is to enclose the electronics racks which hang from the rotating floor and to house the mechanism for the rotating floor. The racks house the TPM, the MCP, the interlock system PLC, UPS units for all the telescope systems, a 24V DC power distribution system, the hydraulic pump for the lift used for instrument change, a rack of support electronics for the camera, a large thermoelectric fluid chiller and associated pumps and power supplies for heat exchange with the flat-field lamps and electronics mounted on the camera and spectrographs, and all of the communication electronics for the telescope. The room also provides some workspace. It is vented by a large axial blower which moves about 7000 cfm (sea-level equivalent) at low differential pressures, which is how it is used currently. The mirror ventilation is accomplished by two centrifugal blowers moving a total of 2500 cfm mounted in the telescope fork and exhausting into this space. The room is provided with louvers on the west end, opposite the blower, to facilitate rapid laminar exchange of air and elimination of the heat generated by the telescope electronics. The heat is dumped at ground level about a hundred feet east (and generally downwind) of the telescope. The seeing with occasional easterly winds is usually very poor anyway, so there is little disadvantage in this relatively simple arrangement. The current configuration dissipates about 4 kW into the air in this room. If the coupling to the flow were perfect this would result in about a 1C temperature rise in the room. The observed average temperature rise in the structure is about twice this, but the insulation and radiation to the night sky keeps the exterior of the room and the telescope floor at or slightly below ambient.
A number of features address personnel safety. Controls are designed so that the operator must be at the end toward which the enclosure is moving. A warning bell sounds and a time delay passes before any movement occurs. The push button must be held down continuously for motion to occur; if the button is released, the enclosure stops. The perimeter of the platform surrounding the telescope is protected by a railing. The outdoor portion of the deck is covered with galvanized steel grating to provide personnel safety but minimize snow buildup and heat retention.
It was originally believed that the lack of ability to move the telescope to the zenith inside the enclosure would not be a serious problem because APO typically has good weather and work could be done with the enclosure rolled off. However in practice the time so available for working on the telescope and instruments proved woefully insufficient, and personnel movement inside the enclosure was so restricted that little could be done when the telescope was inside the enclosure. This was sufficiently serious that the enclosure is certainly responsible for much of the difficulty, delay, and unanticipated expense encountered in commissioning. It was especially serious because during bad weather, the telescope could not be accessed night or day and in good weather the telescope was severely heated by the sun when it was in the open in the daytime — and the mirror ventilation system, as discussed above, was insufficient to the task, so the performance at night was very poor. In any event, the enclosure was rebuilt in the fall and winter of 1999-2000 by adding a central raised section to allow moving the telescope to the zenith. This construction was successful but fraught with difficulty; the composite steel panels, ordered to match the ones in the rest of the structure, could not in the end be obtained on any satisfactory schedule, and when they finally were obtained from a vendor outside the USA they were sized on the metric system and were almost the right size. These problems pushed the construction into the winter and severely tested the temporary enclosure constructed to protect the telescope during this period. The successful completion was accomplished to the delight and relief of everyone involved and enormous advantage to the progress of the project.
6 Installation, First Light, and the Future
The description of the SDSS 2.5m telescope in the previous sections focusses on some of the many powerful and imaginative aspects of the design that have made possible the high quality of the SDSS data. Many of the techniques used in the design, construction and testing of the SDSS hardware were deployed here for the first time. This section provides a brief, incomplete and rather anecdotal history of the construction of the 2.5 m up to first light, as well as a discussion of future plans for the telescope. The installation of the SDSS telescope proceeded in the following order: site preparation and enclosure; telescope bearings, pillow blocks and co-rotating floor panel; azimuth bearing; telescope; optics; interior baffles; wind baffle; interlocks and control system; first light with the completed imaging camera; and finally installation and testing of the spectroscopic system. Improvement of the thermal environment became a high-priority task as soon as the system was far enough along to realize that we had serious problems, but was not really finished until the survey was well underway.
6.1 Optics
The design, construction and testing of the SDSS 2.5 m optics - the 2.5m primary mirror, the 1.1m secondary mirror, the common first-element Gascoigne lens, and the imaging and spectroscopic lenses, are described in §2 and by Gunn et al. (1998). As delivered, the optics were of excellent quality, with each element meeting or exceeding specification. The optical surfaces and axes were accurately measured with respect to mechanical references so that mechanical collimation of the telescope was straightforward. In particular, the null lens which tested the primary mirror was verified using a computer-generated hologram (Burge et al. 1994), while interferometric testing of the secondary used an innovative and powerful holographic test against an almost-matching sphere (Burge 1997). The 2.5 m secondary was the first such mirror to be so tested. It is worth recalling that the time period when the SDSS large optics were under construction closely followed the disastrous discovery right after launch that the primary mirror of the Hubble Space Telescope had been (beautifully) polished to the wrong figure using an untested null lens, causing severe spherical aberration (Allen 1990). In this climate, even more care was taken and more redundant testing carried out than normal.
At this writing (June 2005), when the SDSS has been underway very successfully for five years, it is easy to forget the sometimes heart-stopping misadventures which befell both mirrors. The primary mirror was among the first parts of the telescope to begin construction, informed by much experience that the construction of the primary mirror is the rate-determining item in the construction of any telescope, and was the first large cast blank to be made by Hextek corporation. Casting began in July 1992, but this first attempt failed during annealing, and when the oven was opened the mirror was found to have cracks. The causes were identified and corrected, and it was realized that casting need not be redone ab initio - reheating and re-annealing the mirror was likely to work. The mirror was reheated in January 1993 and re-annealed. This was successful: the cracks fused and the resulting blank was found to be of high quality and to have low internal stresses, a property which proved vital during the loss of the next of the mirror’s nine lives.
The blank was delivered to Arizona Technologies, Inc., for optical generation under subcontract from the Optical Sciences Center, who had overall responsibility for figuring the mirror. During this process, the blank was seriously fractured by the generating tool when there was an accidental partial power failure - the turntable holding the blank continued to rotate and the feed screw for the grinding wheel continued to advance, but the power to the grinding wheel itself failed. Fortunately, the fracture was close to the inner, very large, hole in the blank. The fracture was about 85 mm outside the edge of the center hole, quite cylindrical, and went through the front surface and into the ribs below (cf. Figure 7). In some ribs, the cracks continued down to the back plate but did not pass through it. The proposed fix, which proved successful, was to remove the inner annulus of the mirror containing the damaged elements - the inner skirt and inner portions of the face- and back-plates and ribs. This accident necessitated the redesign of the conical light baffle (§4.4.4). Optical generation was then completed at the Optical Sciences Center, University of Arizona, where the final figuring, polishing and testing phases were also carried out. The mirror was polished to about 100 nm but as noted in §2 and §3, the mirror was slightly stressed during polishing and the relaxed mirror had 1/2 wave of astigmatism. Rather than starting over, the mirror mount was configured to slightly bend the mirror and bring it into tolerance. The primary was aluminized at KPNO, and delivered to APO in July 1996. It is annually cleaned and realuminized (cf. Figure 8). The mirror has suffered no further crises and has performed in an exemplary manner.
The secondary mirror was also seriously damaged during operation by its focus actuator (Figure 15) very shortly after the installation of a new secondary support system, the one described in §3.4.3. The original one, a more-or-less direct copy of that on the 3.5 meter, proved mechanically inadequate for our considerably larger and heavier secondary. A dimension error was made in the design which, when translated into hardware, allowed the central support shaft to contact the glass when the mirror actuators were fully retracted. It did, and on October 19 1999, about four days after the end of the dark run, the mirror was discovered to have several circular cracks near its center around its axis of symmetry. The mirror was stabilized by drilling several holes to intercept the cracks and shipped for testing to the Steward Observatory Mirror Laboratory. It was determined that the cracks had indeed been caused by excessive force exerted normal to the mirror surface along the axis of the central support pin. The support structure was modified (to the proper dimensions) with a new control system containing a force limit switch which directly interrupts power to the actuators in the event of excessive force on the mirror.
SOML determined that, miraculously, the figure of the mirror was essentially unchanged and that the mirror could be repaired by removing its center section. Fortunately, the center of the SDSS secondary mirror is not part of the optical path because of the large central obscuration, but is used for collimation, so a thin E6 meniscus of the correct curvature was made and bonded to the center of the mirror for this purpose, and the optical center mark very carefully transferred. The mirror was repaired and realuminized at SOML and returned to APO at the end of January 2000. The telescope was back in operation on Feb 15 2000 and there has been no further trouble. The telescope down time was not a total loss — other work, such as the rebuilding of the telescope enclosure and the installation of the flatfield screens and a set of Hartmann test screens — was accomplished during this time. The SOML tests had not been able to verify that the figure of the secondary on large scales was unchanged, and in the summer of 2000 the mirror was shipped to Lick and tested on their precision profilometer (Miller, Hilyard, & Mast 1998) and found to be essentially unchanged.
The first corrector lens is relatively straightforward, and was generated, figured and polished using a null test under contract with Contraves Inc. It was delivered in March 1997. The lens met our specifications except for a region some 45 degrees in angular extent by about 100 mm or so width at the edge, as has been mentioned before. When we shipped the secondary to Lick for profilometry we sent this element as well, but the lens was too thin to support properly and the tests were somewhat indeterminate.
The second corrector for imaging mode is very aspheric, with an aspheric sagitta of more than 8 millimeters, but the accuracy required is not very high by optical standards and the surface was monitored with sufficient accuracy with a simple profilometer during generation, polish, and figuring. The lens was completed in the spring of 1996 by Loomis custom optics. The fabrication included drilling the CCD optical bench mounting holes (see Gunn et al. 1998) in the flat side of this corrector, and was concluded by the application of a very complex striped antireflection coating which matches the camera photometric bands.
The second corrector for spectroscopic mode was generated and figured under contract with Tinsley Laboratories, and was delivered in June of 1996. All of the refractive correctors were coated by QSP.
The individual optical elements were each supposed to contribute less than 0.2 arcseconds FWHM to the image size, and all either passed this specification or came close, either on delivery or after some correction (the primary astigmatism). The early overall performance, however, was determined by thermal issues, discussed in more detail elsewhere, which required a great deal of time and effort to solve. The performance is now quite satisfactory, but a detailed post-mortem to illuminate where the remaining errors originate, and what relation, if any, they have to the input error budget has not been done.
One issue which has not been discussed at all is ghosting in the imaging mode. All refracting surfaces are anti-reflection coated, selectively for the relevant imaging bands where practical. As a result, the only significant ghosts arise from reflections from the CCD surface, off some optical surface, and back to the detector, and of these the only important ones are reflections from the filter surface, about 8 mm from the CCD. The worst of these are in the u band, partly because the antireflection coating on the UV CCDs is relatively poor and (mostly) because the coating on the filters does double duty as a red-leak suppressant and an antireflection coat, and the second function is not very well performed. Since in TDI mode the form of the ghosts is determined only by the position of the star in one dimension, it was originally planned to implement subtraction of these primary ghosts in the processing pipeline, but that has never been implemented. The fraction of sky in the survey area disturbed by these ghosts is much less than one percent and the fraction of sky recoverable without exquisite subtraction of the wings of the star responsible for the ghost much smaller yet. This level of ghosting would doubtless be problematical at lower latitude, but fortunately has not been a problem for us.
6.2 Telescope
The enclosure was completed in 1994, ready to receive the telescope. The telescope structure, including the corotating floor panel, was constructed by L&F Industries. As various pieces of the assembly were completed, they were inspected and the entire telescope structure assembled for final testing.
The first part of the telescope to be installed, the azimuth drive assembly, arrived at APO on August 10 1995, was installed on August 15, and tested on August 20 (see Figures 24 and 25). The wind baffle azimuth drive assembly was installed on September 19 1995, and the 2.5 m telescope itself arrived on October 4 1995. The telescope was installed (with dummy optics for balance tests) by October 10 1995 with the assistance of engineers from L&F Industries. Figure 26 shows a close up of the back of the telescope during construction, showing the primary mirror cell, the installed image rotator, and the fork.
The rotator, at installation driven by a small geared-down DC servomotor and a rotary encoder like the ones on the axes, failed to function satisfactorily and was too limber to support the spectrographs adequately. When it was discovered as well that the drive surface had at some point been seriously damaged, it was decided to redesign the system, and the current system with tape encoder and a drive motor system essentially identical to that on the other axes was installed in the spring of 1999.
The baffles and optics were constructed and installed throughout 1996-7, and the imaging camera arrived at APO on October 22 1997 after being driven across the country from Princeton by Roberts White Glove Express. The camera was first tested with the SDSS Data Acquisition system on December 12 1997 in the APO clean room, achieving instrumental “first light”. The original plan had been to test the telescope tracking, drive and interlock systems using a single CCD test (“engineering”) camera, but the arrival of the full survey mosaic camera before the telescope was quite finished allowed the initial testing and data acquisition to be performed with the mosaic camera itself. This was done by drift-scanning with the telescope stationary at the celestial equator (a natural great circle) because the telescope drives were not yet ready, and first light was obtained in the early morning of May 9 1998. That night happened to be close to full moon, and the baffles had not yet been installed, but the run demonstrated that the optics, camera, and data acquisition were working essentially perfectly. High-quality imaging was obtained during the next dark run (May 27 1998) and allowed the first science results to be obtained from SDSS (Fan et al. 1998). SDSS first light was officially announced on June 8 1998 at the June AAS meeting. The first SDSS journal paper, by Fan et al. (1999), reported the discovery of several high-redshift quasars, including the first new “highest redshift” quasar in more than 8 years. The next 18 months saw much work on telescope tracking and control, rebuilding the enclosure, the installation and commissioning of the spectroscopic systems, and improvement of the thermal environment. This last has been one of the most difficult tasks we have faced, as is apparent from some of the earlier discussion; it required the better part of two years to reach a state in which the progress of the survey was determined essentially entirely by the weather and not the thermal state of the telescope. We were in the end successful, however, and for the past three years have been able to take advantage of satisfactory weather conditions when and if they occur with no concern that the telescope might not be in satisfactory thermal equilibrium. A recent image of the SDSS telescope in operation with the new enclosure is shown in Figure 27. Operations began in earnest in Spring 2000 and to mark this the SDSS dedication was held on October 5, 2000. The rest, as they say, is history.
6.3 The Future
At this writing, June 2005, the last dark run of SDSS-I has just been completed. Originally, the SDSS was expected to obtain a filled survey covering square degrees of the North Galactic Cap (NGC), with uniform spectral coverage also, about galaxies and quasars (York et al. 2000), in five years of operation. The statistics of data acquisition during the first years of operation showed, however, that this was unlikely to be accomplished due to slightly greater inefficiencies in data gathering - which were corrected during the first two years - and to weather fluctuations. Accordingly, the strategy in the final years of the SDSS was changed. The original expectation was that the imaging survey of the northern cap (this is the rate-determining step in the entire SDSS) would be finished well ahead of time and that all subsequent available clear time could be devoted to finishing the spectroscopy. The actual rate of data acquisition, however, suggested two alternative strategies: (1) finishing in five years with incomplete coverage of the NGC consisting of two large, separated areas; or (2) acquiring the funds to extend the SDSS beyond five years and finish the northern cap. The latter option was adopted, driven by the evident legacy value of SDSS, and at this writing, the five year survey (SDSS-I) is finished and the extension (SDSS-II) is about to begin.
SDSS-II consists of four programs, three science surveys and an effort to enhance the photometric accuracy:
-
•
Legacy:
This program will finish a contiguous northern survey area (somewhat smaller than the original square degrees) with both imaging and spectroscopy. The imaging is nearly complete, with only a small area at low right ascensions remaining to be done. The entire “ubercalibrated” (see below) imaging map of the sky and all of the spectroscopy will be made public with SDSS Data Release 8 in late 2008.
-
•
SEGUE:
The SDSS was designed primarily as an extragalactic survey, but has made important contributions in many other areas. One of the major SDSS contributions to non-extragalactic science has been the discovery of very large structures in the Galactic halo (e.g. Yanny et al. 2003). Given the ability of the SDSS telescope and imaging camera to sweep the sky in great circles, a program which runs mostly in the Fall, the SEGUE project (Newberg et al. 2003) has been designed to obtain imaging (mostly) along stripes of constant Galactic longitude and to measure spectra of stars selected from the imaging in a fine enough grid that the metallicity, populations and kinematics of both the smooth and structured halo and thick disks can be measured. These stripes will pass through the Galactic plane, providing data for studies of young stellar populations and the interstellar medium (Finkbeiner et al. 2004b).
-
•
Supernova Search:
This program builds upon the repeat imaging of the SDSS equatorial stripe in the Southern Survey (York et al. 2000). The Supernova program is designed to scan 200 square degrees of Fall sky along the equator every other night (when clear), regardless of whether or not the night is photometric. This program exploits the fact that once an area has been imaged on a clear night and photometric calibrations obtained for all objects in that area, the photometric-quality observations can be used to “bootstrap” the photometric calibrations on non-photometric nights, and transient objects can be found by image-subtraction techniques. This was demonstrated for supernovae using SDSS data by Miknaitis and Krisciunas (2001), and descendents of their code will be used for the new survey. The primary science goal is to detect and measure some 200 Type Ia supernovae in the rather neglected redshift range z = 0.1 to 0.35 (Frieman et al. 2004). The redshifts will be obtained via arrangements with several teams using large telescopes. The imaging data will also be valuable for a wide range of other variability studies (proper motions, photometric variability, etc.).
-
•
Photometric Ubercalibration
The SDSS imaging camera saturates at about 14th magnitude, and all well-calibrated photometric standards are much brighter than this. To date, SDSS photometric calibration had been carried out using two smaller telescopes to set up a network of bright and faint standards (Hogg et al. 2001; Smith et al. 2002; Tucker et al. 2005) through which the SDSS camera scans. This effort has resulted in remarkably accurate photometry (Ivezić et al. 2004) but structure along the SDSS scans can be seen at the 1-2% level (e.g. Blanton et al. 2005). Accordingly, the SDSS is now engaged in a major effort to move to a system in which the many redundancies and overlaps in the sky coverage of the SDSS are exploited to achieve a self-consistent photometric calibration which is smooth and accurate all scales, including redetermination of a set of self-consistent flat fields for each detector. Part of the effort involves special photometric scans at four times the sidereal rate (and with the imaging data binned by the data acquisition system accordingly) along great circles which cross both the Northern and Southern SDSS surveys in a spoke-and-rim pattern (this pattern is dubbed “Apache Wheel”). Work to date (e.g. Blanton et al. 2005, which does not yet include the Apache Wheel data) indicates that stripe-to-stripe variations become almost undetectable, the photometric accuracy approaches 1%, and outliers are greatly reduced in number. The scientific payoff for this effort should be enormous. The development of photometric redshift techniques means that huge accurately calibrated samples can be made which probe large-scale structure on the largest scales (see, for example, Schlegel et al. 2003, Budavari et al. 2003, Hogg et al. 2005, Eisenstein et al. 2005); the removal of calibration structure from the data removes this contaminant from statistical analyses such as that of the power spectrum; an extremely accurate Galactic extinction map can be made (Finkbeiner et al. 2004a): rare objects (such as low-metallicity stars) whose broad-band colors differ but subtly from those of more common stellar populations can be selected much more reliably and efficiently; and, together with the large area of sky covered by SDSS-I and SDSS-II, this effort provides photometric calibration to support many other observing efforts (as one example, see Smith et al. 2003), and including planned large-scale successors to the imaging part of SDSS such as LSST and Pan-STARRS.
SDSS-II is a three-year program. And beyond summer 2008? The SDSS hardware at APO is currently working superbly (only the data acquisition system needs to be replaced, and this will occur in late summer 2005), the seeing is as good as allowed by the site, and the data taking is at maximum possible efficiency. Several possible projects, which will make use of the unique capabilities of this telescope, are being investigated and explored, including Galactic plane studies, various studies of bright stars, a faint quasar survey and an extensive planet search program. At this writing nothing is decided beyond 2008, but it is likely that the SDSS 2.5 m telescope will continue to be operated to make major contributions to astronomical surveys.
We are very grateful to Michael Strauss and Željko Ivezić for useful and helpful comments on the manuscript. Funding for the creation and distribution of the SDSS Archive has been provided by the Alfred P. Sloan Foundation, the Participating Institutions, the National Aeronautics and Space Administration, the National Science Foundation, the U.S. Department of Energy, the Japanese Monbukagakusho, and the Max Planck Society. The SDSS Web site is http://www.sdss.org/. The SDSS is managed by the Astrophysical Research Consortium (ARC) for the Participating Institutions. The Participating Institutions are The University of Chicago, Fermilab, the Institute for Advanced Study, the Japan Participation Group, The Johns Hopkins University, the Korean Scientist Group, Los Alamos National Laboratory, the Max-Planck-Institute for Astronomy (MPIA), the Max-Planck-Institute for Astrophysics (MPA), New Mexico State University, University of Ohio, University of Pittsburgh, University of Portsmouth, Princeton University, the United States Naval Observatory, and the University of Washington.
References
- Abazajian et al. [2003] Abazajian, K., Adelman-McCarthy, J.K., Agüeros, M.A., et al. 2003, AJ, 2081
- Abazajian et al. [2004] Abazajian, K., Adelman-McCarthy, J.K., Agüeros, M.A., et al. 2004, AJ, 128, 502
- Abazajian et al. [2005] Abazajian, K., Adelman-McCarthy, J.K., Agüeros, M.A., et al. 2005, AJ, 129, 1755
- Angel & Hill [1992] Angel, J. R. P. & Hill, J. M. 1992, SPIE 332, p 198.
- Allen [1990] Allen, L. ed. “The Hubble Space Telescope Optical Systems Failure Report”, NASA, Washington, D.C., November 1990
- Andersen et al. [1994] Andersen, D., Martin, H., Burge, J., & Ketelsen,D. 1994, SPIE, 2199, 199
- Andersen & Burge [1995] Andersen, D., & Burge, J. 1995, APIE, 2536, 169
- Blanton et al. [2005] Blanton, M.R., Schlegel, D.J., Strauss, M.A., et al. 2005, AJ, 129, 2562
- Bowen & Vaughan [1973] Bowen I.S., and Vaughan A.H., 1973, Applied Optics, 12, 1430.
- Breault [1995] Breault, B.P. 1995, in Handbook of Optics, M. Bass, Ed., (McGraw-Hill:New York), p. 38.1
- Budavari et al. [2003] Budavari, Tamas, et al. Ap. J, 595, p59b
- Burge [1997] Burge, J.H. 1997, SPIE, 2871, 362
- Burge et al. [1994] Burge, J.H., Andersen, D.S., Ketelsen, D.A., & West, C.S. 1994, SPIE, 2199, 658
- Carey et al. [2002] Carey, L., Owen, R., Gunn, J.E., Siegmund, W., Mannery, E., Hull, C., & Browne, Y. 2002, SPIE, 4836, 146
- Castander et al. [2001] Castander, F.J., Nichol, R., Merrelli, A., et al. 2001, AJ, 121, 2331
- [16] Comfort, C.H., Matheson, M., Limmongkol, S., & Siegmund, W.A., Telescope Project FM-20, University of Washington, Seattle, Washington 98195
- Davison & Ulich [1982] Davison W., and Ulich B.L., 1982, in International Conference on Advanced Technology Optical Telescopes, G. Burbidge and L.D. Barr, Ed., Proc. SPIE 332, 9.
- Dettmann & Modisett [1997] Dettmann, L.R., & Modisett, D.L. 1997, SPIE, 3134, 429
- Eisenstein et al. [2001] Eisenstein, D.J., Annis, J., Gunn, J.E., et al. 2001, AJ, 122, 2267
- Eisenstein et al. [2005] Eisenstein, D.J., Zehavi, I., Hogg, D.W. et al. 2005, ApJ (in press: astro-ph/0501171)
- Fan et al. [1998] Fan, X., Strauss, M.A., Gunn, J.E., et al. 1998, AAS, 193, 02.05
- Fan et al. [1999] Fan, X., Strauss, M.A., Schneider, D.P., et al. 1999, AJ, 119, 1
- [23] Finkbeiner, D.P., Schlegel, D.J., Gunn, J.E., et al. 2004, AAS, 204, 61.07
- [24] Finkbeiner, D.P., Padmanabhan, N., Schlegel, D.J., et al. 2004, AJ, 128, 2577
- Forbes et al. [1991] Forbes, F., Wong, W.-Y., Baldwin, J., Siegmund, W., Limmongkol, S., & and Comfort, C. 1991, BAAS, 23, 875
- Frieman et al. [2004] Frieman, J., Adelman-McCarthy, J., Barentine, J., et al. 2004, AAS, 205, 120.01
- Fukugita et al. [1996] Fukugita, M., Ichikawa, T., Gunn, J.E., Doi, M., Shimasaku, K., & Schneider, D.P. 1996, AJ, 111, 1748
- Gunn et al. [1998] Gunn, J.E., Carr, M., Rockosi, C.M., Sekiguchi, M., et al. 1998, AJ, 116, 3040
- [29] Gunnels, S.M., 1990a, in Advanced Technology Optical Telescopes IV, L.D. Barr, Ed., Proc. SPIE 1236, 854.
- [30] Gunnels, S.M., 1990b, “Direct Friction Drives”, Magellan Project Report No. 18.
- Hogg et al. [2001] Hogg, D.W., Schlegel, D.J., Finkbeiner, D.P., & Gunn, J.E. 2001, AJ, 122, 2129
- Hogg et al. [2005] Hogg, D.W., Eisenstein, D.J., Blanton, M.R., et al. 2005, ApJ, 624, 54
- Hull, Limmongkol & Siegmund [1994] Hull, C., Limmongkol, S., & Siegmund, W.A. 1994, Proc. SPIE, 2199, 1178
- Hull, Siegmund & Long [1994] Hull, C., Siegmund, W.A., & Long, D. 1994, Proc. SPIE, 2199, 858
- Ivezić et al. [2004] Ivezić, Ž., Lupton, R.H., Schlegel, D.J., et al. 2004, AN, 325, 583
- Johns & Pilachowski [1990] Johns, M. W., and Pilachowski, C., 1990, in Advanced Technology Optical Telescopes IV, Barr L.D., Ed., Proc. SPIE, 1236, 2.
- [37] Leger, R.F., Long, D., & Klaene, M. 2003a, SPIE, 4837, 247
- [38] Leger, R.F., Long, D., Carey, L., Owen, R., & Siegmund, W. 2003b, SPIE, 4837, 533
- Lloyd-Hart [1990] Lloyd-Hart, M., 1990, in Advanced Technology Optical Telescopes IV, L.D. Barr, Ed., Proc. SPIE 1236, 844.
- Long [2003] Long, D.C. 2003, SPIE, 4844, 65
- Lupton [2006] Lupton, R.H., 2006, submitted to AJ
- Lupton et al. [2001] Lupton, R.H., Gunn, J.E., Ivezić, Ž., Knapp, G.R., Kent, S., & Yasuda, N. 2001, in ADASS X, ed. F.R. Harnden Jr., F.A. Primini, & H.E. Payne, ASP Conf. Ser. 238, 269
- Lupton et al. [2002] Lupton, R.H., Ivezić, Ž., Gunn, J.E., Knapp, G.R., Strauss, M.A., & Yasuda, N. 2002, SPIE, 4836, 350
- [44] Mannery E.J., Siegmund W.A., Balick B., and Gunnels S., 1986a, in Advanced Technology Optical Telescopes III, L.D. Barr, Ed., Proc. SPIE 628, 397.
- [45] Mannery E.J., Siegmund W.A., Balick B., and Gunnels S., 1986b, in Advanced Technology Optical Telescopes III, L.D. Barr, Ed., Proc. SPIE 628, 390.
- McCall & Siegmund [1994] McCall, S.H.C.P., & Siegmund, W.A. 1994, SPIE, 2198, 1385
- McGehee et al. [2002] McGehee, P.M., Brinkmann, J, Rockosi, C.M. et al. 2002, in SPIE Advanced Telescope and Instrumentation Control Software II, H. Lewis, ed. Proc. SPIE, 4848, 156
- Miknaitis and Krisciunas [2001] Miknaitis, G and Krisciunas, K, IAU Circular No. 7778 (19 December 2001).
- Miller, Hilyard, & Mast [1992] Miller, Joseph S.; Hilyard, David F.; Mast, Terry S. 1998, SPIE 3352 250
- Newberg et al. [2003] Newberg, H.J., et al. 2003, AAS, 203, 112.11
- Owen et al. [1994] Owen, R.E., Siegmund, W.A., Limmongkol, S., & Hull, C.L. 1994, Proc. SPIE, 2198, 110
- Pier et al. [2003] Pier, J.R., Munn, J.A., Hindsley, R.B., Hennessy, G.S., Kent, S.M., Lupton, R.H., & Ivezić, Ž., 2003, AJ, 125, 1559
- Pompea & Breault [1995] Pompea, S.M, & Breault, R.P. 1995, in Handbook of Optics, M. Bass, Ed., (McGraw-Hill: New York), p. 37.22
- Richards et al. [2001] Richards, Gordon, et al. 2001 AJ, 123, 2945
- Schier [1990] Schier J.A., 1990, “Torque Perturbations in the Magellan Main Drive Motors”, Magellan Project Report No. 16.
- Schlegel et al. [2003] Schlegel, D.J., Padmanabhan, N., Finkbeiner, D.P., Blanton, M.R., Eisenstein, D.J., Hogg, D.W., & Seljak, U. 2003, AAS, 203, 145.03
- Schmidt et al. [1986] Schmidt, M., Schneider, D.P., and Gunn, J.E. 1986, ApJ, 310, 518
- Siegmund et al. [1998] Siegmund, W.A., Limmongkol, S., Hull, C., & Milsom, D. 1998, in Advanced Techology Optical Telescopes VI, L.M. Stepp, Ed., Proc. SPIE, 3352, 653
- Siegmund, Stepp & Lauroesch [1990] Siegmund, W.A., Stepp, L.M. and Lauroesch, J., 1990, in Advanced Technology Optical Telescopes IV, L.D. Barr, Ed., Proc. SPIE 1236, 834.
- Smith et al. [2002] Smith, J.A., Tucker, D.L., Kent, S.M. et al. 2002, AJ, 123, 2121
- Smith et al. [2003] Smith, J.A., Tucker, D.L., Allam, S.S., & Rodgers, C.T. 2003, AJ, 126, 2037
- Strauss et al. [2002] Strauss, M.A., Weinberg, D.H., Lupton, R.H., et al. 2002, AJ, 124, 1810
- Tucker et al. [2005] Tucker, D.L., Kent, S.M., Richmond, M.W., et al. 2005, in preparation
- Ulich [1988] Ulich B.L., 1988, in Acquisition, Tracking, and Pointing II, Proc. SPIE 887, 22.
- Uomoto et al. [1999] Uomoto, A., Smee, S., Rockosi, C., Burles, S., Pope, A., Friedman, S., Brinkmann, J., Gunn, J.E., & Nichols, R. 1999, AAS, 195, 8701
- Waddell et al. [1998] Waddell, P., Mannery, E.J., Gunn, J.E., & Kent, S.M. 1998, SPIE, 3352, 742
- Yanny et al. [2003] Yanny, M., Newberg, H.J., Grebel, E.K., et al. 2003, ApJ, 588, 824
- York et al. [2000] York, D.G., Adelman, J., Anderson, J., et al. 2000, AJ, 120, 1579
- Zacharias et al. [2004] Zacharias, N., Urban, S.E., Zacharias, M.I., Wycoff, G.L., Hall, D.M., Monet, D.G., & Rafferty, T.J. 2004, AJ, 127, 3043
| TABLE 1 | |||||||||
| The Optical Design for the SDSS Telescope: Camera Mode | |||||||||
| Space | Clear | ||||||||
| Sur | c | mm | Glass | Diam | |||||
| 1 | 8.889e-5 | -air | 3.81e-22 | 1.52e-29 | - | 2500 | |||
| 2 | 1.390e-4 | air | 1.79e-19 | 1080 | |||||
| 3 | fq | 2.321e-5 | 1.173e-10 | 7.87e-17 | 1.59e-22 | 722 | |||
| 4 | air | 721 | |||||||
| 5 | fq | 2.732e-4 | 2.056e-9 | 5.81e-15 | 1.75e-20 | 657 | |||
| 6 | bk7 | 652 | |||||||
| 7 | air | 651 | |||||||
| 8 | air | 651 | |||||||
Column Notes: = curvature, = conic constants. See text for details.
| TABLE 2 | |||||||||
| The Optical Design for the SDSS Telescope: Spectroscopic Mode | |||||||||
| Space | Clear | ||||||||
| Sur | c | mm | Glass | Diam | |||||
| 1 | 8.889e-5 | -air | 3.81e-22 | 1.52e-29 | 2500 | ||||
| 2 | 1.390e-4 | - | air | 1.79e-19 | 1080 | ||||
| 3 | fq | 2.321e-5 | 1.173e-10 | 7.87e-17 | 1.59e-22 | 722 | |||
| 4 | air | 721 | |||||||
| 5 | 4.307e-4 | fq | 657 | ||||||
| 6 | air | 7.747e-5 | 4.123e-10 | 6.53e-15 | 5.23e-20 | 656 | |||
| 7 | air | 653 | |||||||
Column Notes: = curvature, = conic constants. See text for details. TABLE 3 Telescope Optical Performance for the Imaging Mode: Parameters for Best Focus Angle Angle arcmin Å mm mm mm arcmin Å mm mm mm 0.00 3540 0.017 0.00 7690 0.018 30.00 3540 0.014 30.00 7690 0.018 45.00 3540 0.013 45.00 7690 0.020 60.00 3540 0.019 60.00 7690 0.024 70.00 3540 0.027 70.00 7690 0.029 *73.00 3540 0.030 73.00 7690 0.031 *82.00 3540 0.037 *82.00 7690 0.038 *90.00 3540 0.043 *90.00 7690 0.048 0.00 4760 0.018 0.00 9250 0.018 30.00 4760 0.015 30.00 9250 0.019 45.00 4760 0.013 45.00 9250 0.022 60.00 4760 0.010 60.00 9250 0.028 70.00 4760 0.011 70.00 9250 0.034 73.00 4760 0.011 73.00 9250 0.036 82.00 4760 0.015 *82.00 9250 0.045 *90.00 4760 0.021 *90.00 9250 0.057 0.00 6280 0.018 30.00 6280 0.017 45.00 6280 0.017 60.00 6280 0.019 70.00 6280 0.022 73.00 6280 0.023 82.00 6280 0.029 *90.00 6280 0.037
∗ These field angles/color values are not reached for the photometric array. TABLE 4 Imaging Focal Surface ( = 4760 Å) Angle ht lindev arcmin mm mm mm 0.0 30.0 45.0 60.0 70.0 73.0 82.0 90.0
Note: Scale=3.61519 mm arcmin-1
| TABLE 5 | ||||||||||||
| Telescope Optical Performance for the Spectrographic Mode: Average Focus | ||||||||||||
| Angle | Angle | |||||||||||
| arcmin | Å | mm | mm | mm | mm | arcmin | Å | mm | mm | mm | mm | |
| 0.00 | 4000 | -0.135 | 0.036 | 0.00 | 6500 | 0.062 | 0.031 | |||||
| 30.00 | 4000 | -0.081 | 0.030 | 30.00 | 6500 | 0.037 | 0.027 | |||||
| 45.00 | 4000 | -0.015 | 0.025 | 45.00 | 6500 | 0.007 | 0.024 | |||||
| 60.00 | 4000 | 0.076 | 0.028 | 60.00 | 6500 | -0.035 | 0.029 | |||||
| 70.00 | 4000 | 0.148 | 0.036 | 70.00 | 6500 | -0.068 | 0.034 | |||||
| 80.00 | 4000 | 0.231 | 0.049 | 80.00 | 6500 | -0.106 | 0.036 | |||||
| 90.00 | 4000 | 0.325 | 0.065 | 90.00 | 6500 | -0.149 | 0.040 | |||||
| 0.00 | 4600 | -0.058 | 0.031 | 0.00 | 9000 | 0.131 | 0.036 | |||||
| 30.00 | 4600 | -0.035 | 0.027 | 30.00 | 9000 | 0.078 | 0.029 | |||||
| 45.00 | 4600 | -0.006 | 0.024 | 45.00 | 9000 | 0.014 | 0.026 | |||||
| 60.00 | 4600 | 0.033 | 0.025 | 60.00 | 9000 | -0.074 | 0.036 | |||||
| 70.00 | 4600 | 0.065 | 0.027 | 70.00 | 9000 | -0.145 | 0.046 | |||||
| 80.00 | 4600 | 0.101 | 0.030 | 80.00 | 9000 | -0.226 | 0.056 | |||||
| 90.00 | 4600 | 0.141 | 0.035 | 90.00 | 9000 | -0.317 | 0.068 | |||||
| 0.00 | 5300 | 0.000 | 0.029 | |||||||||
| 30.00 | 5300 | 0.000 | 0.026 | |||||||||
| 45.00 | 5300 | 0.000 | 0.024 | |||||||||
| 60.00 | 5300 | 0.000 | 0.025 | |||||||||
| 70.00 | 5300 | 0.000 | 0.027 | |||||||||
| 80.00 | 5300 | 0.000 | 0.026 | |||||||||
| 90.00 | 5300 | 0.000 | 0.025 | |||||||||
| TABLE 6 | |||||
| Average Focal Surface | |||||
| Angle | Focus | ||||
| arcmin | mm | mm | mm | rad | rad |
| 0.0 | |||||
| 30.0 | |||||
| 45.0 | |||||
| 60.0 | |||||
| 70.0 | |||||
| 80.0 | |||||
| 90.0 | |||||
Note: scale=3.62730 mm arcmin-1; mean exit pupil at 5174 mm

