Presenter: A.C. Rovero (rovero@iafe.uba.ar), arg-rovero-AC-abs1-he15-poster
Absolute Calibration of the Auger Fluorescence Detectors
Abstract
Absolute calibration of the Pierre Auger Observatory fluorescence detectors uses a light source at the telescope aperture. The technique accounts for the combined effects of all detector components in a single measurement. The calibrated 2.5 m diameter light source fills the aperture, providing uniform illumination to each pixel. The known flux from the light source and the response of the acquisition system give the required calibration for each pixel. In the lab, light source uniformity is studied using CCD images and the intensity is measured relative to NIST-calibrated photodiodes. Overall uncertainties are presently 12%, and are dominated by systematics.
1 Introduction
The reconstruction of air shower longitudinal profiles and the ability to determine the total energy of a reconstructed shower depend on being able to convert ADC counts to a light flux at the aperture for each channel that receives a portion of the signal from a shower. To achieve this objective, it is necessary to have some method for evaluating the response of each pixel to a given flux of incident photons from the solid angle covered by that pixel, including effects of aperture projection, optical filter transmittance, reflection at optical surfaces, mirror reflectivity, pixel light collection efficiency and area, cathode quantum efficiency, PMT gain, pre-amp and amplifier gains, and digital conversion.
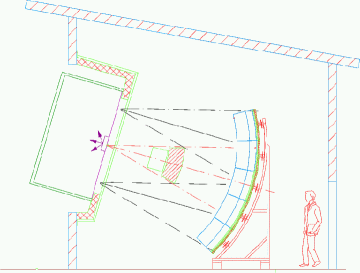
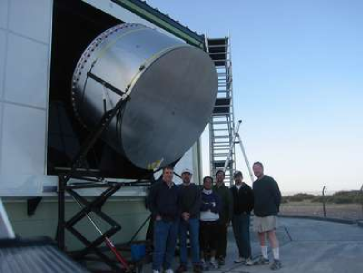
While this response could be assembled from independently measured quantities for each of these effects, the Auger FD calibration group is using an alternative method in which the cumulative effect is measured in a single end-to-end calibration. The technique is based on a portable 2.5 m diameter drum-shaped light source which mounts on the exterior of the FD apertures (see Fig. 1), providing a pulsed photon flux of known intensity and uniformity across the aperture and simultaneously triggering all the pixels in the camera.
The absolute calibration of the drum light source intensity is based on a set of UV enhanced Si photodetectors, calibrated at NIST [1]. While the small surface area and low response of these detectors preclude detection of the small photon flux from the drum surface directly, the NIST calibration can be transferred to a more sensitive PMT/DAQ system. Prototype work is described in Ref. [2]; the current procedure is presented here, including a more direct calibration of the drum intensity.
Ideally, this calibration would occur at many wavelengths in the N2 spectrum, between 300 and 400 nm, and at several intensities. At present, the system is single-wavelength, using UV LEDs emitting in a narrow band around 375 nm. Modifications to the present system are under construction to allow multi-wavelength calibration, using a Xenon light source, light guide and bandpass filters.
2 Light source and drum
The light source consists of a pair of pulsed UV LEDs [3] ( nm) mounted coaxially in a 2.5 cm diameter x 2.5 cm long teflon cylinder. A silicon detector attached to the end of the cylinder monitors the relative light output for each pulse of the LEDs. This source is mounted in a 15 cm diameter reflector cup.
The cup is mounted flush to the center of the drum front surface, illuminating the interior of the 2.5 m diameter cylindrical drum, 1.4 m deep. The lightweight drum, shown in Fig. 1, was constructed in sections, using laminations of honeycomb core and aluminum sheet. The sides and back surfaces of the drum interior are lined with Tyvek, a material diffusively reflective in the UV. The front face of the drum is a 0.38 mm thick Teflon sheet, which transmits light diffusively.
3 Drum relative uniformity measurements
Uniformity of light emission from the drum surface is important, since the pixels in an Auger fluorescence detector camera view the aperture at varying angles. In addition, for each pixel, a different part of the aperture is blocked by the camera itself. So studies were made of uniformity of emission across the surface and as a function of viewing angle.
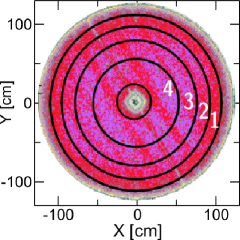
These uniformity measurements were made using a CCD, viewing the emitting surface of the drum from a distance of 14 m (see Fig. 2). Images were recorded with the drum axis at angles of 0, 10, 20 and 25 degrees relative to the CCD axis, covering the range of the Auger telescope field of view (0–210). For these images, the UV LEDs were powered continuously.
The 00 image was used to analyze the uniformity of emission over the drum surface. Using software, concentric circles were drawn on the image, defining annular regions of increasing radius, as shown in the figure. The intensity of the pixels in each region was analyzed to obtain the intensity as a function of radius. In the area defined by the 2.2 m aperture radius, the relative uniformity of intensity is constant over the area to about 2%. The variation with viewing angle of a section of the drum image is also shown in Fig. 2.
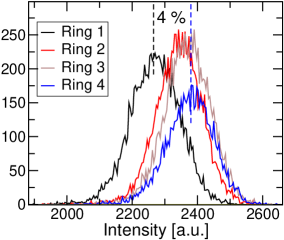
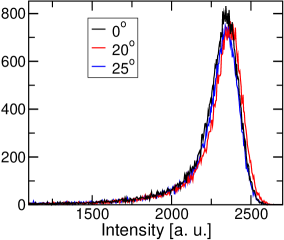
The fact that the drum intensity decreases at larger radii and that the area viewed decreases as cos with viewing angle is partly compensated for by the location of the camera shadow for pixels in different parts of the camera. Central pixels view the fuller 00 area but the more intense center of the drum is shadowed; large angle pixels and those in the corners of the camera see a reduced area, but the camera shadow moves off-center, exposing more of the brighter drum center.
The small drum non-uniformities that are measured (diagonal stripes in Fig. 2, intensity decrease with radius, etc.) indicate that the FD pixels see similar intensities integrated over the drum surface. While perfect drum uniformity is desirable, non–uniformities which are small and well mapped over the surface of the drum are acceptable. A ray-tracing program using the uniformity and angular intensity information from the CCD images shows less than 1% variation in total flux seen by the pixels, and corrections are applied for these variations.
4 Drum calibration
To establish the absolute flux of photons emitted from the drum surface, a reference PMT is placed on the drum axis, 14 m from the surface. The LED light source in the drum is pulsed for a series of 5 s pulses and the charge from the PMT is integrated and recorded for each pulse, resulting in a histogram of the distribution of the observed integrated flux.
On an optical bench, the PMT is then exposed to a small diffuse LED light source of adjustable intensity similar to that of the drum. The LEDs are pulsed with the same driving circuitry as for the drum, and the intensity is set to a series of values producing a series of histograms with centroids surrounding that from the drum measurement, above. At each of these intensity settings a second measurement is made in which the PMT is replaced by the NIST-calibrated photodiode and a neutral density filter in the source is removed, increasing the intensity to a level measurable by the photodiode. For this second measurement, the LEDs are run in DC mode. The relationship of PMT response to photodiode current is found to be very linear. The flux of photons at 14 m from the drum surface is then calculable from the active area of the photodiode, the neutral density filter reduction factor, the LED pulsed/DC duty factor, the NIST calibration for the photodiode, and the value of photodiode current corresponding to the PMT-drum centroid, as interpolated from the linear response-current relationship above.
5 Calibration Results
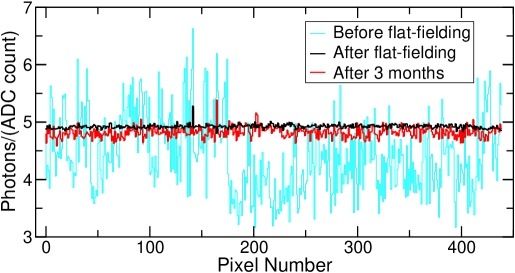
Use of the drum for gain adjustment and calibration provides a known, uniform response for each pixel in a detector as shown for one camera in Fig. 3. The typical sensitivity for Auger FD pixels is approximately 5 photons per ADC count. At present, the absolute calibration is performed every three months. The long-term variations of camera response are typically within 2% of the calibration and are associated with several factors, including gain shifts due to PMT exposure to varying night sky intensities during the previous few nights of data taking. These small variations in pixel response are tracked several times per night by a relative calibration system, and appropriate corrections for each pixel are entered daily in the analysis database (see associated Auger paper in this ICRC [4]). The absolute calibration as described here has been checked for some pixels using remote laser shots at 337 and 355 nm [5].
Several effects on the calibration have been studied, including:
-
•
Reflections from detector components back to the drum emitting surface when the drum is mounted in the aperture, making the surface brighter than when calibrated in the lab. This is dominated by reflections from the UV filter back to the teflon face of the drum. This is a 4% effect, with a 1% uncertainty.
-
•
Temperature variations between calibration lab and FD apertures. LED intensity, electronics, and monitoring equipment are all temperature sensitive. Varying effect; 3% uncertainty.
-
•
Shape of LED light emission pulse. Pulsed LED duty factor compared to measured DC intensity is a component of the calibration calculation. This is a 2% effect; 1% uncertainty.
While the general technique of Auger FD calibration is now well established, the equipment and detailed procedures are still evolving. Recent improvements of the lab optical equipment will improve the overall uncertainties in the next calibration. At present, uncertainties total 12% and are dominated by contributions associated with the optical setup in the lab (10%) and a conservative estimate of the nightly variations (5%). Uncertainties of about 8% are achievable.
References
- [1] National Institute of Standards and Technology, U.S. Dept. of Commerce, Calibration Program, Gaithersburg, MD 20899-2330; NIST Special Publication 250-41, 1998.
- [2] J. Brack, R. Meyhandan, G. Hofman, J. Matthews, Astroparticle Physics 20, 653 (2004).
- [3] Nichia America Corp., NSHU550 UV LED
- [4] C. Aramo et al., ICRC 2005, ita-insolia-A-abs1-he15-poster.
- [5] Auger technical note GAP-2002-10, B. Dawson, B. Fick, J. Matthews, M. Roberts, P. Sommers, http://www.auger.org/admin/GAP_Notes/GAP2002/gap2002-010.pdf,