A Graphical-User Interface for Editing Segmentation Images
Abstract
I present a graphical-user interface for performing several image operations on segmentation maps. The package is written entirely in IDL, and is provided as source code (for those who may want to develop, link to existing packages, or reappropriate the code base) and eventually as a stand-alone, run-time executable upon request (for those without an IDL license). The software facilitates a number of operations, which are generally tedious without a graphical interface, such as deleting, merging, ungrouping, and drawing regions; erasing and painting individual pixels; and compression, dilation, and erosion of a segmentation image. The segmentation image is displayed with random RGB triplets to ensure adjacent regions are readily discernible, whereas the direct image is shown as an inverted greyscale with controls for brightness range, bias, and contrast with several scaling functions (as similar to ds9). The opacity between the segmentation and direct image is tunable, which gives full control to the image display.
1 Introduction
Image segmentation refers to the process of uniquely identifying a given pixel or set of pixels in a digital image as a member of a region. In astronomy, this notion led to the development of segmentation images (or maps) that define astrophysical sources in pixelated images. Such images are often used used to define apertures through which various measurements are made (for example brightness or center-of-mass). Therefore, it is imperative to ensure that the segmentation maps are free of pathological defects and false positives are judiciously removed.
One common tool for algorithmically creating segmentation maps is Source Extractor (SExtractor; Bertin & Arnouts, 1996), which has a host of parameters that govern the properties of the deblending of nearby sources. Although SExtractor is extremely efficient, it can often segment an image in a way far different than a human might expect or desire (notably regions near extended sources or bright point sources). But also, it is challenging to force a segmentation region without inadvertently creating many false sources. To remedy these issues, several schemes have proposed to remove extraneous sources (such as hot/cold running; Barden et al., 2012). Here, I propose an alternative paradigm: a graphical-user interface (GUI) that allows the user to directly interact with the segmentation image pixels. Although there are distinct advantages with an algorithmic approach (such as repeatability), a properly cleaned segmentation map avoids erroneous sources corrupting the aggregate properties of the sample and/or biasing measurements of other sources in the field. With these tradeoffs in mind, I expect the ideal approach is to begin with a segmentation map derived by some algorithmic means then sensibly polishing the map for clear mistakes, but primum non nocere.
This document is organized as follows: I introduce the package, including installation and functionality in § 2, I present several examples in § 3, I describe the User preferences in § 4, I present additional improvements and limitations of the current implementation in § 5, and close with a few closing remarks and waivers in § 6.
2 Segmentation Editor
2.1 Installation, Dependencies, and Calling
The GUI is entirely written in IDL111http://www.harrisgeospatial.com/SoftwareTechnology/IDL.aspx, and is installed by simply placing the directory tree in the IDL_PATH of the user. The code requires the astronomy library (AstroLib; Landsman, 1993), which can be similarly installed. The main component of SegEditor is written as a class that is instantiated from the IDL command line as:
IDL> obj=obj_new(’segeditor’,SEGFILE,IMGFILE)
where SEGFILE and IMGFILE are variables referring to the full path of the segmentation and direct image, respectively. I also provide a procedural-oriented wrapper that handles the object-oriented aspects internally. Since older versions of IDL do not explicitly destroy objects, it may be imperative to explicitly destroy the resultant object (obj in the above example). However, if the GUI is properly closed, then the object reference will also be destroyed. Therefore if SegEditor is called from an external code-base, it may be necessary to verify the object still exists (such as with obj_valid()).
2.2 Basic Functionality
The initial state of the GUI is shown in Figure 1 with data from Postman et al. (2012). There are several quick keys to execute common functions, often for the left side of the keyboard (see Table 1). However, the main controls are driven by the state of the mouse, which is dictated by toolbar along the top. These buttons are briefly described in Table 3.
| Key | Description |
|---|---|
| SPACE | Step the left-mouse state |
| d | Redisplay the image to the screen |
| u | Undo the last region manipulation, same as |
| r | Redo the last region manipulation, same as |
| q | Quit the GUI |
| Q | Force quit the GUI |
| p | Print the current image to postscript |
| Move cursor up one pixel | |
| Move cursor down one pixel | |
| Move cursor left one pixel | |
| Move cursor right one pixel |

3 Example Actions
Although it may be readily straightforward to manipulate the GUI, it may be useful to describe a few actions to begin.


 to separate the light blue region from the main pink region. Next
is to ungroup the separated blue region with the
disassociate tool
  . Finally, the
remaining light blue region can be grouped with the larger pink
region with merge tool
 .
.In Figure 2, I show an example in using SegEditor.
Here the light-blue object has been associated as a small object to
the lower right, but SExtractor identified several pixels
that probably should belong to the main galaxy to the upper left (pink
source). To reassign those pixels to the main galaxy, one can simple
erase the collection of pixels that connect the two regions with
![]() . Once the smaller object is isolated from the
erroneous pixels to the upper left, then it can be ungrouped from the
pair with
. Once the smaller object is isolated from the
erroneous pixels to the upper left, then it can be ungrouped from the
pair with ![]() and finally two bits of the main
galaxy can be merged with
and finally two bits of the main
galaxy can be merged with ![]() .
.
But it is perhaps still the case that one may wish to increase the
outer edge of the region of a source, such as that as seen for the
pink galaxy. To execute such an operation, one selects the paint tool
![]() then will click and drag to paint the pixels.
However it is important to begin the click/drag motion on the region
to be expanded (the paint tool does not paint a new region from
scratch). To draw a new region, where one was not there before, the
draw tool
then will click and drag to paint the pixels.
However it is important to begin the click/drag motion on the region
to be expanded (the paint tool does not paint a new region from
scratch). To draw a new region, where one was not there before, the
draw tool ![]() is used (see Figure 3).
Here, one clicks and drags to encompass an set of pixels (the region
is automatically closed), which will be given a unique segmentation
value (the current maximum segmentation value plus one).
is used (see Figure 3).
Here, one clicks and drags to encompass an set of pixels (the region
is automatically closed), which will be given a unique segmentation
value (the current maximum segmentation value plus one).


 .
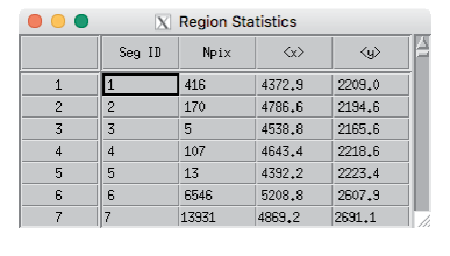
.Sometimes it is useful to identify a particular known source or scan
the segmentation for pathological issues (such as the smallest/largest
sources). Such operations are easily achievable from the tabulation
view, which is opened with ![]() . With this interface,
one can click on a column heading to sort the table by this column,
and once the data is sorted a second click will sort in reverse order.
Also, by clicking on a row header, the primary GUI will pan to the
object of interest. However it is important to note, the tabulation
GUI will not update as operations are performed in the main window.
Therefore it is imperative to refresh the table with
. With this interface,
one can click on a column heading to sort the table by this column,
and once the data is sorted a second click will sort in reverse order.
Also, by clicking on a row header, the primary GUI will pan to the
object of interest. However it is important to note, the tabulation
GUI will not update as operations are performed in the main window.
Therefore it is imperative to refresh the table with
![]() .
.

4 Preferences
There are several parameters that control the fundamental operations
of the GUI and the text displays. These can be edited with
![]() and
and ![]() , respectively.
In Table 2, I describe the meaning of most of these keywords.
, respectively.
In Table 2, I describe the meaning of most of these keywords.
| Keyword | Description |
|---|---|
| GUI Preferences |
|
| Eraser Size | eraser tool size (percent of image size) |
| Painter Size | paint tool size (percent of image size) |
| Zoom Speed | speed of the zoom for wheel motion |
| Omit Zero | flag to omit zero in range calculation |
| Min/max Method | algorithm for computing min/max |
| RA/Dec Units | units of the RA/Dec display |
| Scaling | grayscale distribution for direct image |
| Invert Colors | flag to invert the direct image |
| Range Color | color of the min/max box |
| Range Opacity | opacity of the min/max box |
| Range Linestyle | linestyle of border of the min/max box |
| RGB Number | number of cached RGB triplets $\dagger$$\dagger$footnotemark: |
| Powscl Base | base of the power-law scaling |
| Text Preferences**Other properties are ignored. |
|
| Show | flag to show the text on the screen |
| Color | RGB triplet of the text |
| Fill background | flag to display a color behind the text |
| Fill color | color of the background |

5 Additional Remarks and Functionality
I have identified a few places where the current implementation does not facilitate certain actions that a User may like. I may address these in future versions, but am willing to work with Users wishing to modify the codebase to enact these or other improvements.
- Fixed window size
-
The size of the main graphics window is fixed to facilitate performance rendering and manipulating the RGB displays, which necessitated fixing the text sizes and margins. Either of these maybe relaxed in future, but Users wishing to force a different window size can easily adjust the self.winsize in the init method of the file segeditor__define.pro. This variable is in units of screen pixels.
- Segmentation map must exist
-
I have assumed that the segmentation map exists and will be modified. However, one may prefer to start with a blank segmentation map and simply draw the entire collection of regions. If such functionality is required, then a simple workaround is to create a blank segmentation map before working with SegEditor and ensure that the world-coordinate system variables match those of the direct image. Of course, such a created image should likely have the BITPIX keyword set to an integer-like value.
- More interaction in sub-GUIs
-
There are several sub-GUIs that can be spawned from within SegEditor, however their relative interaction with the primary graphics window is quite limited. One such example of these limitation is related to the tabulation GUI, where it might be desirable to have the table update as regions are modified in the primary graphics window. Conversely, it is often advantageous to interact with segmentation map via the table (such as deleting regions in the table view). Until such changes are implemented, it is necessary to refresh the sub-GUIs and/or the primary graphics window as changes are made.
6 Coda
I hope others find this software useful, and if so, then I would gratefully appreciate a reference to this report. I encourage any Users to report bugs and/or suggestions. I distribute the software according to The MIT License.
References
- Barden et al. (2012) Barden, M., Häußler, B., Peng, C. Y., McIntosh, D. H., & Guo, Y. 2012, MNRAS, 422, 449
- Bertin & Arnouts (1996) Bertin, E. & Arnouts, S. 1996, A&AS, 117, 393
- Landsman (1993) Landsman, W. B 1993 in Astronomical Data Analysis Software and Systems II, A.S.P. Conference Series, Vol. 52, ed. R. J. Hanisch, R. J. V. Brissenden, and Jeannette Barnes, p. 246.
- Postman et al. (2012) Postman, M.; Coe, D.; Benítez, N.; et al. 2012, ApJS, 199, 25
| Name | Description | |
|---|---|---|
| File Controls | ||
| New | delete all segmentation regions | |
| Save | save the current segmentation map | |
| Preferences | ||
| Image Prefs | edit the image properties | |
| Text Prefs | edit the properites of the text displays | |
| Undo/Redo | ||
| Undo | undo the last region manipulation | |
| Clear History | delete the cache of undo/redo commands | |
| Redo | redo the last region manipulation | |
| Left Mouse Button Control | ||
| Default | basic cursor state for pan, zoom, and pixel values | |
| Delete | left click to delete a region | |
| Merge | left click and drag to merge two regions | |
| Erase | left click and drag to erase segmentation regions under the cursor | |
| Draw | left click and drag to draw a new segmentation region | |
| Unmerge | left click to unmerge a region from a parent | |
| Paint | left click and drag to paint the current segmentation region on the image | |
| Range | left click and drag to draw a box and compute min/max range from pixels inside the box | |
| Right Mouse Button | ||
| Scale | toggle controls right mouse button (engaged: opacity between images, disengaged: ds9-like scaling) | |
| Miscellaneous Controls | ||
| Tabulate | view the region properties in a tabular format | |
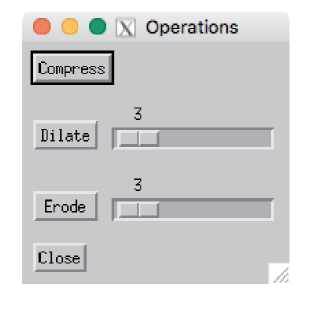
| Operations | open a sub-GUI for basic image operations (see Figure 5) | |
| Random RGBs | set a unique set of random RGB triplets for the segmentation map | |
| Help | open a basic help display | |