∎
99institutetext: Ulrich Hopp 1010institutetext: Ralf Bender 1111institutetext: Stella Seitz 1212institutetext: Max Planck Institut für Extraterrestrische Physik, Giessenbachstr., D85748 Garching, Germany
1212email: kosyra@usm.uni-muenchen.de
The 64 Mpixel wide field imager for the Wendelstein 2m Telescope: Design and Calibration
To appear in Springer Experimental Astronomy)
Abstract
The Wendelstein Observatory of Ludwig Maximilians University of Munich has recently been upgraded with a modern 2m robotic telescope. One Nasmyth port of the telescope has been equipped with a wide-field corrector which preserves the excellent image quality ( median seeing) of the site (Hopp et al., 2008) over a field of view of 0.7 degrees diameter. The available field is imaged by an optical imager (WWFI, the Wendelstein Wide Field Imager) built around a customized mosaic of m e2v CCDs from Spectral Instruments. This paper provides an overview of the design and the WWFI’s performance. We summarize the system mechanics (including a structural analysis), the electronics (and its electromagnetic interference (EMI) protection) and the control software. We discuss in detail detector system parameters, i.e. gain and readout noise, quantum efficiency as well as charge transfer efficiency (CTE) and persistent charges. First on sky tests yield overall good predictability of system throughput based on lab measurements.
Keywords:
Astronomical instrumentationInstrumentation: detectors Telescopes Charge coupled devicespapertype:
generic article1 Introduction

The Wendelstein Wide Field Imager (WWFI) was chosen as the scientific first light instrument for the new Fraunhofer Telescope 111 Fraunhofer Telescope was built by Kayser-Threde GmbH, Munich and Astelco Systems GmbH, Martinsried for two reasons. First, it should support the tedious alignment of the very compact optical system of the telescope, and second, it should provide early science verification during telescope commissioning with a number of projects we were already pursuing. These projects were: Difference imaging of Local Group galaxies to search for variables and microlensing events (e.g. Lee et al., 2012; Kodric et al., 2013), planet transit analyses (e.g. Koppenhoefer et al., 2013), surface photometry of galaxies (e.g. Kormendy & Bender, 2012) and weak lensing mass estimates for galaxy clusters (e.g. Gruen et al., 2013).
In Sect. 2 we present an overview of the optical and mechanical layout with the camera subcomponents, as well as the electrical and software design of the WWFI. In Sect. 3 we describe all measurements that have been performed in the laboratory to characterize the most important parameters of the detector system: Gains, the detectors’ quantum efficiencies (QE), the readout noises, the charge transfer efficiencies as well as the characteristics of charge persistence of the CCDs are derived from those data. We also compare our results of combined lab efficiency measurements of all optical elements and detectors with on sky commissioning observations of globular cluster Messier 13 and three standard star fields from the Landolt catalog (Landolt, 1973, 1983, 1992, 2009). In Sect. 4 we compare our system to ESO OmegaCAM (Iwert et al., 2006) and ESO WFI (Baade et al., 1999) and conclude with a summary of our results in Sect. 5.
Fig. 1 shows an image of the WWFI mounted at the wide-field port of the Fraunhofer Telescope, and Fig. 2 shows images of the fully assembled camera including filter wheels and EMI shielding in the laboratory and a close-up on the WWFI cabling and electronics. Table 1 gives an overview of the most important camera parameters.


| Global parameters | |
|---|---|
| Size (envelope) | m radius and depth cylinder |
| Mass | kg |
| Operating temperature | C C |
| Power consumption | kW |
| Optical parameters | |
| Telescope aperture | 2.0 m |
| F-ratio | 7.8 |
| Field of view | (27.6x29.0) arcmin2 |
| Pixel scale | 0.2 arcsecpixel |
| Gaps | and |
| Mosaic alignment | |
| Field distortion | |
| Wavelength range | nm nm |
| Guiding FOV | arcmin |
| Main detector system parameters | |
| SI900 Mosaic | e2v 231-84 type |
| deep depletion CCDs | |
| Readout time | 8.5 s at 500 kHz, |
| (4 ports per CCD) | 40 s at 100 kHz |
| Readout noise | at 500 kHz, |
| at 100 kHz | |
| Gain | ADU at 500 kHz, |
| ADU at 100 kHz | |
| Dark Current | h / pix |
| (at C) | |
| Dynamical range | 16 bit |
| Full well capacity | k pix |
| Peak QE | 0.9 |
2 Components of the WWFI

2.1 Optics and detector systems
The WWFI is built around the wide field corrector optics, which was
integral part of the Fraunhofer Telescope package, and a Spectral
Instruments 900 series detector system (SI900222SI900 is a trademark by Spectral Instruments
Inc., Tucson, USA).
The optical design is based on a three elements transmissive field
corrector optics and a mandatory 15 mm silica plate (or equivalent)
for filters.
The field corrector is split into a lens doublet directly attached to the
telescope flange and a field flattener lens333The field flattener was produced by POG Präzisionsoptik Gera GmbH, Germany
which also serves as entrance window of the detector dewar.
The system is designed to yield diffraction-limited images within
optical wavebands (Hopp et al., 2010; Gössl et al., 2010).
To map the good to excellent seeing quality of the site
( median, up to at best, Hopp et al., 2008), a
sampling of arcsec pixels is required which is realized by a
mosaic of k m pixel, back-illuminated e2v
CCDs444The CCDs are a trademark of e2v Inc, Chelmsford, Essex, England.
The SI900 is a state-of-the-art scientific CCD system (see basic
parameters in table 1 and detailed discussion in
subsections of Sect. 3).
The system employs active cooling of the mosaic with two Polycold PCC
Compact Coolers555Polycold PCC Compact Cooler is a trademark of Brooks Automation Inc, Chelmsford, USA.
The PCC compressors are offloaded into a separate cabinet and supply
the refrigerant by 23 m long lines which run through the telescope
cable wrap.
The two offset guiding units pick off their light after the corrector
doublet (still in front of the main detector shutter).
While this gives partly vignetted, non-flat image planes it is easily
still good enough for guiding and allows for guide star
acquisition / guiding to be done independently from the main
shutter/filter/detector system.
We cannibalized the CCD cameras of a previous project666I.e. AMiGo, a two channel CCD-camera for the former
80 cm telescope of the Wendelstein Observatory (Gössl, 2007).,
two Fingerlake Instruments Microline ML3041, for guiding cameras in
the WWFI.
Both cameras have k)2, m pixel, back illuminated
Fairchild CCDs 3041, use thermoelectric cooling for the detector and
had their air cooled heat sinks replaced by water cooled ones.
2.2 Mechanics and structural analysis


The mechanical design of the WWFI had to follow basic constraints derived from the optical design and the observatory environment:
-
•
It must fit inside a cylindrical volume with 1 m depth and radius and have its mass not exceeding 350 kg.
-
•
The camera has to operate at environment temperatures from to without contributing to dome seeing.
-
•
The “truss” part of the WWFI covering the field corrector lens doublet has to be stiff enough to carry the whole instrument without significant flexure.
-
•
A tilt of the image plane can not be accepted while some minor shift of the image plane during rotation will have no discernable impact on image quality.
-
•
Since we aim at robotic operations the WWFI should provide more than 10 filter slots.
-
•
An effective EMI protection is mandatory for any electronics to work due to the emissions of the close by radio transmitter.
-
•
Two off axis guiding cameras are needed to provide sufficient field and “lever” to correct for tracking errors of the telescope and its field derotator.
Our design solution aligns the corrector lens doublet, the double off-axis guiding units, a Bonn Shutter (Reif et al., 2005), two large filter wheels, and the SI900 detector system in a row (see Fig. 3). The instrument envelope is designed to act as an effective electromagnetic interference protection against the 0.5 MW emissions of a nearby radio transmitter. The complete mechanical design is shown in figure 4.
The WWFI is divided into three sections: An aluminum cast cone with eight struts directly casted to it and a m diameter mount plate enclose the first volume. The stiff cone covers the corrector lens doublet frame and has a small aperture which fits to the derotator flange and a large aperture which can sustain the rest of the camera components. The struts form a “Semi- Serrurier” configuration which avoids tilts against the optical axis of the subsequent components and are massive enough to allow only for minor shifts perpendicular to the optical axis (Fig. 5). The telescope side of the mount plate carries the 200 mm Bonn Shutter777Bonn Shutters (Reif et al., 2005) are widely used for large format astronomical CCD cameras, e.g. ESO OmegaCAM (Iwert et al., 2006), Pan-STARRS-1 Gigapixel Camera (Tonry et al., 2007). Their simple and compact twin blade design yields uniform, “photometric” exposures even for short exposures (1 ms).and, on top of that, two offset guiding stages. The guiding stages each support a pick-off mirror and an FLI Microline 3041 CCD camera888FLI Microline 3041 is a trademark of Finger Lakes Instrumentation, New York, USA in a cardanic mount for manual tip/tilt adjustment on a motorized linear stage999The linear stages were produced by Franke GmbH, Aalen, Germany for independent focusing. The linear stages are driven by stepper motors connected to ball screws and allow for a travel range of 40 mm. A precise MYCOM limit switch101010The precision switches were produced by MYCOM AG, Berlin, Germany is used as reference for initialization; counting motor steps gives the relative position.
The second volume holds two eight-position filter wheels in between the guider/shutter mount plate and a second mount plate for the SI900 detector system and the electronics. There are 14 slots for filters as one empty slot is needed in each wheel. The first wheel (next to the science camera) is already equipped with an SDSS filter set (, Fukugita et al., 1996). The size of the filters is mm in the first and mm in the second filter wheel (as the distance from the second wheel to the focal plane is slightly larger). For now we have also installed a black metal sheet filter in each wheel to allow for additional stray light and EMI tests. The plates are attached to each other with four short thick “tubes”. Two of these contain shafts for the bearings that hold the wheels, all four can be used to feed support lines from the last section through to the first. For a repeatable positioning of the filters we employ a notch mechanism. The wheels are driven by stepper motors attached to a gearbox with a gear ratio of 12:1 which provides the torque needed to drive the system. We installed two “limit” switches to get information about the position of the notch itself (notch in the groove or not) and one extra switch to define a reference position111111See next Sect. for details on drive logics..
The backside of the second plate carries the camera head and all electronics121212I.e. power supplies, RS232 to Ethernet converters, thermostats, switches, motor controllers, compressor relays, and embedded control PCs. needed to drive and control the WWFI components. The back focus tolerance of the telescope optical design was . Therefore, and to allow for less tight tolerances when machining the mechanical parts, we mounted the camera head with a manual 5-axis (tip/tilt and x, y, z translation) stage onto the plate. This electronics volume is insulated with Armaflex131313Armaflex is a trademark of Armacell GmbH, Münster, Germany and cooled by two liquid-to-air heat exchangers from Thermatron Engineering Inc. to minimize the contribution to dome seeing of the instrument.
We also did a finite element method (FEM) analysis of the WWFI to have a look at the Eigenfrequencies and bending behavior. Because all telescope axes (azimuth, elevation and both derotators) are driven by direct drives we had to make sure that the Eigenfrequencies of the structural parts are high enough ( Hz), to lower the risk of mechanical oscillations induced by the direct drive controllers. Because of the complexity of the model, the FEM analysis was split into several steps. First we had a look at subassemblies as the guider mechanism or the heat exchanger mounts. When the FEM model showed that the Eigenfrequencies are high enough, we integrated the part only as mass point in the complete FEM model of the WWFI. This helped to keep the complexity small enough to have reasonable calculation times. Only the electronics mounts and one sheet metal of the EMI housing that covers the electronics and camera head showed Eigenfrequencies low enough to possibly get excited. The sheet metal was damped by the Armaflex insulation we attached to it. We haven’t encountered any problems yet with this part. We also put some Armaflex insulation beneath the electronics mounts to have a soft connection to the stiff structure. The lowest Eigenfrequency of the supporting structure was found at 83 Hz (see Fig. 5).
The other value we were interested in was the bending behavior. For this we used the same FEM model as for the Eigenfrequencies, because everything necessary was already implemented there (mass points for subassemblies, connections, mesh). The only thing that needed to be done was switching on gravity in different directions to get the bending behavior. We were especially interested in the differential bending between the detector surface and the guider, because of its impact on guiding performance. The differential translation we found was negligibly small. The maximum total translation at the camera surface was around m (see Fig. 5).
2.3 EMI covers
The covers of the WWFI not only serve as a shield from light but also from EMI (electromagnetic interference) due to a close by radio transmitter station. The camera has to work within fields V/m. Without an effective shield the detector displays enhanced noise (Sect. 3.3) and the motor controllers for the filter wheels and offset guider focus movement just do not work at all. (They pick up too much interference from the lines to the limit/position switches to boot properly.) The 5-part cover is built from chromated aluminum sheets screwed and conductively glued onto a minimal truss. High conductivity glues have about 80% filling of silver (or a similar conductive metal) and therefore are not adhesive enough without the additional screws to hold the sheets in place. The “sharp” edges of the covers slide into light traps with conductive lip seals. The only electric lines into the camera are shielded and filtered power lines; network connection is established via optical fiber link. Hierarchized thermal switches protect the electronics from overheating in case of a cooling failure.
2.4 Software and control
The WWFI control software has to support and combine the different proprietary interfaces of its hardware components: The SI900 is controlled through a Windows graphical user interface (GUI, based on LabView141414LabView is a trademark of National Instruments Corporation, Austin, USA) which offers a TCP/IP socket for “backdoor” control. The FLI MicroLine 3041 guiding cameras come with a C Developer Kit for Linux. The filter wheels and offset guiding focus work through Pollux151515Pollux Controller and Venus-2 command language are trademarks of PI miCos GmbH, Eschbach, Germany high resolution positioning controllers via the Venus-2 command language on serial interfaces (which we map to TCP/IP via Moxa NPort161616Moxa NPort is a trademark of Moxa Inc., Brea, USA). The Bonn shutter is directly controlled by an I/O signal from the camera but also offers additional controlling and surveillance options through a serial interface of its motor controller (again mapped to TCP/IP). For all four components we developed device programs which can be accessed by TCP/IP sockets and translate simple human readable commands to the explicit hardware control commands and vice versa for the messages received from the hardware. The device programs log state and optionally debug messages to a central syslog facility server which again parses a subset of those messages to provide status webpages (simple HTML) which are independent of the higher level controlling software. They also already allow for “scripted” observations which greatly enhance the efficiency of commissioning.
While the device programs were planned to map only basic functions of their respective hardware there had to be some exceptions to that rule: The motor controller of the filter wheels and its language was specifically designed for arbitrary linear movements between hard limits which is obviously almost the opposite of moving between mechanically fixed positions on a circle. Therefore, we use the position switch as a simultaneous upper/lower limit switch with the reference switch inverting the upper limit again171717Because of this the initialization run has to move “backwards”.. Now, as the switches reset the position accounting within the motor controller the device program has to count filter notches. It also has to turn off hard limits before starting moves and turn them back on while moving as active limit switches control the direction in which subsequent moves are allowed. The second exception is guiding image evaluation. As the device program already holds the images (before optionally saving them to disk) it is also the right place to evaluate them, i.e. to correct for bias / dark current, compute star positions and perform a rudimentary point spread function (PSF) analysis (second order moments). This saves bandwidth and improves performance (speeds up guiding turn around) as the higher level control instance runs on another platform.
The next layer of software represents the logically integrated WWFI control: It connects to the single device programs and again offers simple human-readable commands and messages on its TCP/IP interface to control the instrument. It allows to start / stop guiding, move filters, expose etc. while keeping track of the individual components and prohibits “stupid” mistakes (like changing filter while exposing). This layer now can not only be controlled from the command line but also via a web-browser based GUI or a robotic scheduler. Our prototype for this layer which already provides the guiding for the WWFI makes heavy use of multithreading and is implemented in Python181818Python Programming Language is a trademark of Python Software Foundation, Beaverton, USA (work in progress).
3 Calibration and commissioning
In this section we describe all laboratory measurements that we have performed with the WWFI as well as the on-sky calibration and present the results. The tests include gain, quantum efficiency, charge transfer efficiency and charge persistence measurements as well as photometric zero point calibration and an on-sky calibration with stellar spectra.
3.1 Gain


| Gain [ADU] | ||||
|---|---|---|---|---|
| CCD | 0 | 1 | 2 | 3 |
| 500 / 100 | 500 / 100 | 500 / 100 | 500 / 100 | |
| Port | [kHz] | [kHz] | [kHz] | [kHz] |
| 1 | 5.87 / 0.71 | 5.94 / 0.71 | 5.87 / 0.71 | 5.85 / 0.71 |
| 2 | 5.88 / 0.69 | 5.85 / 0.68 | 5.84 / 0.70 | 5.87 / 0.69 |
| 3 | 5.76 / 0.68 | 5.75 / 0.67 | 5.73 / 0.67 | 5.72 / 0.67 |
| 4 | 5.75 / 0.68 | 5.78 / 0.68 | 5.75 / 0.68 | 5.79 / 0.69 |
The gain of a photon collecting device is given by the ratio
| (1) |
To measure the gain factor we made use of the photon transfer gain method, as it is described in McLean (2008): In principle it would be necessary to take multiple flat field images at multiple illumination levels and measure the mean signal and noise for each and every pixel on the chip at each illumination level. Instead of analyzing each pixel in several (equally illuminated) flat field images, we take only one image per illumination level and substitute the averaging over several images by averaging over several pixels and previously removing the pixel-to-pixel variations by dividing each image by a masterflat composed of 30 single flat-field images at a signal level significantly below half well capacity. Then we determine the mean signal and variance of every image (one per illumination level). For further considerations we can neglect the readout noise as it is well below the photon noise, so the photon noise is the only source of variance left in an image with an average signal , since (with photon noise and readout noise ). Dividing this equation by the squared gain, the left hand side becomes the variance (in ADU) and since the photon noise p is equal to the square root of the signal , we get:
| (2) |
Unfortunately, the introduction of the masterflat also introduces additional photon noise. We used the method introduced in Gössl et al. (2012) to correct for this additional noise, the following description closely follows the derivation therein.
The relative noise in the final signal () is given by:
| (3) |
where is the average signal in the original exposure (index for number of the exposure), is the average signal of the masterflat and the average signal in the final image (divided by the masterflat) and the the corresponding photon noises. Since the masterflat is normalized to 1 we can assume that and use equation 2 to obtain the following equation for the gain:
| (4) |
for any indices , for all pairs of data points. The gain is now estimated via equation 4, to determine the (relative) photon noise in the masterflat via equation 2, which is then subtracted in in equation 3 to obtain the pure photon noise, corrected for the contribution of the masterflat. Figure 6 shows the photon transfer functions for the 500 kHz (top) and 100 kHz (bottom) readout mode, with blue “” for uncorrected values and red “+” for values corrected for the noise of the masterflat. The gain has finally been determined as the slope of the linear fit to the corrected values. Table 2 shows the gain for both readout modes for all ports and CCDs.
3.1.1 Relative gain calibration
While the absolute gain determination is not better than a few % we used flat-fields to adjust the gains within one detector to be consistent to each other to better than 0.05%. Usually flatfielding would take care of those minor differences as a per port individual multiplicative gain factor is applied to both flat-field and science images and therefore cancels out. But adjusting gain levels helps us overcome differential bias level fluctuations at the 0.3 level. We use clipped averages of almost adjacent rows/columns191919We used the third row/column next to the border. for correction factors. The “almost” is because the CTE (see Sect. 3.10) is affecting the last read out rows/columns enough to give overall wrong correction factors if those were used.
3.2 Bias level calibration
As mentioned before the bias level and even its offset between serial overscan202020We read three overscan regions from each port: Serial pre- and overscan, as well as parallel overscan. The serial overscan displays the smallest and most stable offset to the image region in bias and dark frames. and the image region is not stable to more than about 0.3. The resulting “small” steps between different ports within one detector can yield rather large distortions of the isophote shapes of extended objects (galaxies) which fill more than one quadrant of a detector. Since we have calibrated the gain ratios within one detector we can apply the same principle again for scientific images with big enough regions of low flux levels at the port boundaries. (For medium to higher flux levels the steps are irrelevant). Here we use median clipped averages of the directly adjacent rows/columns to derive and correct for the remaining bias offsets between the detector ports.
3.3 Readout noise
There are three types of noise present in CCD images: readout noise, photon noise and pixel noise. A detailed description of the noise types in a CCD can be found in Janesick (2001).
| Readout | Gain [/ADU] | |||
| mode | USM | SI | ||
| 500 kHz | 5.89 | |||
| 100 kHz | 0.72 | |||
| Readout | Noise [] | |||
| mode | WST | WST-shield | USM | SI |
| 500 kHz | 12.4 | 8.0 | 7.8 | 8.1 |
| 100 kHz | 3.3 | 2.2 | 2.2 | 2.4 |
The readout noise can be determined by measuring the noise of a bias frame. We did this for all 16 ports of the WWFI by determining the noise of a whole image and clipping of outliers above in order to remove defective pixels. Table 3 shows the average values of the readout noise for both readout modes measured in our lab compared to the results of the manufacturer.
The values measured in our lab are systematically lower than the ones achieved by SI. The reason for this are the slightly lower gain values we measured.
We also checked the noise difference in the laboratory and on-site with and without the electromagnetic shielding. The results show that the noise on-site is about higher due to the strong radiation and the shield mitigates this effect (for slow readout even completely). Additionally, we checked the contribution of the charge quantization to the readout noise: we found no difference in the fast readout mode, while in the slow mode we measured a quantization noise of 0.02 electrons, which is negligible for all our applications.
3.4 Quantum efficiency
The quantum efficiency (QE) of a detector is the fraction of photons incident on the surface of the device that produce charge carriers. It is measured in terms of electrons per photon and is a function of wavelength.
Next, we describe our method to measure the QE in the laboratory and compare our results for all four chips with the results obtained by the CCD manufacturer e2V.
3.4.1 The setup

Measuring the QE of a detector requires a homogeneously illuminated area at least as large as the collecting area of the detector, which in our case is . We used a 100 W white halogen lamp as source of illumination. After passing through a double-monochromator for wavelength selection, the monochromatic light is fed to an integrating sphere (via an optical fiber) which randomizes the direction of the light rays and creates a uniformly illuminated source. The flat light from the sphere passes through a tube with a diameter of 30 cm to a large darkbox where the detector is mounted at a distance that corresponds to a focal ratio of , which is the same as at the Fraunhofer telescope in order to simulate the incident angles as they are at the telescope site. A calibrated photodiode was used to measure the absolute amount of photons per unit area arriving at the camera plane in the dark box. Figure 7 shows a sketch of the integrating sphere and the darkbox.
3.4.2 Measurement
The quantum efficiency of the camera was measured in the wavelength region 340 - 1000 nm, in 20 nm steps up to 900 nm and in 50 nm steps above 900 nm. At each wavelength, five images were taken with an exposure time just high enough that the average amount of counts is something around 10000 ADU. Additionally, a single dark frame was taken for each exposure time.
3.4.3 Data analysis
The definition of the gain is given in equation 1 and the definition of the quantum efficiency of a detector is given by:
| (5) |
with (where is the power of the incident light and is the photodiode current) and the spectral response of the photodiode and the transmissivity of the entrance window we obtain:
| (6) |
Since the detection area of the photodiode () is different from the active area of a CCD-pixel () we need to multiply the equation by the ratio of the two areas:
| (7) |
Table 4 explains all parameters and quantities used in this derivation. There are two problems arising in our setup concerning the reference measurement with the photodiode: First, the measurements with the CCD and the diode should take place simultaneously, or to be more exact, the time interval between the measurements must be shorter than the time in which the illumination from the lamp changes significantly. The current-stabilized power supply of the halogen lamp provides constant illumination over a time period of a few hours, so the time interval between the measurements should be much less than that, which cannot be realized in our setup. Second, the amount of light incident at the camera plane is very low. At short wavelengths (where the spectral response of the photodiode is low) it is therefore not possible to measure a signal with the diode at all. At the surface of the integrating sphere however, the illumination is higher by approximately a factor 100. We solved these problems by measuring the diode current at the surface of the integrating sphere simultaneously with the CCD measurement. With this measurement we only determine the number of photons per unit area at the surface of the integrating sphere, but we need to know it in the plane of the camera. Now we need to measure the ratio of the illuminations in the sphere and in the camera plane, which can be done in a separate measurement, where the two values for the diode current can be taken within few minutes and thus one does not have any problem with the instability of the light source. With these two values for the diode current we generated a calibration factor that is equal to the ratio of the illuminations in the sphere and at the camera plane:
The illumination ratio can also be estimated by geometrical considerations: Let be the diameter of the tube through which the light leaves the integration sphere, denotes the diameter of the illuminated area in the camera plane, is the length of the tube and is the distance of the camera from the front wall of the dark box (see red lines and arrows in Fig. 7). All of these quantities can be measured directly except for which can be calculated: or . The illumination on the surface of the integrating sphere is proportional to while the illumination in the camera plane is proportional to , so the ratio of illuminations is equal to . With the numbers from our setup , and we get an illumination ratio of . The (wavelength-averaged) illumination ratio from our measurement is which means that we lose more than a factor 3 more light than we expect from our (simple) estimation. Remembering that inside of the sphere all angles of light rays are present, while in the camera plane there are only light rays under steep angles given by the geometry (the flat angles hit the inside of the tube which is black and will absorb the most), we can instantly say that our simple approximation underestimates the illumination ratio by an amount which is given by the geometry (i.e. the minimum acceptance angle of light rays incident at the camera plane). This ratio enters the equation for the QE as a linear factor:
| (8) |
| QE | quantum efficiency of CCD |
|---|---|
| gain (ratio of electrons per ADU) | |
| #ADU | number of analog to digital counts |
| spectral response of the photodiode in | |
| Planck’s constant | |
| speed of light | |
| current of the photo diode | |
| exposure time of the image | |
| wavelength | |
| area of one pixel | |
| area of the photodiode | |
| correction factor for the distance | |
| from the integrating sphere |
For a first guess, the calibration factor does not depend on wavelength. When looking more closely one recognizes the differences in the angle dependencies of the spectral response of the photodiode for different wavelengths, e.g. at long wavelengths the effective cross section of the diode becomes larger for flat angles, while at short wavelengths a larger fraction of the light is being reflected at the surface for flat angles. This means in our case that the calibration factor is wavelength-dependent, since inside the sphere the diode sees light coming from all angles, while in the dark box only steep angles are arriving at the diode. We tried to overcome this problem by measuring for wavelengths in between 400 nm and 1000 nm, extrapolating for wavelengths below 400 nm. In this region the diode current is of the same order of magnitude as the fluctuations of the dark current, so it is not possible to measure the light intensity directly inside the dark box.

Figure 8 shows the QE curves measured in the USM laboratory (red, green, blue, purple, for the four chips) and by the manufacturer (cyan). It can clearly be seen that our lab measurement yields a slightly higher QE than the one from e2v, nearly over the complete spectrum, which makes sense as the curve from e2v is not an individual detector measurement, but rather a minimum guaranteed curve. The only exception is at wavelengths below 400 nm, where our measurement yields lower results. These are, however, in agreement within the error margins that are much larger in this region due to the very low photodiode currents.
3.5 Filter transmission
The transmissivity of the optical filters212121The filters were manufactured by Omega Optical Inc, Brattleboro, USA (following the SDSS-system: , Fukugita et al., 1996) has also been measured in our laboratory. The measurement setup used the same light source and double monochromator described in Sect. 3.4, but this time without the integrating sphere. Instead, the light from the monochromator is illuminating the photodiode directly through the filter inside a dark box. The diode current is measured once with filter and once without filter to obtain the transmissivity. This procedure was repeated for nine different equally distributed positions on the filter, giving the average as the value for the filter transmission. The measured transmission curves are shown in Fig. 9 (green lines).
3.6 Total efficiency
In order to predict the on-sky performance of our camera, it is necessary to determine the total efficiency of the system. This includes:
-
•
Quantum efficiency of the detector (see Sect. 3.4).
-
•
Transmission curve of each filter.
-
•
Transmission of the field corrector, which consists of three lenses.
-
•
Reflectivity of the primary, secondary and tertiary mirror.
-
•
Extinction in the atmosphere, including the contributions from Rayleigh scattering, ozone absorption and aerosol scattering (Bindel, 2011).
With the total efficiency known one can calculate the number of photons incident to the Earth’s atmosphere from the number of counts in a CCD image.

Since the statistical error of our QE measurement is very large at wavelengths smaller than 400 nm (see Fig. 8) we decided to use the manufacturer’s QE below 400 nm and our own measurement above this value as the “true” QE, as displayed in Fig. 9 (blue curve). Fig. 9 shows that the QE (blue curve) of the detector is only of minor importance regarding the total efficiency, while major contributions come from the mirrors (purple curve) at long wavelengths and from the atmosphere (cyan curve) at shorter wavelengths. For the z-band, however, the total efficiency is dominated by the steeply falling QE curve.
The contribution from ozone absorption is negligible (but has been considered here), while Rayleigh and aerosol scattering both contribute a significant fraction to the total efficiency, especially at short wavelengths. Since the aerosol abundance on Mt. Wendelstein is not known, we followed Bindel (2011) and assumed that the abundance is comparable to that at Fred Lawrence Whipple Observatory on Mt. Hopkins at an altitude of 2617 m (Hayes & Latham, 1975).
Table 5 shows the limiting AB magnitudes222222Following the definition by Oke & Gunn (1983).(with apertures of ) of objects with which a signal-to-noise ratio of 5.0 can be achieved with a cumulative exposure time of (split into five exposures) taking into account all system parameters and assuming unity airmass and a PSF with FWHM of .
| waveband | |||||
|---|---|---|---|---|---|
| 0.201 | 0.363 | 0.415 | 0.325 | 0.155 | |
| night sky AB | 22.80 | 21.90 | 20.85 | 20.15 | 19.26 |
| 5.0 | 5.0 | 5.0 | 5.0 | 5.0 | |
| AB mag | 24.88 | 25.46 | 25.00 | 24.43 | 23.60 |
| zero point | 24.25 | 25.41 | 25.36 | 24.87 | 23.54 |
3.7 Photometric zero points
The photometric zero point () is the magnitude of an object that produces exactly one electron in a one second exposure in an instrument. We measured the zero point of the WWFI with the first on-sky data taken with the Wendelstein Fraunhofer Telescope of the globular cluster M13232323Exposure times M13: : 60 s, : 20 s, : 10 s, : 20 s, : 40 s, and with data from one night of the Landolt standard star fields SA95242424Exposure times SA95: : 60 s, : 10 s, : 10 s, : 10 s, : 20 s, SA97252525Exposure times SA97: : 30 s, : 10 s, : 10 s, : 10 s, : 10 s and PG0918262626Exposure times PG0918: : 60 s, : 30 s, : 30 s, : 30 s, : 30 s. In this section we describe the data analysis of the two observations, present the results, compare them to each other and compare them to theoretical predictions.
3.7.1 Zero points from M13 data
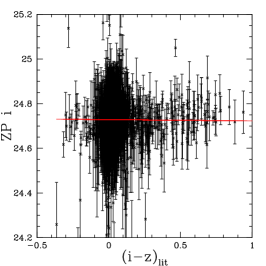
After bias subtraction and skylight flat-field calibration we used SeXtractor (Bertin & Arnouts, 1996) on our images (in , , , and band) with a detection threshold of for 4 contiguous pixels and obtained aperture magnitudes with diameter (we chose this small aperture to avoid errors induced by crowding effects, and extrapolated the magnitudes later on to an aperture of with 23 isolated bright stars in the outer region of the field).
We used the lists published by An et al. (2008) to identify and match our stars, as well as for reference magnitudes to calculate the zero point using the equation:
| (9) |
where is the magnitude from the catalog of An et al. (2008) in the AB photometric system, is the (un-calibrated) instrumental magnitude, is the airmass which was in our observation, is the atmospheric extinction coefficient, for which we took the average approximated values from Bindel (2011)272727Since we have only a single observation in each filter per airmass, we were not able to calculate the extinction., is the exposure time and is the gain of the detector (the estimated values for the extinction are given in table 6).
To minimize systematic errors we only accepted stars with:
-
•
Literature magnitude <19.
-
•
Distance from center of M13 >, in order to reject stars with bad photometry due to crowding effects in the center of the globular cluster.
-
•
Magnitude error <0.1 (from SeXtractor run).
To finally obtain the zero point in each filter we plotted the individual zero point (each star) for each filter versus a color (Fig. 10) and found that the resulting data can be fitted linearly to obtain the color term as well:
| (10) |
where is the color term and is the zero point at color 0. The color term originates from comparing non-identical filters, but since the magnitudes in the catalog from An et al. (2008) are in the SDSS AB-system, we expect the color terms to be very small (for identical systems, the color terms are equal to 0).



3.7.2 Zero points from Landolt standard star fields data
We used the Landolt standard star fields SA95, SA97 and PG0918 (Landolt, 1973, 1983, 1992, 2009) to measure the zero point again independently from the method explained above , with two exposures per filter in SA95 and SA97 each and one exposure per filter in PG0918 for a total of five airmasses for the calculation of the extinction coefficient. The procedure of data reduction and application of photometry by SeXtractor is the same as described in the previous section, with the one exception that we used aperture diameters for photometry of from start, since we did not have to deal with a crowded field here. The main advantage over the previous method is the availability of observations at multiple airmasses and thus the possibility to fit the extinction coefficient for the particular night, rather than relying on theoretical estimates for the atmospheric extinction.
The first step is to determine the extinction coefficient (in each filter) by applying a linear fit to all stars that are detected at at least two airmasses. The extinction coefficient results from a global fit to all the star multiplets simultaneously. The slope of this linear fit (in magnitude over airmass) is equal to the extinction coefficient.
We investigated the possibility of a variable extinction coefficient throughout the night by comparing the magnitudes of stars dependent on time. We found a constant extinction coefficient for each filter except the u-filter, where we estimated the systematic error from varying extinction to be 0.05 mag. We added this error to the flux error in our analysis in order to obtain a better fit for the zero point in the u-filter.
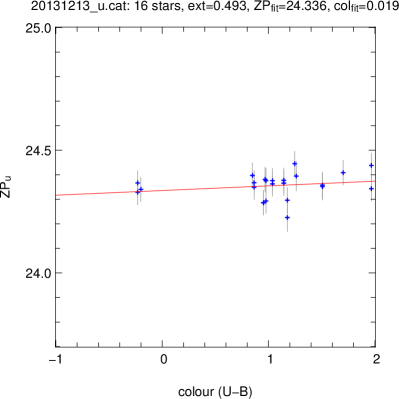
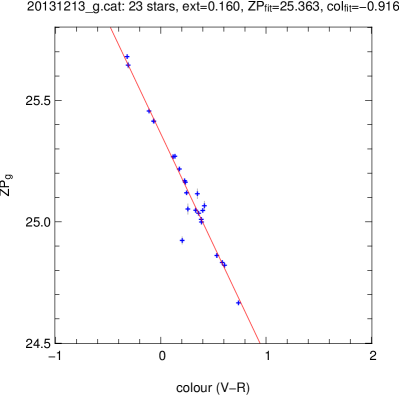
After correcting for the extinction, our photometric catalogs are matched with the standard star catalogs from Landolt (1973, 1983, 1992, 2009). Since the WWFI is using a filter set that is similar to SDSS ( Fukugita et al., 1996) and the Landolt catalog uses Johnson-Morgan (, , ) (Johnson & Morgan, 1953) and Cousins () (Cousins, 1976) filters, we have to compare our magnitudes to the literature magnitudes taken from the nearest (in terms of central wavelength) filter from the Landolt catalog, which results in larger color terms. Therefore, we compared our with , our with , our with and our with . We found that the filters are “similar enough” that a linear color term is sufficient to correct for the differences (Fig. 11). Unfortunately there is no adequate filter in the Johnson-Morgan and Cousins system to compare our filter with, so we limited this analysis to , , and . All magnitudes in the Landolt catalog, which are given in the Vega-system, have been transformed to AB-magnitudes for our analysis.
In the near future, the photometry from the PanStarrs survey will be available for most of the northern sky in the SDSS filter system, which will be a great opportunity to redo this kind of analysis without having the problem of converting between two photometric systems.
After the matching has been completed, we calculated a zero point for each matched star via Eqn. 9 and applied a linear fit to the results in dependence of color (according to Eqn. 10), in order to determine the color term and zero point at color 0. Figure 11 shows the results of the linearly fitted zero points over color, and Table 6 summaries the results of this measurement and the one from the previous section and compares them to our theoretically predicted values based on our laboratory results. Table 6 shows that there is an overall good agreement between our two measurements, the deviations are always within the margins of error. The measured and observed values are in very good in agreement in the and filter while in the filter the agreement is a little worse, most probably due to the large uncertainties in the laboratory calibration at short wavelengths arising from low illumination. In the and filters the discrepancy is still a little larger (0.14 and 0.15 respectively), and since the statistical error in in this wavelength region is small, we conclude that this arises most probably from systematic errors in the lab calibration.
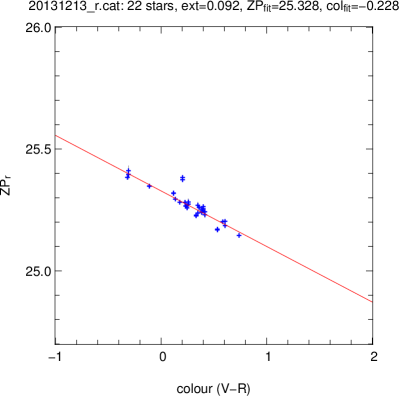
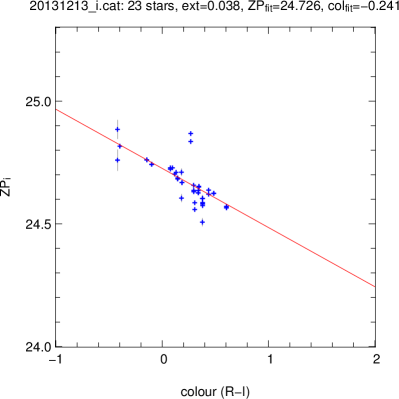
| waveband | |||||
|---|---|---|---|---|---|
| calculated | 24.25 | 25.41 | 25.36 | 24.87 | 23.96 |
| measured M13 | |||||
| M13 | |||||
| color term M13 | |||||
| color | - | - | - | - | - |
| extinct. estimated M13 | 0.56 | 0.18 | 0.10 | 0.08 | 0.07 |
| number of stars M13 | 382 | 1376 | 1482 | 1726 | 1807 |
| measured Landolt | |||||
| Landolt | |||||
| color term Landolt | 0.019 | -0.916 | -0.228 | -0.241 | |
| color | - | - | - | - | |
| extinction Landolt | 0.495 | 0.160 | 0.092 | 0.038 |
3.8 On-sky performance with stellar SEDs
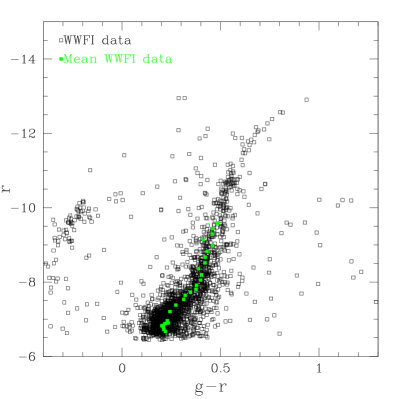
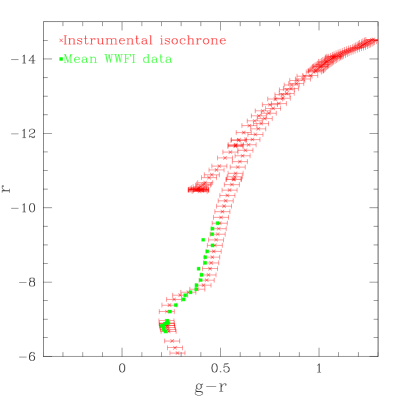
The throughput of a system is defined as the amount of photons detected by the instrument divided by the amount of photons incident at the telescope aperture in a given filter. Now we predict the instrumental magnitudes of objects in our system depending on their spectral energy distributions (SEDs). We use the same set of observations of M13 as described in Sect. 3.7, since a globular cluster is very well suited for this kind of analysis because it consists of stars of approximately the same age and metalicity, thus of the same isochrone. To obtain theoretical magnitudes for comparison we used the synthetic stellar SEDs from Kurucz ATLAS 9 [as described in Castelli et al. (1997), available on the CD-ROM No. 13 of Kurucz (1993) based on the initial grid from Kurucz (1979)] and the isochrones from Girardi et al. (2004). Since the Kurucz spectra are on a grid spaced by 0.5 in and by 250 K at low temperatures (and more coarsely at higher temperatures) it is not possible to assign a separate SED to each entry of the isochrone. Thus, we interpolated linearly in and to estimate the SED for each isochrone entry. The so found SEDs were then convolved for each filter with the instrumental efficiency curve measured in our lab (as presented in Fig. 9, red curve) to find the instrumental magnitudes these stars would have with our camera. These magnitudes were then corrected for the distance modulus of M13 ( from Buckley & Longmore, 1992) and for the interstellar extinction282828From the Schlafly & Finkbeiner (2011) recalibration of the Schlegel et al. (1998) dustmap.. These theoretical magnitudes are then plotted into a color-magnitude diagram and compared to the observational data, as shown in Fig. 12. The black empty squares in the left panel represent the observational data, the red crosses in the right panel are the expected magnitudes (based on our lab data, the Kurucz-spectra and the isochrone) and the green filled squares in both panels represent the ridgeline of the observational values. We computed the ridgeline as the color-averaged values in magnitude bins, each centered at the magnitude position of an (instrumental) isochrone data point and a bin width equal to half the difference to the neighboring isochrone data points. At the bright end of the color-magnitude diagram of the globular cluster the sequence is very sparsely populated. In this region the objects scattered around the sequence (which are in fact field stars not belonging to the globular cluster) would have a large systematic impact on the averaging process and thus making it very difficult to define a ridgeline. Due to this reason we decided to apply a magnitude cut at the bright end of the sequence (cut level depends on filter) and restricted this analysis to the region where the sequence is densely populated.
| color and | |||||
|---|---|---|---|---|---|
| waveband | |||||
| difference [mag] | 0.083 | 0.037 | 0.030 | 0.063 | 0.057 |
Table 7 shows the root mean square of the color difference between the ridgeline and the expected instrumental colors, for different combinations of colors and magnitudes. For all combinations we tested the differences are between 0.030 and 0.083.
In this section we showed how well we can predict the performance of our system using the calibration measurements in the laboratory. The numbers are compatible with the relative errors of our laboratory calibration at the corresponding wavelengths, which shows that there is no dominant systematic error. The performance of this kind of prediction can be improved by using a more sensitive lab calibration system (especially more sensitive at short wavelengths). Furthermore it would help to have observations at different airmasses at hand, in order to be able to correct for atmospheric extinction more accurately.
3.9 Charge persistence
Persistent charges, also called residual images can be divided in two different forms: Residual surface images (RSI) and residual bulk images (RBI). RBI are only caused by photons with a high penetration depth, thus they generally occur only when the chip is illuminated by radiation with wavelengths greater than 700nm. RSI can occur after illumination by any wavelengths. RSI and RBI can be distinguished by their appearance: RBI cause persistent charges only in the pixels that were illuminated, while RSI cause the complete column (parallel to the readout direction) to bleed. If one observes bleeding columns with a spot somewhere which is bleeding stronger than the rest of the columns, both RSI and RBI are present. A very detailed explanation of this effect can be read in Janesick (2001).
The detector of the WWFI is operated at a temperature of where the escape time of trapped charges should be large (Janesick & Elliott (1992) state the decay time to be exponentially dependent on chip temperature). Therefore, we have investigated whether the presence of residual images may hamper the performance of our detector.
Janesick (2001), Janesick & Elliott (1992) and Barrick et al. (2012) state that one can get rid of residual (surface) images in backside illuminated CCDs by inverting the clock voltage during readout, but unfortunately since we bought the detector system as a “black box” we have no access to the detector electronics and are not able to adjust these parameters. So we have to live with that problem and provide to the observer a useful workaround, which is what we try to do in this section.
3.9.1 Method
We used a mask with 64 small holes (hole diameter 1mm) in front of the detector and a stabilized white LED to generate defined oversaturated regions on the detector (16 per chip, 4 per port). We oversaturated the spots on the detector defined by the mask, then took a dark frame immediately afterwards and repeated this procedure 10 times (of oversaturating and taking a dark frame), where the only quantity that changes is the exposure time of the dark frame. In other words we were measuring the integrated value of decaying charges. We also took as series of real dark frames (beforehand, without residual images) for dark-subtraction. The signal in each spot has been analyzed in a pixel box, while the diameters of the spots are approximately 100 pixels. In order to characterize the effects of persistent charges, we performed several measurements with varying parameters. These parameters were:
-
•
the chip temperature,
-
•
the amount of oversaturation that we defined as the charge in units of the full-well capacity, and
-
•
the wavelength of the incident light.
3.9.2 Data analysis
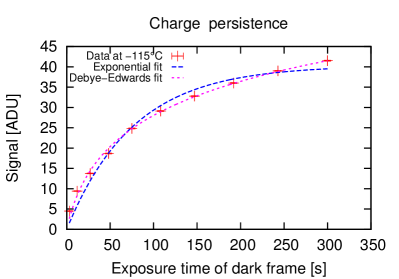
To quantify our results we plot the exposure time of the dark frame on the horizontal axis and the total charge on the vertical axis, such that the derivative of these functions represents the charge decay. We tried to fit an integrated exponential function as well as an integrated Debye-Edwards type decay function (as proposed in Barrick et al., 2012) with a power-law exponent of 1,
| (11) |
to our data, where is the decaying charge, is the amplitude, gives the variability with time and represents the contribution of the dark current to the signal. The latter is equal to 0 in our case, since we subtracted a dark frame of the same exposure time from each image.
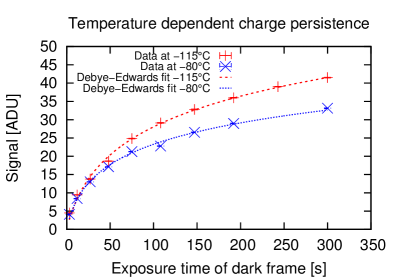
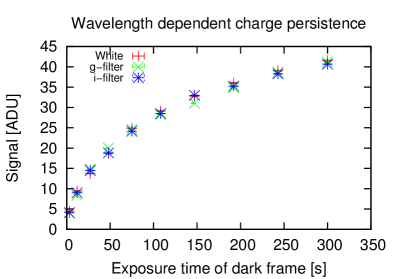
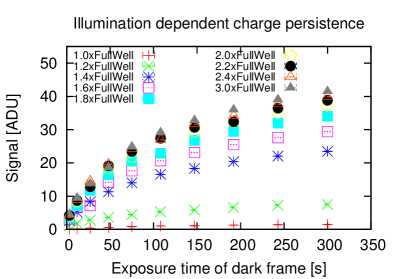
The top left plot of Fig. 13 shows the total charge in the dark frame taken directly after saturation as a function of (dark) exposure time. CCD temperature was at and the oversaturation is three times the full well capacity. The green curve shows an exponential fit and the blue curve shows a Debye-Edwards fit. Evidently, the fitting of the Debye-Edwards function works better, which tells us that the decay of the charges happens not independently for each electron, but is a function of the amount of trapped charges. We assume that the electrostatic repulsion between the trapped charges is the driving force of charge decay, but this requires further investigation. In the top right graph in Fig. 13 we show the persistent charges for (red) and (green), with the result of faster decaying charges at higher temperatures, as expected. The bottom left plot of Fig. 13 shows the persistent charges for different wavelength regions of incident light, i.e. white light, an SDSS filter and an SDSS filter292929 filter: , filter: . The result is that the charge decay is independent from the wavelength of the incident light, i.e. it does not matter how deep the radiation penetrates into the pixel. This proves that there are no residual bulk images, which should show up only in the -Filter, since only radiation with wavelengths greater than penetrates deep enough into the bulk to create them. Our result is in agreement with Janesick (2001), who states that residual bulk images do not show up in backside illuminated devices. In the bottom right graph of Fig. 13 the persistent charges are plotted for several levels of oversaturation. At light levels slightly above the full-well capacity the charge decay time is strongly dependent on the light level, with a decreasing dependence for higher illumination.
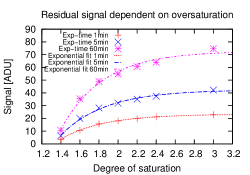
In order to characterize the dependence of the charge persistence on the illumination level we plotted the residual signal vs. the oversaturation level (in units of full well capacity, Fig. 14). The fact that these data are well fitted by an exponential function means that there is a worst case (the asymptotic maximum), which we can use for further treatments of the persistent charges.
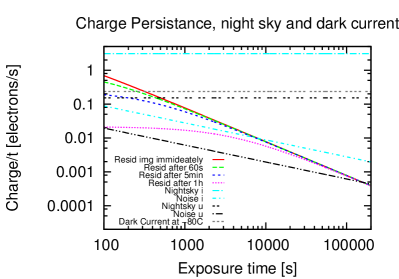
The red, green, blue and magenta lines in the left plot of Fig. 15 show the charge persistence for different waiting times between oversaturation and beginning of the following exposure (with no wiping between the exposures). Comparing these to the signal from the night sky background in the current filter gives us the time we should mask out the oversaturated region.
3.9.3 Dealing with persistent charges
There are several possible ways of dealing with residual images:
-
1.
Run the detector at a higher temperature.
-
2.
Pre-flash (saturate) the detector before each sky exposure.
-
3.
Mask oversaturated regions for a defined amount of time.
-
4.
Prevent saturation, which is impossible for a wide field imager.
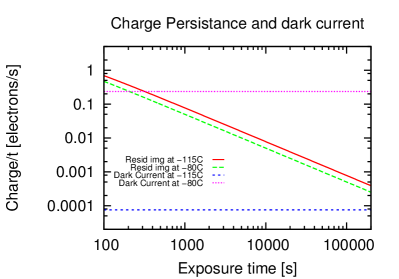
The right graph of Fig.15 clearly shows that raising the temperature of the detector to accelerate the decay of persistent charges is not an option since the dark current rises by a factor greater than when changing the temperature from to . Pre-flashing the detector would require a light source that illuminates the detector area homogeneously. Furthermore, pre-flashing is in principle the same as raising the dark current and noise (by the needed amount to let residual images disappear in the dark), so it is slightly preferable over a warmer detector, but still not an ideal solution.
Masking of the oversaturated regions sounds like a method that is easy to realize, but there are two issues one has to deal with: First, one has to decide for how long one wants to mask the bleeding regions. By looking again at the left plot of Fig. 15, it becomes clear that the amount of time has to depend on the filter of the next exposure (since the level of the night sky background depends on the filter). Second, it is not an easy task to decide which regions of the detector are saturated, since the amount of analog to digital counts do not saturate by themselves, but overflow and show lower values again at high illumination. We decided to go for the masking solution, since it leaves most of the detector area usable without adding an artificial signal (and noise). Our task is now to find saturated regions: Before the overflow effect sets in, the signal will be constantly rising with illumination level, so if one finds a closed ring of pixel maxima, one can tell for sure that everything inside this ring is saturated. We will use this method to find saturated regions, and flag these regions in subsequent images (depending on the time interval between the exposures and the filter used in the subsequent image). The observer can then decide whether to discard the flagged regions.
3.10 Charge transfer efficiency
In this section we will present the results of our measurement of the charge transfer efficiency (CTE) and characterize the dependence of the CTE on the illumination level. CTE is defined as the number of charges arriving at the target pixel during a single shift, divided by the number of charges departing from the original pixel. Analogously, one defines the charge transfer inefficiency (CTI) as :
| (12) |
The effects that are responsible for the CTI are described for example in Janesick (2001). The CTI causes a distortion of image shapes along parallel and serial readout direction (there is CTI in the serial register as well), since the amplifier assigns the deferred charges to another pixel. In fact, the deformation of images in both directions depends on the parallel and serial CTE and on the amount of parallel and serial shifts the charge undergoes until it reaches the readout amplifier. An otherwise perfect PSF is no longer circular. This may become important for applications where one wants to measure image shapes, as in the analysis of weak gravitational lensing. The effect of CTE on image shapes is further in investigated in Rhodes et al. (2010).
Generally, CTE becomes better at higher illumination levels, since the time constant of self-induced drift (Janesick, 2001) becomes smaller for larger charge packets. At very high signal levels (around half-well and higher), CTE can again become worse because the time constant of fringing fields becomes larger (Janesick, 2001). Below that point, CTI can generally be described by a power law dependent on signal level:
| (13) |
with generally .
3.10.1 Method
There are several different methods for measuring the CTE. A relatively straightforward method, which is both qualitatively and quantitatively useful, is to take a series of flat field images at different light levels and overscan the serial and parallel registers to produce an image that is several pixels larger on both axes than the actual detector. If the CTE would be 1.0, one would measure just bias level in the overscan region. In real CCDs with CTEs slightly lower than 1.0 the light level in the first row (or column, in case of serial register) of the overscan region is slightly above the bias level depending on the value of the CTE. The CTE can be obtained as follows:
| (14) |
where is the mean intensity in the first row (column) of the overscan, is the intensity in the last row (column) of the active region and is the number of transfers necessary to read the complete image (equal to the number of pixels per column (row)). This method is called Extended Pixel Edge Response, and is described in more detail in McLean (2008) and Janesick (2001) among several other methods.
3.10.2 Results
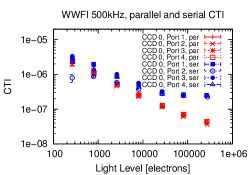
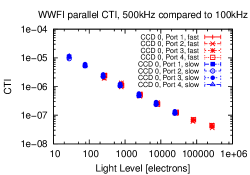
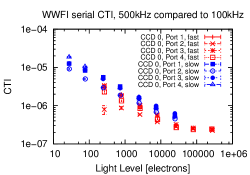
The top graph in Fig. 16 shows the parallel CTI (red) compared to the serial CTI (blue) vs. the light level in the last light sensitive line (column). The data can be described by a power-law. At illumination levels below the serial CTI is higher than the parallel one by a constant factor of approximately 1.5, at higher illumination the serial CTI deviates from the power-law. Usually that happens when the signal level approaches the full-well capacity, but since we have not yet measured this quantity in the serial register, we are not able to confirm this. The middle graph in Fig. 16 shows the parallel CTI for the fast (red) and slow (blue) readout mode, indicating that there is no difference. The bottom graph in Fig. 16 shows the serial CTI for the fast (red) and slow (blue) readout mode. In this section we present only the results of one of the camera’s CCDs (number 0). For the complete results and a comparison to the manufacturer’s results we refer the reader to App. A.
We do not expect any problems with photometry as the CTI values of the WWFI are very low.
4 Comparison to similar systems
| instrument | WWFI | OmegaCAM | ESO-WFI |
|---|---|---|---|
| CCD type | e2v 231-84 | e2v CCD44-80 | e2v CCD44 |
| pixels | |||
| field of view | |||
| pixel scale | |||
| telescope | 2.0 m | 2.6 m | 2.2 m |
| aperture | |||
| gain | 5.81 or 0.69 | 0.54 | |
| readout noise | or | ||
| readout time | 8.5 s or 40 s | 29.5 s | |
| dark current |
In this section we compare the parameters of the Wendelstein Wide Field Imager with the ESO OmegaCAM (Iwert et al., 2006) at the VST survey telescope and with the ESO-WFI (Baade et al., 1999) at the 2.2 m Telescope at LaSilla. Table 8 shows a comparison of the most important parameters of the three wide field imagers. In terms of pixel scale, all three imagers are compatible, the OmegaCAM has a larger field of view since it has four times the amount of pixels compared to ESO-WFI and to our camera. One should point out that our imager has a significantly lower readout noise when choosing the slow readout mode (and a compatible readout time), while we could choose to have a much faster readout if we live with a slightly higher readout noise. The dark current of our camera at operating temperature is by a factor 2 lower than the dark current of the OmegaCAM.
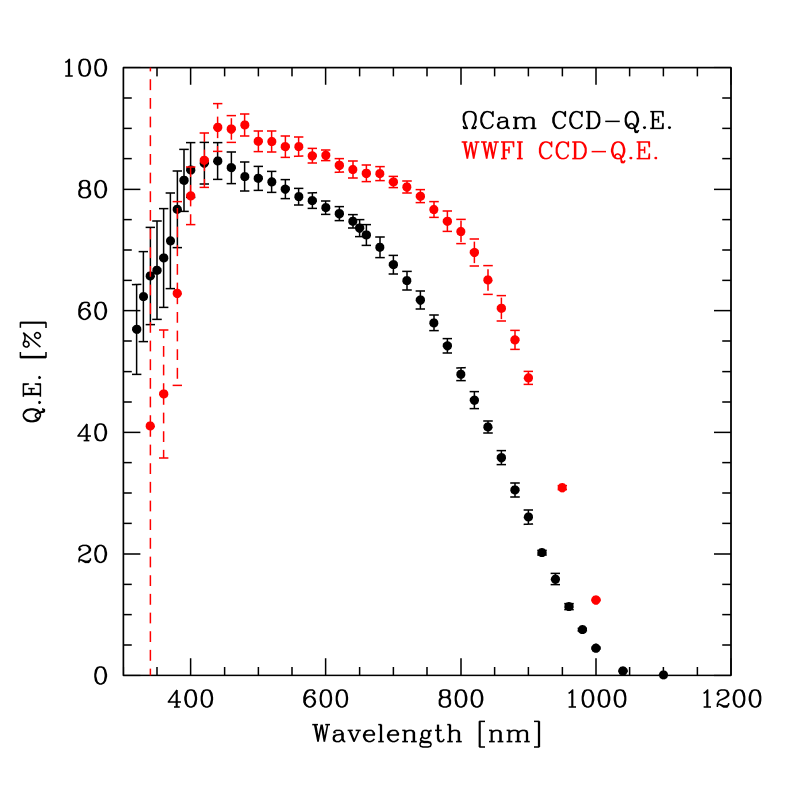
Figure 17 shows a comparison of the quantum efficiency of the detector of OmegaCAM with the QE of the WWFI. In the wavelength region above 450 nm the QE of the WWFI is higher by approximately 5-10%, while at short wavelengths the QE of the WWFI seems to be lower but the QEs of the two detectors are in agreement with each other in the margins of the errors of the WWFI measurement in this region.
5 Summary
We have presented the details about the mechanical construction of our wide field imager as well as about the electromagnetic shielding and the software. Furthermore we have shown the details and results of our calibration measurements in our laboratory as well as first on-sky data. In Sect. 3.1 we used the analytical method introduced in Gössl et al. (2012) that successfully allows us to consider data points at high count rates in our photon-transfer analysis even when the photon noise of the masterflat begins to dominate. We found reasonable results for the gain compared to the manufacturer’s estimation (Table 3). Our quantum efficiency measurement in the laboratory shows only small variations between the four CCDs and absolute values that are slightly higher than the manufacturer’s minimum guaranteed values (at least at long wavelengths, while at short wavelengths our measurement errors are large). We consider these values to be in good agreement. We determined the photometric zero point of our system by two different methods (an observation of a globular cluster with published photometry and a standard star field) and found the results to be in good agreement with each other (with exception of the filter where we have only one result available), the dominant error source being the atmospheric extinction which has been measured for the standard star analysis but has been estimated for the globular cluster analysis. The results are also generally in good agreement with theoretically calculated values, with the exception of the and filters where the dominant error source is assumed to be systematic errors in our lab measurements. We have shown that we can predict the on-sky performance of our system with an accuracy between 0.030 and 0.083 in all colors. To improve these numbers, a better lab equipment would be necessary, especially a brighter calibration lamp. We found out that the charge persistence in our detector is well described by a Debye-Edwards law. It varies with temperature and with illumination level, but is independent from the wavelength of the incident light. We were able to predict the amount of residual charge that remains on the detector in dependence of time for the “worst case” of oversaturation, which may be important for future observations. We have shown that the CTE behaves as one would expect from low values at low light levels to higher values at intermediate illumination (it can be described by a power-law in this region quite well), becoming slightly lower above half of full-well capacity. In App. A we show that results compare well to the values determined by the manufacturer, with few exceptions for very few ports only. Finally in Sect. 4 we found out that our system is very well comparable to similar systems, ESO OmegaCAM (Iwert et al., 2006) and ESO-WFI (Baade et al., 1999) in most respects. Our field of view is smaller than the FoV of OmegaCAM, but in terms of QE and dark current our system is even better.
Acknowledgements.
The authors thank Johannes Koppenhoefer and Mihael Kodric for their support with the data reduction process with the WWFI. Furthermore we thank Daniel Gruen for helpful discussions regarding charge transfer efficiency. We also thank Michael Schmidt and Christoph Ries, the night observers at the Wendelstein Observatory for taking the necessary data for our on-sky calibration. Michael Schmidt also took the responsibility for wiring our imager, and we thank him for doing so. We thank Wolfgang Mitsch for giving invaluable advice on configuring the electronics of our camera. We acknowledge the constructive discussion with Dietrich Baade and Olaf Iwert (ESO). This research was supported by the DFG cluster of excellence “Origin and Structure of the Universe” (www.universe-cluster.de).References
- An et al. (2008) An, D., Johnson, J. A., Clem, J. L., et al. 2008, ApJS, 179, 326
- Baade et al. (1999) Baade, D., Meisenheimer, K., Iwert, O., et al. 1999, The Messenger, 95, 15
- Barrick et al. (2012) Barrick, G. A., Ward, J., & Cuillandre, J.-C. 2012, in Society of Photo-Optical Instrumentation Engineers (SPIE) Conference Series, Vol. 8453
- Bertin & Arnouts (1996) Bertin, E. & Arnouts, S. 1996, A&AS, 117, 393
- Bindel (2011) Bindel, A. 2011, Master’s thesis, Ludwig-Maximilians-Universität München
- Buckley & Longmore (1992) Buckley, D. R. V. & Longmore, A. J. 1992, MNRAS, 257, 731
- Castelli et al. (1997) Castelli, F., Gratton, R. G., & Kurucz, R. L. 1997, A&A, 318, 841
- Cousins (1976) Cousins, A. W. J. 1976, MmRAS, 81, 25
- Fukugita et al. (1996) Fukugita, M., Ichikawa, T., Gunn, J. E., et al. 1996, AJ, 111, 1748
- Girardi et al. (2004) Girardi, L., Grebel, E. K., Odenkirchen, M., & Chiosi, C. 2004, A&A, 422, 205
- Gössl (2007) Gössl, C. 2007, PhD thesis, Ludwig-Maximilians-Universität München
- Gössl et al. (2012) Gössl, C., Bender, R., Fabricius, M., et al. 2012, in Society of Photo-Optical Instrumentation Engineers (SPIE) Conference Series, Vol. 8446
- Gössl et al. (2010) Gössl, C., Bender, R., Grupp, F., et al. 2010, in Society of Photo-Optical Instrumentation Engineers (SPIE) Conference Series, Vol. 7735
- Gruen et al. (2013) Gruen, D., Seitz, S., Kosyra, R., et al. 2013, ArXiv e-prints
- Hayes & Latham (1975) Hayes, D. S. & Latham, D. W. 1975, ApJ, 197, 593
- Hopp et al. (2008) Hopp, U., Bender, R., Goessl, C., et al. 2008, in Society of Photo-Optical Instrumentation Engineers (SPIE) Conference Series, Vol. 7016
- Hopp et al. (2010) Hopp, U., Bender, R., Grupp, F., et al. 2010, in Society of Photo-Optical Instrumentation Engineers (SPIE) Conference Series, Vol. 7733
- Iwert et al. (2006) Iwert, O., Baade, D., Balestra, A., et al. 2006, in Society of Photo-Optical Instrumentation Engineers (SPIE) Conference Series, Vol. 6276
- Janesick (2001) Janesick, J. 2001, Scientific Charge-Coupled Devices, Spie Press Monograph, Pm83 (Society of Photo Optical)
- Janesick & Elliott (1992) Janesick, J. & Elliott, T. 1992, in Astronomical Society of the Pacific Conference Series, Vol. 23, Astronomical CCD Observing and Reduction Techniques, ed. S. B. Howell, 1
- Johnson & Morgan (1953) Johnson, H. L. & Morgan, W. W. 1953, ApJ, 117, 313
- Kodric et al. (2013) Kodric, M., Riffeser, A., Hopp, U., et al. 2013, AJ, 145, 106
- Koppenhoefer et al. (2013) Koppenhoefer, J., Saglia, R. P., Fossati, L., et al. 2013, MNRAS, 435, 3133
- Kormendy & Bender (2012) Kormendy, J. & Bender, R. 2012, ApJS, 198, 2
- Kurucz (1993) Kurucz, R. 1993, ATLAS9 Stellar Atmosphere Programs and 2 km/s grid. Kurucz CD-ROM No. 13. Cambridge, Mass.: Smithsonian Astrophysical Observatory, 1993., 13
- Kurucz (1979) Kurucz, R. L. 1979, ApJS, 40, 1
- Landolt (1973) Landolt, A. U. 1973, AJ, 78, 959
- Landolt (1983) Landolt, A. U. 1983, AJ, 88, 439
- Landolt (1992) Landolt, A. U. 1992, AJ, 104, 340
- Landolt (2009) Landolt, A. U. 2009, AJ, 137, 4186
- Lee et al. (2012) Lee, C.-H., Riffeser, A., Koppenhoefer, J., et al. 2012, AJ, 143, 89
- McLean (2008) McLean, I. 2008, Electronic Imaging in Astronomy: Detectors and Instrumentation, Springer Praxis Books / Astronomy and Planetary Sciences (Springer)
- Oke & Gunn (1983) Oke, J. B. & Gunn, J. E. 1983, ApJ, 266, 713
- Reif et al. (2005) Reif, K., Klink, G., Müller, P., & Poschmann, H. 2005, Astronomische Nachrichten, 326, 666
- Rhodes et al. (2010) Rhodes, J., Leauthaud, A., Stoughton, C., et al. 2010, PASP, 122, 439
- Schlafly & Finkbeiner (2011) Schlafly, E. F. & Finkbeiner, D. P. 2011, ApJ, 737, 103
- Schlegel et al. (1998) Schlegel, D. J., Finkbeiner, D. P., & Davis, M. 1998, ApJ, 500, 525
- Tonry et al. (2007) Tonry, J. L., Isani, S., & Onaka, P. 2007, in Bulletin of the American Astronomical Society, Vol. 39, American Astronomical Society Meeting Abstracts, 807
Appendix A Charge transfer efficiency in more detail
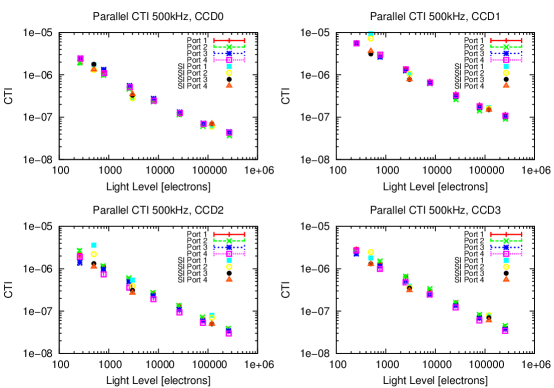
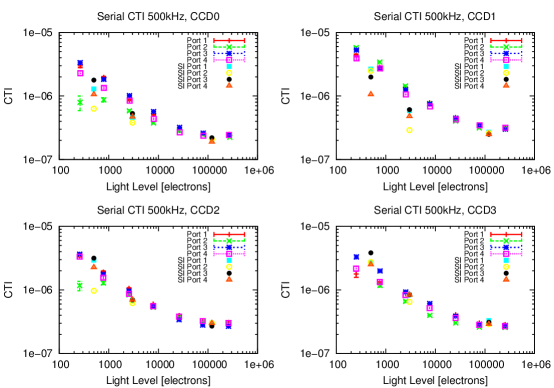
In Sect. 3.10 we presented the results of the CTI measurement in our laboratory, but we only showed results for one CCD (number 0). In this appendix we will show the complete set of measurements for all CCDs and compare them to the manufacturer’s results. Figure 18 shows the parallel CTI for all four CCDs compared to the values measured by Spectral Instruments. (USM: red crosses, green, blue and magenta; SI: cyan, yellow, black and red triangles). The plots show overall good agreement between the two measurements with few outliers in CCD1 and CCD2 (top right and bottom left) at low signal levels, where the measurement performed by SI yields higher values than our own results. Figure 19 shows the same for serial CTI. Here we can identify a few more outliers also at low signal levels, but this time SI measures lower values than ourselves. We trust our own measurements more than the SI measurements due to two reasons: First, our measurements are fitted by a power law, while the measurements showing outliers are not, and second, the port-to-port variations of our measurements (without outliers) are much smaller.
The reason why port 2 of CCDs 0 and 2 (green data points in top left and top right of 19) show a lower CTI by approximately factor of 3 at low signal levels are unknown to the authors.
