Investigation of the Young’s modulus and thermal expansion of amorphous titania-doped tantala films
Abstract
The current generation of advanced gravitational wave detectors utilize titania-doped tantala/silica multilayer stacks for their mirror coatings. The properties of the low-refractive-index silica are well known; however, in the absence of detailed direct measurements, the material parameters of Young’s modulus and coefficient of thermal expansion (CTE) of the high refractive index material, titania-doped tantala, have been assumed to be equal to values measured for pure tantala coatings. In order to ascertain the true values necessary for thermal noise calculations, we have undertaken measurements of Young’s modulus and CTE through the use of nanoindentation and thermal-bending measurements. The measurements were designed to assess the effects of titania doping concentration and post-deposition heat-treatment on the measured values in order to evaluate the possibility of optimizing material parameters to further improve thermal noise in the detector. Young’s modulus measurements on pure tantala and 25% and 55% titania-doped tantala show a wide range of values, from 132 to 177 GPa, dependent on both titania concentration and heat-treatment. Measurements of CTE give values of and for 25% and 55% titania-doped tantala, respectively, without dependence on post-deposition heat-treatment.
pacs:
(310.6870) Thin Films, other properties; (310.3840) Thin Films, Materials and process characterization; (310.1860) Thin Films, Deposition and fabrication; (160.2750) Materials, Glass and other amorphous materials.I Introduction
The current generation of interferometric gravitational wave detectors, including the Advanced LIGO Harry10 and Advanced Virgo AVIRGO detectors, are undergoing construction, and are expected to reach design sensitivity in the next few years. An important limiting noise source in the detectors is the thermal noise arising from the coatings used to make the mirrored test masses reflective at a wavelength of 1064 nm. These high-reflectivity coatings are made from alternating layers of high index of refraction Ion Beam Sputtered (IBS) amorphous titania-doped tantala (Ti:Ta2O5) and low index IBS amorphous silica (SiO2), with the layer structure optimized to reduce thermal noise while maintaining the requisite reflectivity Villar10 .
In order to calculate the thermal noise that arises in the interferometers a priori, the thermo-mechanical properties of the coating materials need to be well known. In order to calculate the thermo-optic noise Evans08 of the coatings, knowledge of the heat capacity, CTE, thermo-optic coefficient, thermal conductivity, Young’s modulus, and Poisson ratio of the coating material is required. In order to calculate the Brownian thermal noise Harry02 , the Young’s modulus, Poisson ratio, and mechanical loss of the coating material is also needed. Furthermore, calculation of the mechanical loss from various ‘ring-down’ measurement techniques Penn03 ; Martin09b requires knowledge of the coating material’s Young’s modulus and Poisson ratio.
While the properties of silica are fairly well known, the properties of tantala, and especially titania-doped tantala, have rarely been measured. In some cases, there has even been some controversy regarding some measurements. In the case of the CTE, measurements have ranged from K-1 for ion-assisted e-beam sputtered tantala Inci04 , to K-1 for IBS tantala Tien00 . Measurements made by Braginsky and Samoilenko Braginsky03a suggested that the CTE of tantala was roughly K-1. This new measurement was used to support the use of a value of K-1 within the LIGO community for IBS pure tantala and it has since been commonly used (Evans08, ; Fejer04, , and others). However, this value was calculated Tien00 from measurements of the temperature coefficients Scobey94 and normalized thermo-optic coefficients Chu97 , and was not a direct measurement of thermal expansion, nor were these values measured on IBS coatings.
For the Young’s modulus of tantala, the value of 140 GPa is most often used in analysis of coating mechanical loss and estimates of coating thermal noise. The article by Martin et al. Martin93 is often cited (Crooks04, ; Penn03, ; Martin08, ; Martin09b, , and others); however, this paper only displays plots of indentation modulus as a function of indentation depth using a micro-indentation system, and these plots have not been fully analyzed to give an appropriate coating Young’s modulus. Other measurements support the value of 140 GPa using nanoindentation, including measurements of GPa Gross04 , and 143 GPa Cetinorgu09 . Unfortunately, these measurements do not offer a complete analysis of the substrate effects on the nanoindentation measurements.
The purpose of the measurements made in this paper is twofold: first, to remove any further controversy regarding the Young’s modulus and CTE of IBS tantala films; and second, to measure these properties for the case of the IBS titania-doped tantala coatings used in advanced detectors. As dopant level and post-deposition heat treatment have been identified as variables that can affect the Brownian thermal noise in the detectors Harry07 ; Martin10 ; Martin09b , coatings with a range of dopant levels and heat-treatments were also studied here.
II Measurement
All coatings were produced by CSIRO (Commonwealth Scientific and Industrial Research Organization) and deposited upon both 1-inch silica discs and the silicon cantilevers commonly used in mechanical-loss measurements Martin09b . The pure tantala samples were prepared as part of one coating run, and were heat-treated to 300, 400, 600, and 800 ∘C. It was previously shown that the 800 ∘C sample had begun to crystallize Martin10 . The titania-doped samples were made during a separate coating run and were either left untreated or heat-treated to 300, 400, or 600 ∘C. The untreated samples are often referred to as As Deposited (AD); the deposition temperature was 100 ∘C, so for the purpose of this paper, the results are considered as heat-treated to this temperature. Additional heat-treatment was carried out by annealing samples in air for 24 hours. All of the titania-doped tantala samples were found to be amorphous. Titania-doped samples were either 25 or 55% doped, as measured by metal cation. All coatings were measured using ellipsometry to be 500 nm thick.
II.1 Nanoindentation
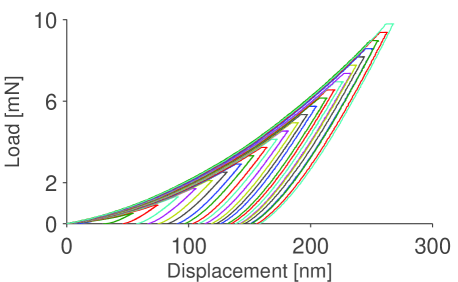
Nanoindentation is a technique developed to measure the mechanical properties of small volumes of materials in a simple fashion Mencik97 . These properties are measured by making indentations at the nanometer scale and recording the load, , and displacement, , response as the indenter is driven into and withdrawn from the material. An example of the nanoindentation load-displacement curves taken into tantala can be seen in Figure 1. In this example, the indents are made using the standard load-hold-unload cycle. A load is applied to the indentation tip, forcing it into the sample and increasing the displacement. During the loading phase, work is done as the sample is both elastically and plastically deformed. During the hold phase, the force is held constant, but the sample continues to deform due to creep effects which arise due to the movement of the material within the specimen under high pressure. During the unloading phase, the load is reduced and the indentation tip is withdrawn from the sample. This phase is characterized by having only an elastic response. We therefore analyze the unloading phase in order to measure the Young’s modulus of the material.
Using this technique, indentation measurements were made using the Hysitron TI-700 Ubi, located at the University of Cambridge, with a diamond Berkovich pyramidal tip. Effective moduli, composed of the coating and substrate Young’s moduli, were extracted from the indentation data using the method of Oliver and Pharr Oliver04 . Once the load-displacement data is recorded, the elastic modulus is determined from:
| (1) |
where is the projected area of contact under load, is the slope of the load-displacement curve at the beginning of the unloading phase, and is the combined modulus of the sample and indenter:
| (2) |
Here, is the Young’s modulus, and is the Poisson’s ratio of the sample and indenter, marked with subscripts ‘s’ and ‘i’, respectively.
The value of is generally extracted from the data by fitting an empirically-derived equation,
| (3) |
to the unloading portion of the curve. Here, and are the fitting constants, and is the displacement at zero load on the unloading curve. Once fit, the derivative of the P-h relation is taken at the maximum value of h, , to give the value of .
The area function is calculated by making a series of indents into a fused quartz reference sample with a known hardness and Young’s modulus, solving Equation 1 for , and fitting the following equation Oliver92 :
| (4) |
Here, is usually a number close to 24.5 for a Berkovich indenter, and the remaining constants are fit to indents made into samples of known modulus at different depths in order to account for tip rounding.
For a thin coating on much thicker substrate, if the Young’s moduli of the coating and substrate differ, the modulus measured using the Oliver and Pharr method will vary with indentation depth Saha02 . This is due to the increasing influence of the substrate as the load is increased. In order to minimise this influence, it is often suggested that indents be made such that is less than 10% of the thickness of the coating, Oliver92 . While this is generally acceptable for coatings greater than about a micron, it is not practical on thinner coatings where the errors in the area function and surface defects begin to have an effect at very small indentation depths FischerCripps06 .
The coating modulus was extracted from the values taken from the Oliver and Pharr method using the model of Song and Pharr Song99 ; Rar01 . In the Song and Pharr model, the elastic moduli of the film and substrate are added in series, and weighted by a factor dependent upon the indentation area:
| (5) |
Here, the subscripts and represent the coating and substrate, respectively, and is a weighing function that is equal to 1 for shallow indents and 0 for deep indents, and is given by the equation Gao92 :
| (6) |
where is the radius of a circle with the equivalent area as the projected area of indent, , and is the difference between the thickness of the coating and the contact depth of the indent Rar01 . A plot of against for a number of indents made at different depths will yield a linear relationship with y-intercept of and a value of at . An example of this can be seen in Figure 2, showing as a function of measured on one of the pure tantala samples, heat-treated to C, in red circles, and the fit of equation 5 in blue. The green dotted lines are the one standard deviation uncertainties from the fit, assuming that the noise in the data are Gaussian.
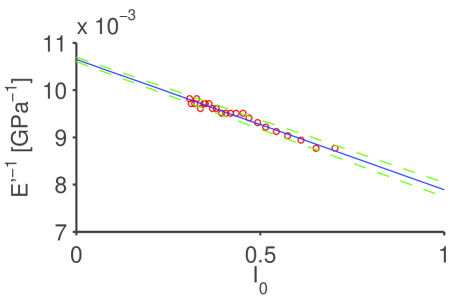
This method requires indents at varying depth, so for each location on a sample, at least 25 indents were made, varying the maximum applied load evenly between 500 and 10000 N. At least two positions were measured on each sample, and the weighted mean of the extracted coating moduli was calculated and is given in Table 1.
For the pure tantala samples, indentations were made into coatings deposited onto both silicon and silica substrates. Finite element analysis suggests that indents into coatings on the more compliant silica substrates will have an additional substrate effect that would artificially reduce the extracted coating modulus by as much as 5% Hay11 . Comparing the moduli measured on silica to those measured on silicon, the moduli measured on the silica substrate samples are in fact 5% lower. This uncertainty is included as a +5% systematic uncertainty for all the samples on silica substrates in the table. The modulus extracted using the Song and Pharr method also depends upon the Poisson ratio of the coating material. The Poisson ratios of amorphous tantala and titania-doped tantala are unknown, however the Poisson ratios of similar amorphous metal oxides tend to be in the range of 0.20-0.30. The values listed in the table are given using an assumed value for the Poisson ratio of 0.25. Variation within the range of 0.20-0.30 varies the resulting moduli by less than 3% in all cases.
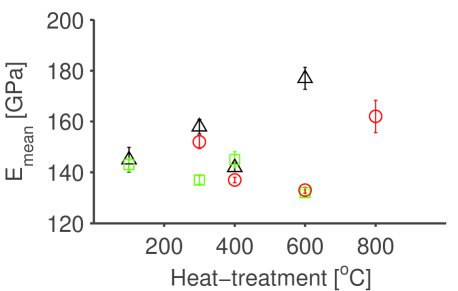
| % Ti | H-T [∘ C] | Substrate | Pos. Meas. | E [GPa] | Stat. Uncert. [GPa] | Sys. Uncert. % |
| 0 | 300 | SiO2 | 5 | 152 | 2.6 | 3+5 |
| 0 | 400 | SiO2 | 5 | 137 | 1.1 | 3+5 |
| 0 | 600 | SiO2 | 5 | 133 | 1.2 | 3+5 |
| 0 | 800 | SiO2 | 5 | 162 | 6.4 | 3+5 |
| 0 | 300 | Si | 2 | 160 | 14.2 | 3 |
| 0 | 400 | Si | 2 | 146 | 3.3 | 3 |
| 0 | 600 | Si | 2 | 137 | 3.7 | 3 |
| 25 | AD | SiO2 | 3 | 143 | 2.6 | 3+5 |
| 25 | 300 | SiO2 | 2 | 137 | 1.7 | 3+5 |
| 25 | 400 | SiO2 | 3 | 145 | 3.2 | 3+5 |
| 25 | 600 | SiO2 | 7 | 132 | 1.1 | 3+5 |
| 55 | AD | SiO2 | 3 | 145 | 4.9 | 3+5 |
| 55 | 300 | SiO2 | 3 | 158 | 2.9 | 3+5 |
| 55 | 400 | SiO2 | 3 | 142 | 1.7 | 3+5 |
| 55 | 600 | SiO2 | 4 | 177 | 4.3 | 3+5 |
II.2 Thermal Bending
Measurements of the CTE were made using silicon cantilevers of dimensions 34 mm long x 5 mm wide and 115 m thick, similar to those used in cryogenic mechanical loss measurements Abernathy11 ; Martin10 ; Martin09b ; Reid06a . The CTE of a coating deposited upon such a cantilever can be determined by measuring the variation in coating stress with sample temperature. Following the modified Stoney’s formula Stoney09 ; Hoffman66 ,
| (7) |
the change in the radius of curvature of a coated substrate, , from that of the uncoated substrate, , is related to the stress in the coating , where is the biaxial modulus of the substrate, is the thickness of the substrate, and is the thickness of the coating. The biaxial modulus of a material is defined as: . Some of this stress is related to the thermal expansion mismatch, , between the coating and the substrate,
| (8) |
where is the intrinsic stress in the coating from non-thermal sources, and is the temperature difference from the last significant thermal treatment of the coating, such as deposition or heat-treatment Doerner88 . Therefore, the variation in the stress as a function of temperature yields the following relation:
| (9) |
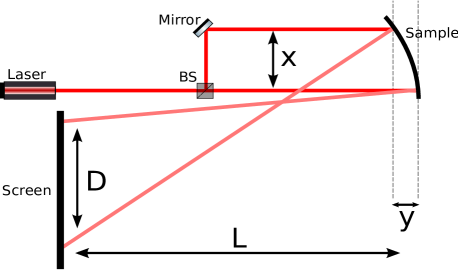
A simple apparatus was designed in order to measure the radius of curvature of coated cantilever samples. In this apparatus, shown schematically in Figure 3, a laser beam is separated into two parallel beams using a beam-splitter and mirror, separated by a distance, . These beams are reflected from the cantilever, with one spot reflecting from very near the clamped base of the cantilever, and the other spot reflecting from the tip. These two reflected beams are incident upon a screen placed a distance from the sample.
The distance between the spots on the screen, , will be the sum of the original separation of the beams and the deviation caused by the curvature of the cantilever: , where is negative if the beams cross between the sample and the screen. Therefore, if is negative or less than , the beams are convergent, and the sample is concave (as drawn in Figure 3); if is greater than , then the beams are divergent, and the sample is convex. If the displacement of the sample tip, is small relative to , the radius of curvature of the sample can be calculated using the relation:
| (10) |
This device was able to measure the radius of curvature of the samples to an accuracy of 5%, as tested in measurements of concave mirrors of known radius. In order to make measurements at varying temperatures, the samples were placed within an insulated copper box with a thin transparent opening to allow the passage of the laser beams. The temperature within the box was controlled using resistive heaters mounted inside the box and the temperature was measured using a thermocouple mounted within the cantilever clamp.
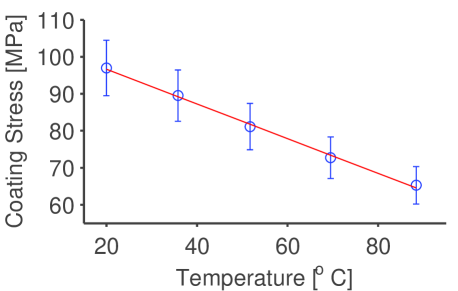
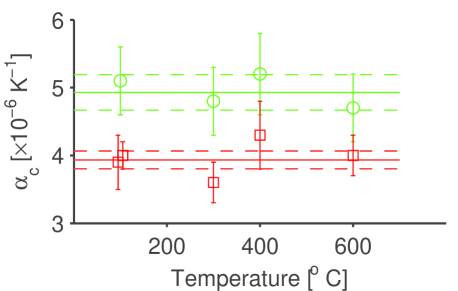
Measurements of the radius of curvature were made at intervals between 25 and 100 ∘C. The radius was converted to stress, and the stress variation with temperature was fit with a straight line to give the slope in Equation 9. An example of the resulting plot of stress as a function of temperature is given in Figure 4. In this plot, the error bars are from the statistical uncertainty in the measurements as well as the systematic uncertainty in all the components of equation 7 except for the thickness of the substrate. Our uncertainty in the thickness of the substrate can add a systematic error of as much as 20% to the measurements of tensile stress; however, even these uncertainties are utilized in the calculation of the thermal expansion. By taking the Young’s modulus measured using the nanoindention procedure discussed above, and assuming a Poisson ratio of , the coefficient of thermal expansion could be calculated for each sample. The results are shown in Figure 6.
III Results
III.1 Young’s Modulus
Coating Young’s moduli as measured on silica substrates are shown in Figure 5 as a function of heat-treatment. Looking only at the pure tantala (red circles), the Young’s modulus appears to decrease with increasing heat-treatment until the coating begins to crystallize between 600 and 800 ∘C. Such a trend was postulated in Brown04 , as an indicator of increasing void space with increased heat-treatment. A similar trend is seen with the 25% titania-doped samples (green squares), with the exception of the 400 ∘C sample. The opposite trend is seen with the 55% titania-doped samples (black, upward triangles); again, with the exception of the 400∘ C sample. This is most likely due to the abundance of titania, which is known to have a low crystallization temperature and a high Young’s modulus Gaillard09 ; Kurosaki05 . The two titania-doped samples heat-treated at 400∘ C were produced at the same time, they were most likely heat-treated together, and may not have been fully heat-treated; this agrees with the fact that the two samples give approximately the same moduli as the As Deposited coatings. Overall, it is shown that while the commonly measured value of 140 GPa Cetinorgu09 ; KlembergSapieha04 is a reasonable value for the Young’s modulus of tantala, it is dependent upon both the doping and heat-treatment of the coating.
III.2 Thermal Expansion
The coefficients of thermal expansion for both of the titania doping concentrations are shown in Figure 6. The plot suggests that there is no obvious trend in the coefficient of thermal expansion of the coatings with heat-treatment temperature. Also plotted as solid lines are the weighted means of the coefficients. For the 55% titania-doped tantala, the mean coefficient of thermal expansion is , and for the 25% titania-doped samples, the mean is . These values can be compared to the reported coefficient of thermal expansion of pure tantala coatings deposited by dual ion-beam sputtering in Cetinorgu09 , which gives a value of . Both of these values are higher than that used for pure tantala, however, they are probably affected by the presence of the titania doping. Unfortunately, we were unable to measure any samples of pure tantala.
IV Conclusion
We have made direct measurements of the coefficient of thermal expansion and Young’s modulus of pure and titania-doped tantala heat-treated at various temperatures. Our results indicate that the Young’s modulus of IBS tantala films is affected by both post-deposition heat-treatment and titania doping, and that the coefficient of thermal expansion is not affected by heat-treatment, but is altered by titania doping. We have also made direct measurements of coating materials very similar to those used in second generation interferometric gravitational wave detectors, confirming previous estimates and allowing for greater confidence in the prediction of thermal noise levels within these detectors.
Acknowledgements.
The authors would like to acknowledge the contributions of the Oyen Group from the Cambridge University Department of Engineering, especially Oliver Hudson, Tamaryn Shean, and Daniel Strange, for their aid in obtaining the nanoindentation data. IWM holds a Royal Society University Research Fellowship and SR is a Royal Society-Wolfson Research Merit Award holder. The authors would like to thank the UK Science and Technology Facilities Council, the University of Glasgow, the Scottish Universities Physics Alliance and the Scottish Founding Council for financial support. We also wish to thank our colleagues in the GEO600 and LIGO Scientific Collaboration for their interest in this work. The LIGO Observatories were constructed by the California Institute of Technology and Massachusetts Institute of Technology with funding from the National Science Foundation under cooperative agreement PHY-9210038. The LIGO Laboratory operates under cooperative agreement PHY-0107417. This paper has been assigned LIGO Document Number LIGO- P1300107.References
- (1) G. M. Harry et al., “Advanced LIGO: the next generation of gravitational wave detectors,” Classical and Quantum Gravity 27, 084006 (2010).
- (2) The Virgo Collaboration, “Advanced virgo baseline design,” https://tds.ego-gw.it/itf/tds/file.php?callFile=VIR-0027A-09.pdf (2009). Note VIR-027A-09.
- (3) A. E. Villar, E. D. Black, R. DeSalvo, K. G. Libbrecht, C. Michel, N. Morgado, L. Pinard, I. M. Pinto, V. Pierro, V. Galdi, M. Principe, and I. Taurasi, “Measurement of thermal noise in multilayer coatings with optimized layer thickness,” Physical Review D 81, 122001 (2010).
- (4) M. Evans, S. Ballmer, M. Fejer, P. Fritschel, G. Harry, and G. Ogin, “Thermo-optic noise in coated mirrors for high-precision optical measurements,” Physical Review D 78, 102003 (2008).
- (5) G. M. Harry et al., “Thermal noise in interferometric gravitational wave detectors due to dielectric optical coatings,” Classical and Quantum Gravity 19, 897 (2002).
- (6) S. D. Penn et al., “Mechanical loss in tantala/silica dielectric mirror coatings,” Classical and Quantum Gravity 20, 2917 (2003).
- (7) I. W. Martin, E. Chalkley, R. Nawrodt, H. Armandula et al., “Comparison of the temperature dependence of the mechanical dissipation in thin films of Ta2O5 and Ta2O5 doped with TiO2,” Classical and Quantum Gravity 26, 155012 (2009).
- (8) M. N. Inci, “Simultaneous measurements of the thermal optical and linear thermal expansion coefficients of a thin film etalon from the reflection spectra of a super-luminescent diode,” Journal of Physics D: Applied Physics 37 (2004).
- (9) C.-L. Tien, C.-C. Lee, K.-P. Chuang, and C.-C. Jaing, “Simultaneous determination of the thermal expansion coefficient and the elastic modulus of ta2o5 thin film using phase shifting interferometry,” Journal of Modern Optics 47, 1681–1691 (2000).
- (10) V. B. Braginsky and A. A. Samoylenko, “Measurements of the mirror optical coating properties,” Physics Letters A 315 (2003).
- (11) M. Fejer, S. Rowan, G. Cagnoli, D. Crooks, A. Gretarsson, G. Harry, J. Hough, S. Penn, P. Sneddon, and S. Vyatchanin, “Thermoelastic dissipation in inhomogeneous media: loss measurements and displacement noise in coated test masses for interferometric gravitational wave detectors,” Physical Review D 70, 082003 (2004).
- (12) M. A. Scobey and P. D. Stupik, “Stable ultranarrow bandpass filters,” Proc. SPIE 2262, 37–46 (1994).
- (13) A. Chu, H. Lin, and W. Cheng, “Temperature dependence of refractive index of Ta2O5 Dielectric Films,” Journal of Electronic Materials 26, 889–892 (1997).
- (14) P. Martin, A. Bendavid, M. Swain, R. Netterfield, T. Kinder, W. Sainty, and D. Drage, “Mechanical and optical properties of thin films of tantalum oxide deposited by ion-assisted deposition,” Materials Research Society Symposium Proceedings 306, 583 (1993).
- (15) D. Crooks, G. Cagnoli, M. Fejer, A. Gretarsson et al., “Experimental measurements of coating mechanical loss factors,” Classical and Quantum Gravity 21, S1059 (2004).
- (16) I. Martin et al., “Measurements of a low-temperature mechanical dissipation peak in a single layer of Ta2O5 doped with TiO2,” Classical and Quantum Gravity 25, 055005 (2008).
- (17) M. Gross, “CSIRO Report 1, Ion Beam Deposited Coatings,” https://dcc.ligo.org/public/0027/T040236/000/T040236-00.pdf (2004). LIGO documnet LIGO-T040236-00-D.
- (18) E. Çetinörgü, B. Baloukas, O. Zabeida, J. E. Klemberg-Sapieha, and L. Martinu, “Mechanical and thermoelastic characteristics of optical thin films deposited by dual ion beam sputtering,” Applied Optics 48, 4536–4544 (2009).
- (19) G. Harry, M. Abernathy, A. Becerra-Toledo, H. Armandula et al., “Titania-doped tantala/silica coatings for gravitational-wave detection,” Classical and Quantum Gravity 24, 405 (2007).
- (20) I. W. Martin, R. Bassiri, R. Nawrodt, M. M. Fejer et al., “Effect of heat treatment on mechanical dissipation in Ta2O5 coatings,” Classical and Quantum Gravity 27, 225020 (2010).
- (21) J. Menc̆ík, D. Munz, E. Quandt, E. Weppelmann, and M. Swain, “Determination of elastic modulus of thin layers using nanoindentation,” Journal of Materials Research 12, 2475–2484 (1997).
- (22) W. C. Oliver and G. M. Pharr, “Measurement of hardness and elastic modulus by instrumented indentation: Advances in understanding and refinements to methodology,” Journal of Materials Research 19, 3 (2004).
- (23) W. Oliver and G. Pharr, “An improved technique for determining hardness and elastic modulus using load and displacement sensing indentation experiments,” Journal of Materials Research 7, 1564–1583 (1992).
- (24) R. Saha and W. Nix, “Effects of the substrate on the determination of thin film mechanical properties by nanoindentation,” Acta Materialia 50, 23 – 38 (2002).
- (25) A. Fischer-Cripps, “Critical review of analysis and interpretation of nanoindentation test data,” Surface and Coatings Technology 200, 4153 – 4165 (2006).
- (26) H. Song, “Selected mechanical problems in load and depth sensing indentation testing,” Ph.D. thesis, Rice University (1999).
- (27) A. Rar, H. Song, and G. M. Pharr, “Assessment of new relation for the elastic compliance of a film-substrate system,” MRS Online Proceedings Library 695, L10.10.1 (2001).
- (28) H. Gao, C.-H. Chiu, and J. Lee, “Elastic contact versus indentation modeling of multi-layered materials,” International Journal of Solids and Structures 29, 2471 – 2492 (1992).
- (29) J. Hay and B. Crawford, “Measuring substrate-independent modulus of thin films,” Journal of Materials Research 26, 727 (2011).
- (30) M. R. Abernathy, S. Reid, E. Chalkley, R. Bassiri, I. W. Martin, K. Evans, M. M. Fejer, A. Gretarsson, G. M. Harry, J. Hough, I. MacLaren, A. Markosyan, P. Murray, R. Nawrodt, S. Penn, R. Route, S. Rowan, and P. Seidel, “Cryogenic mechanical loss measurements of heat-treated hafnium dioxide,” Classical and Quantum Gravity 28, 195017 (2011).
- (31) S. Reid, G. Cagnoli, D. Crooks, J. Hough, P. Murray, S. Rowan, M. Fejer, R. Route, and S. Zappe, “Mechanical dissipation in silicon flexures,” Physics Letters A 351, 205–211 (2006).
- (32) G. G. Stoney, “The tension of metallic films deposited by electrolysis,” Proceedings of the Royal Society of London A 82, 172–175 (1909).
- (33) R. W. Hoffman, “The mechanical properties of thin condensed films,” in “Physics of Thin Films,” , vol. 3 (Academic, 1966).
- (34) M. F. Doerner and W. D. Nix, “Stresses and deformation processes in thin films on substrates,” Critical Reviews in Solid State and Materials Sciences 14, 225–268 (1988).
- (35) J. T. Brown, “Center wavelength shift dependence on substrate coefficient of thermal expansion for optical thin-film interference filters deposited by ion-beam sputtering,” Appl. Opt. 43, 4506–4511 (2004).
- (36) Y. Gaillard, V. J. Rico, E. Jimenez-Pique, and A. R. González-Elipe, “Nanoindentation of TiO2 thin films with different microstructures,” Journal of Physics D: Applied Physics 42, 145305 (2009).
- (37) K. Kurosaki, D. Setoyama, J. Matsunaga, and S. Yamanaka, “Nanoindentation tests for TiO2, MgO, and YSZ single crystals,” Journal of Alloys and Compounds 386, 261 – 264 (2005).
- (38) J. E. Klemberg-Sapieha, J. Oberste-Berghaus, L. Martinu, R. Blacker et al., “Mechanical characteristics of optical coatings prepared by various techniques: A comparative study,” Applied Optics 43, 2670–2679 (2004).