E-mail to: liccardo@fe.infn.it, virgilli@fe.infn.it
Bent crystal selection and assembling for the LAUE project
Abstract
For the first time, with the Laue project, bent crystals are being used for focusing photons in the 80-300 keV energy range. The advantage is their high reflectivity and better Point Spread Function with respect to the mosaic flat crystals. Simulations have already shown their excellent focusing capability which makes them the best candidates for a Laue lens whose sensitivity is also driven by the size of the focused spot. Selected crystals are Germanium (perfect, (111)) and Gallium Arsenide (mosaic, (220)) with 40 m curvature radius to get a spherical lens with 20 m long focal length. A lens petal is being built. We report the measurement technique by which we are able to estimate the exact curvature of each tile within a few percent of uncertainty and their diffraction efficiency. We also discuss some results.
keywords:
Laue lenses, astrophysics, bent crystals, focusing telescopes, Gamma-rays, X-rays measurements.1 INTRODUCTION
In the framework of the Laue project [1], [2], one of the main goals is the development of a technology for the production of bent crystals with the required characteristics, like proper curvature, high efficiency, low mosaicity. The advantage of curved crystals is their high diffraction efficiency and their capability of better concentrating the signal collected over a large area into a small focal spot [3], [4]. This challenging goal is being achieved, thanks to the cooperation of many institutions. Thus, for the first time a Laue lens petal completely made of bent crystals is being assembled.
A previous set of measurements [5], performed in the LARIX facility of the University of Ferrara, has shown that bent mosaic crystals of GaAs, diffractive planes (220), and bent perfect crystals of Ge (111) are very good candidates. They are resulted to show a good reproducibility in terms of curvature and efficiency. Thus they have been adopted for assembling a lens petal. In this paper, we will report the method used to measure the curvature of these bent crystals and the curvature measurement results.
2 Facility set-up
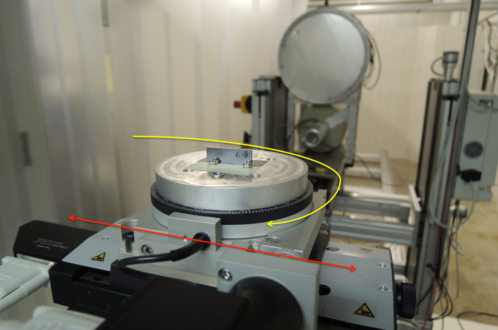
The measurements have been carried out in the LARIX facility of the University of Ferrara. A detailed description of the set up adopted can be found in Ref. [5]. However, some changes have been made since the last set of measurements to get more accurate results. In particular, the translation and rotation stages of the crystal holder have been upgraded, achieving an accuracy of 1 m along a direction perpendicular to the incident beam, and of 3 arcsec for the Bragg angle determination (see Fig. 1). These movements are monitored with an external system of optical encoders. In this way the true position of the sample and the position of the XYZ holder (X being the beam direction) can be accurately measured. The two beam collimators have been adjusted in such a way to provide a beam size of 0.5 mm 3 mm and a divergence value of about 18 arcsec. The first collimator does not significantly influence the size of the beam but affects the beam intensity, whereas the second collimator is crucial to get the size of the spot needed for the specific application. In the current configuration, the setup can be used for measuring the crystal curvature, and the beam photon angular spread, from which we can determine the crystal mosaicity.
3 Crystal bending
The bent crystals of Ge (111) are provided by the Sensor and Semiconductor Laboratory (LSS) of the University of Ferrara. The bending is obtained by means of a series of parallel superficial indentations on one of the largest faces of the crystals [6], [7], resulting in a primary curvature perpendicular to the indentation and a secondary curvature, also called quasi-mosaic, which acts with the crystal, perpendicular to the main curvature [8].
Bent mosaic crystals of GaAs (220) are instead provided by CNR-Institute of Materials for Electronics and Magnetism (IMEM) of Parma, Italy. The crystal curvature is obtained by a controlled surface damaging, which introduces defects in a superficial layer of few tens of nanometers in thickness undergoing a highly compressive strain. The controlled surface damaging were obtained by means of a mechanical lapping process on one of the two sides of the planar samples [9].
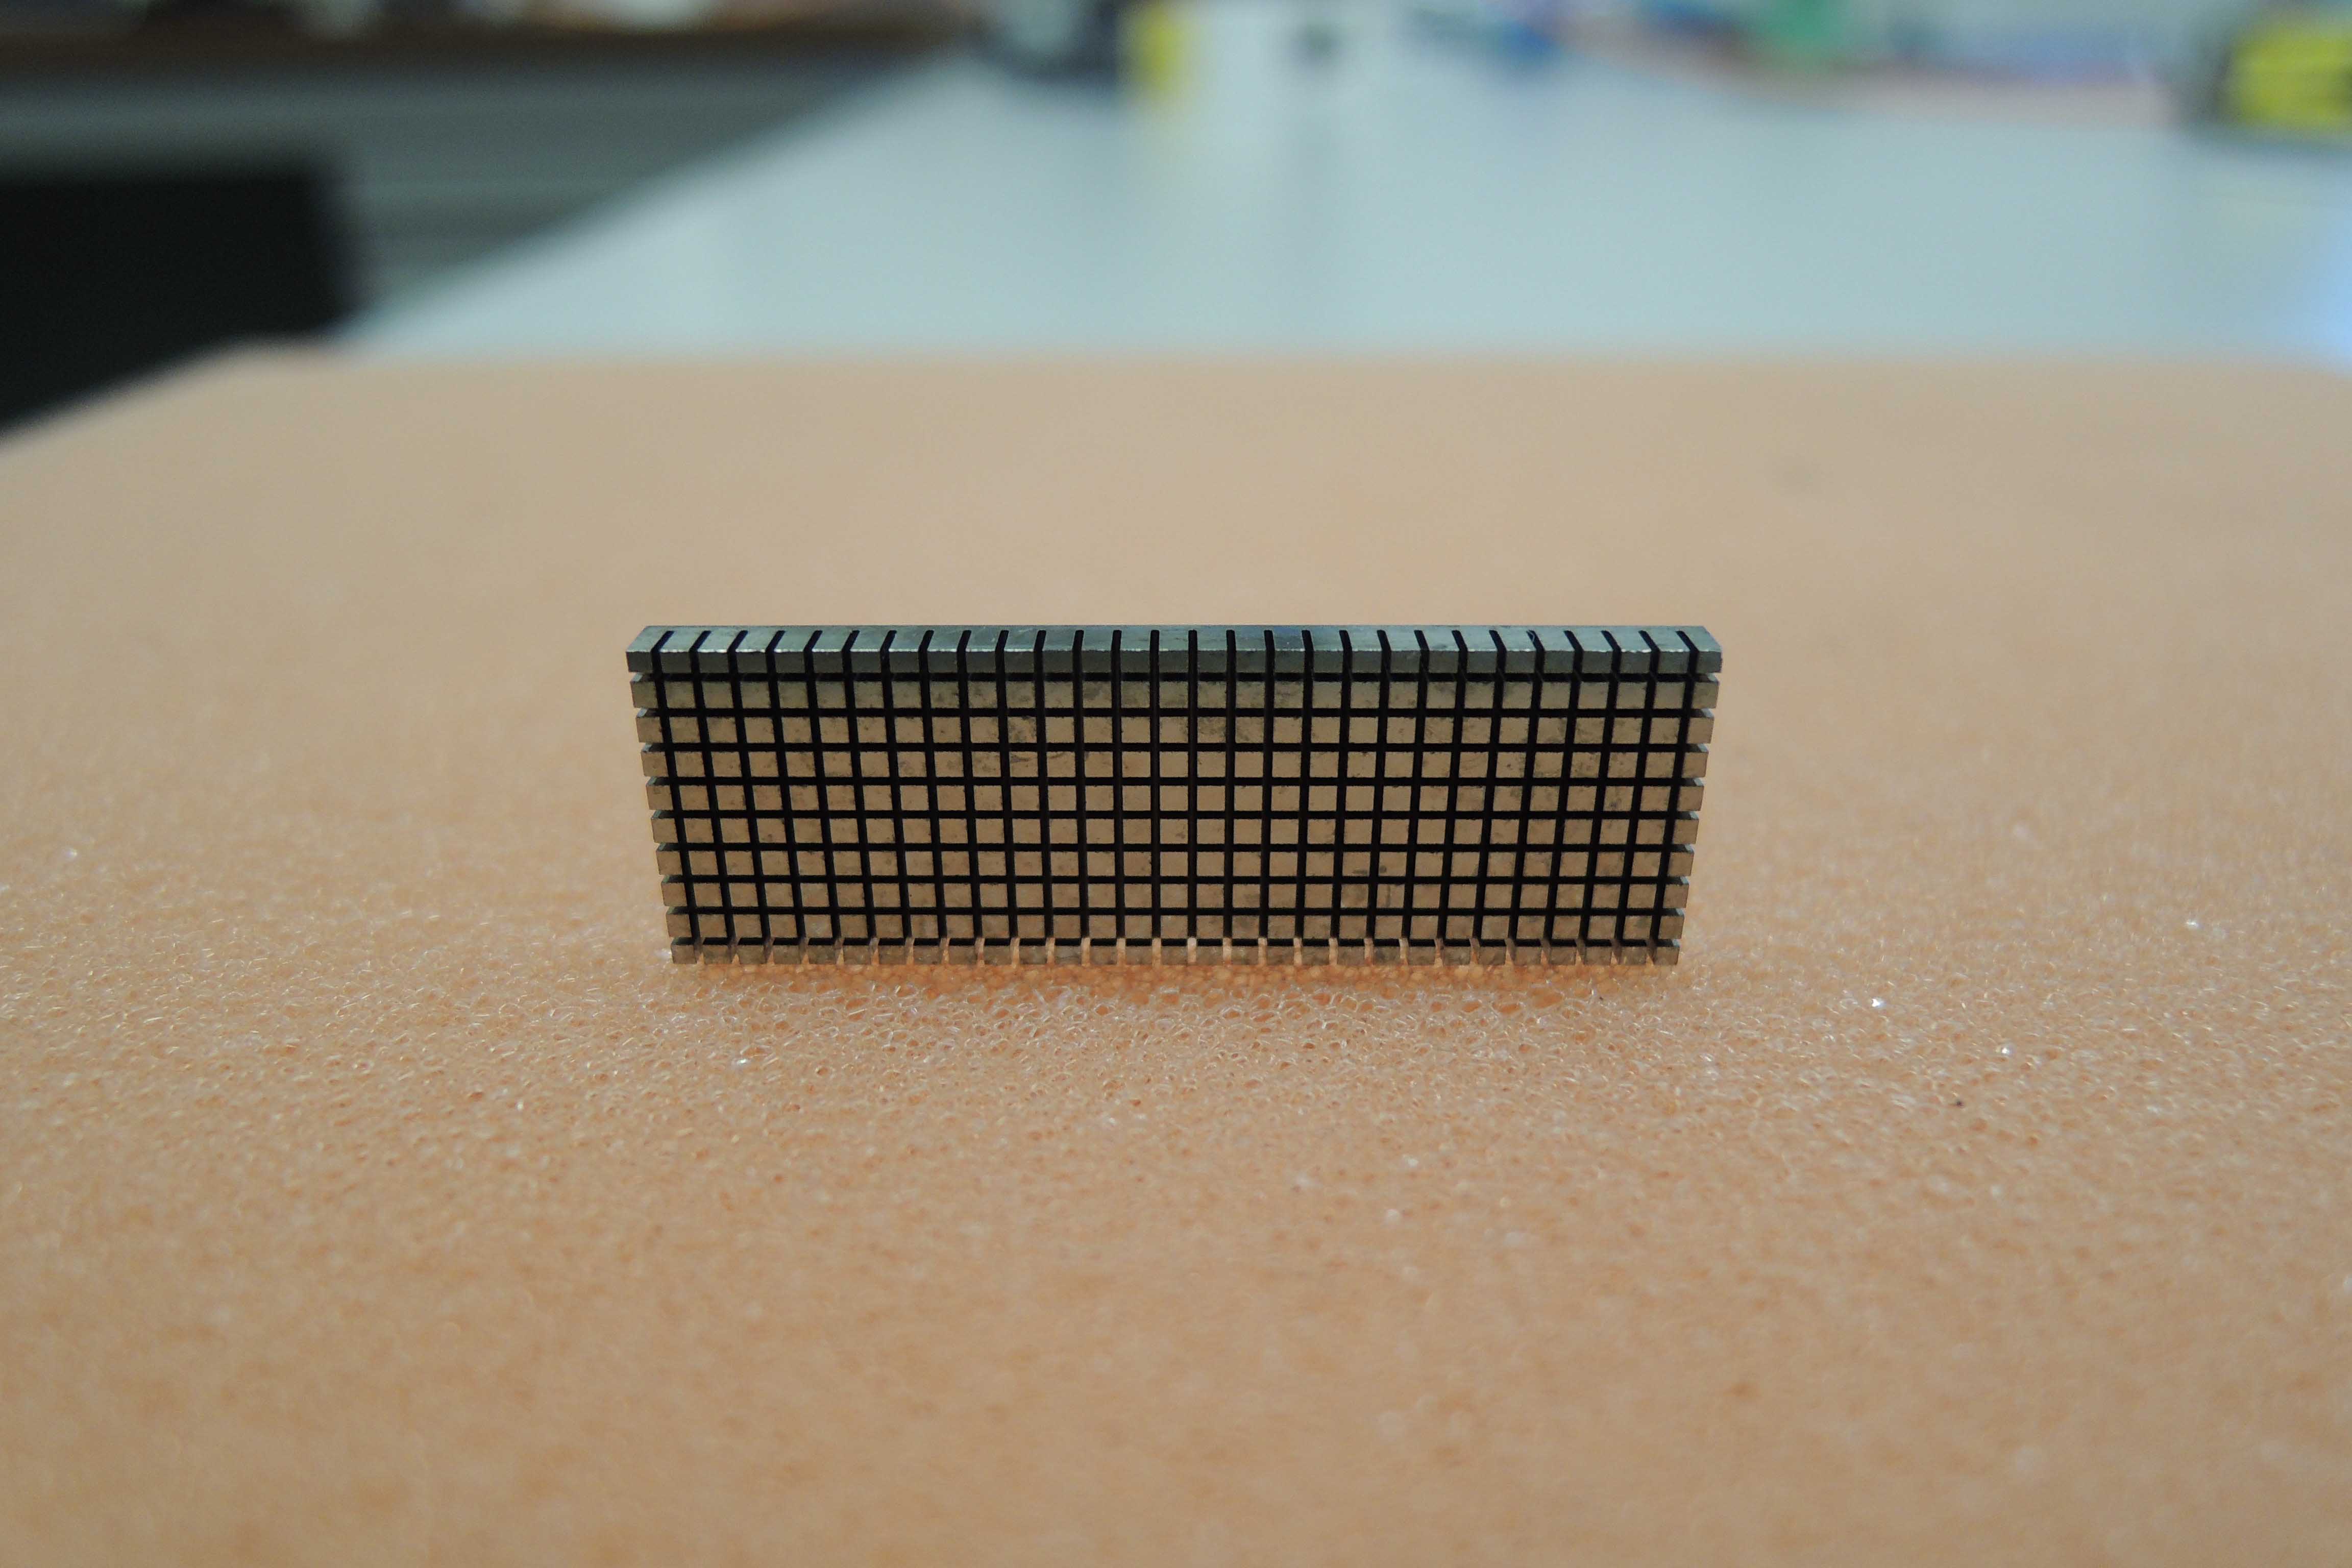
With the developed setup, it is possible to analyze the curvatures of both set of crystals. The required crystal tile size of both crystal types is 30 mm 10 mm, with a thickness of 2 mm (Fig. 2).
For the lens petal prototype, which is being assembled, LSS has already provided all the bent Ge (111) crystal tiles (about 150) with a nominal angular spread of 4 arcsec, but only 39 crystals have been analysed in order to test the curvature obtained by means of the indentations. The curvature is preliminarly measured by the LSS staff means of a profilometer, obtaining a curvature radius of 40m. However, it is important to take into account that the measured curvature just estimates the profile of the external surface of the single crystals. For this reason we have carried out, in the LARIX facility, diffraction tests in transmission geometry, to better investigate the curvature of the lattice planes, obtaining some deviations with respect the profilometer results. The indented Ge samples have an excellent regularity in thickness (22.01 mm) and weight (2.062.08 g).
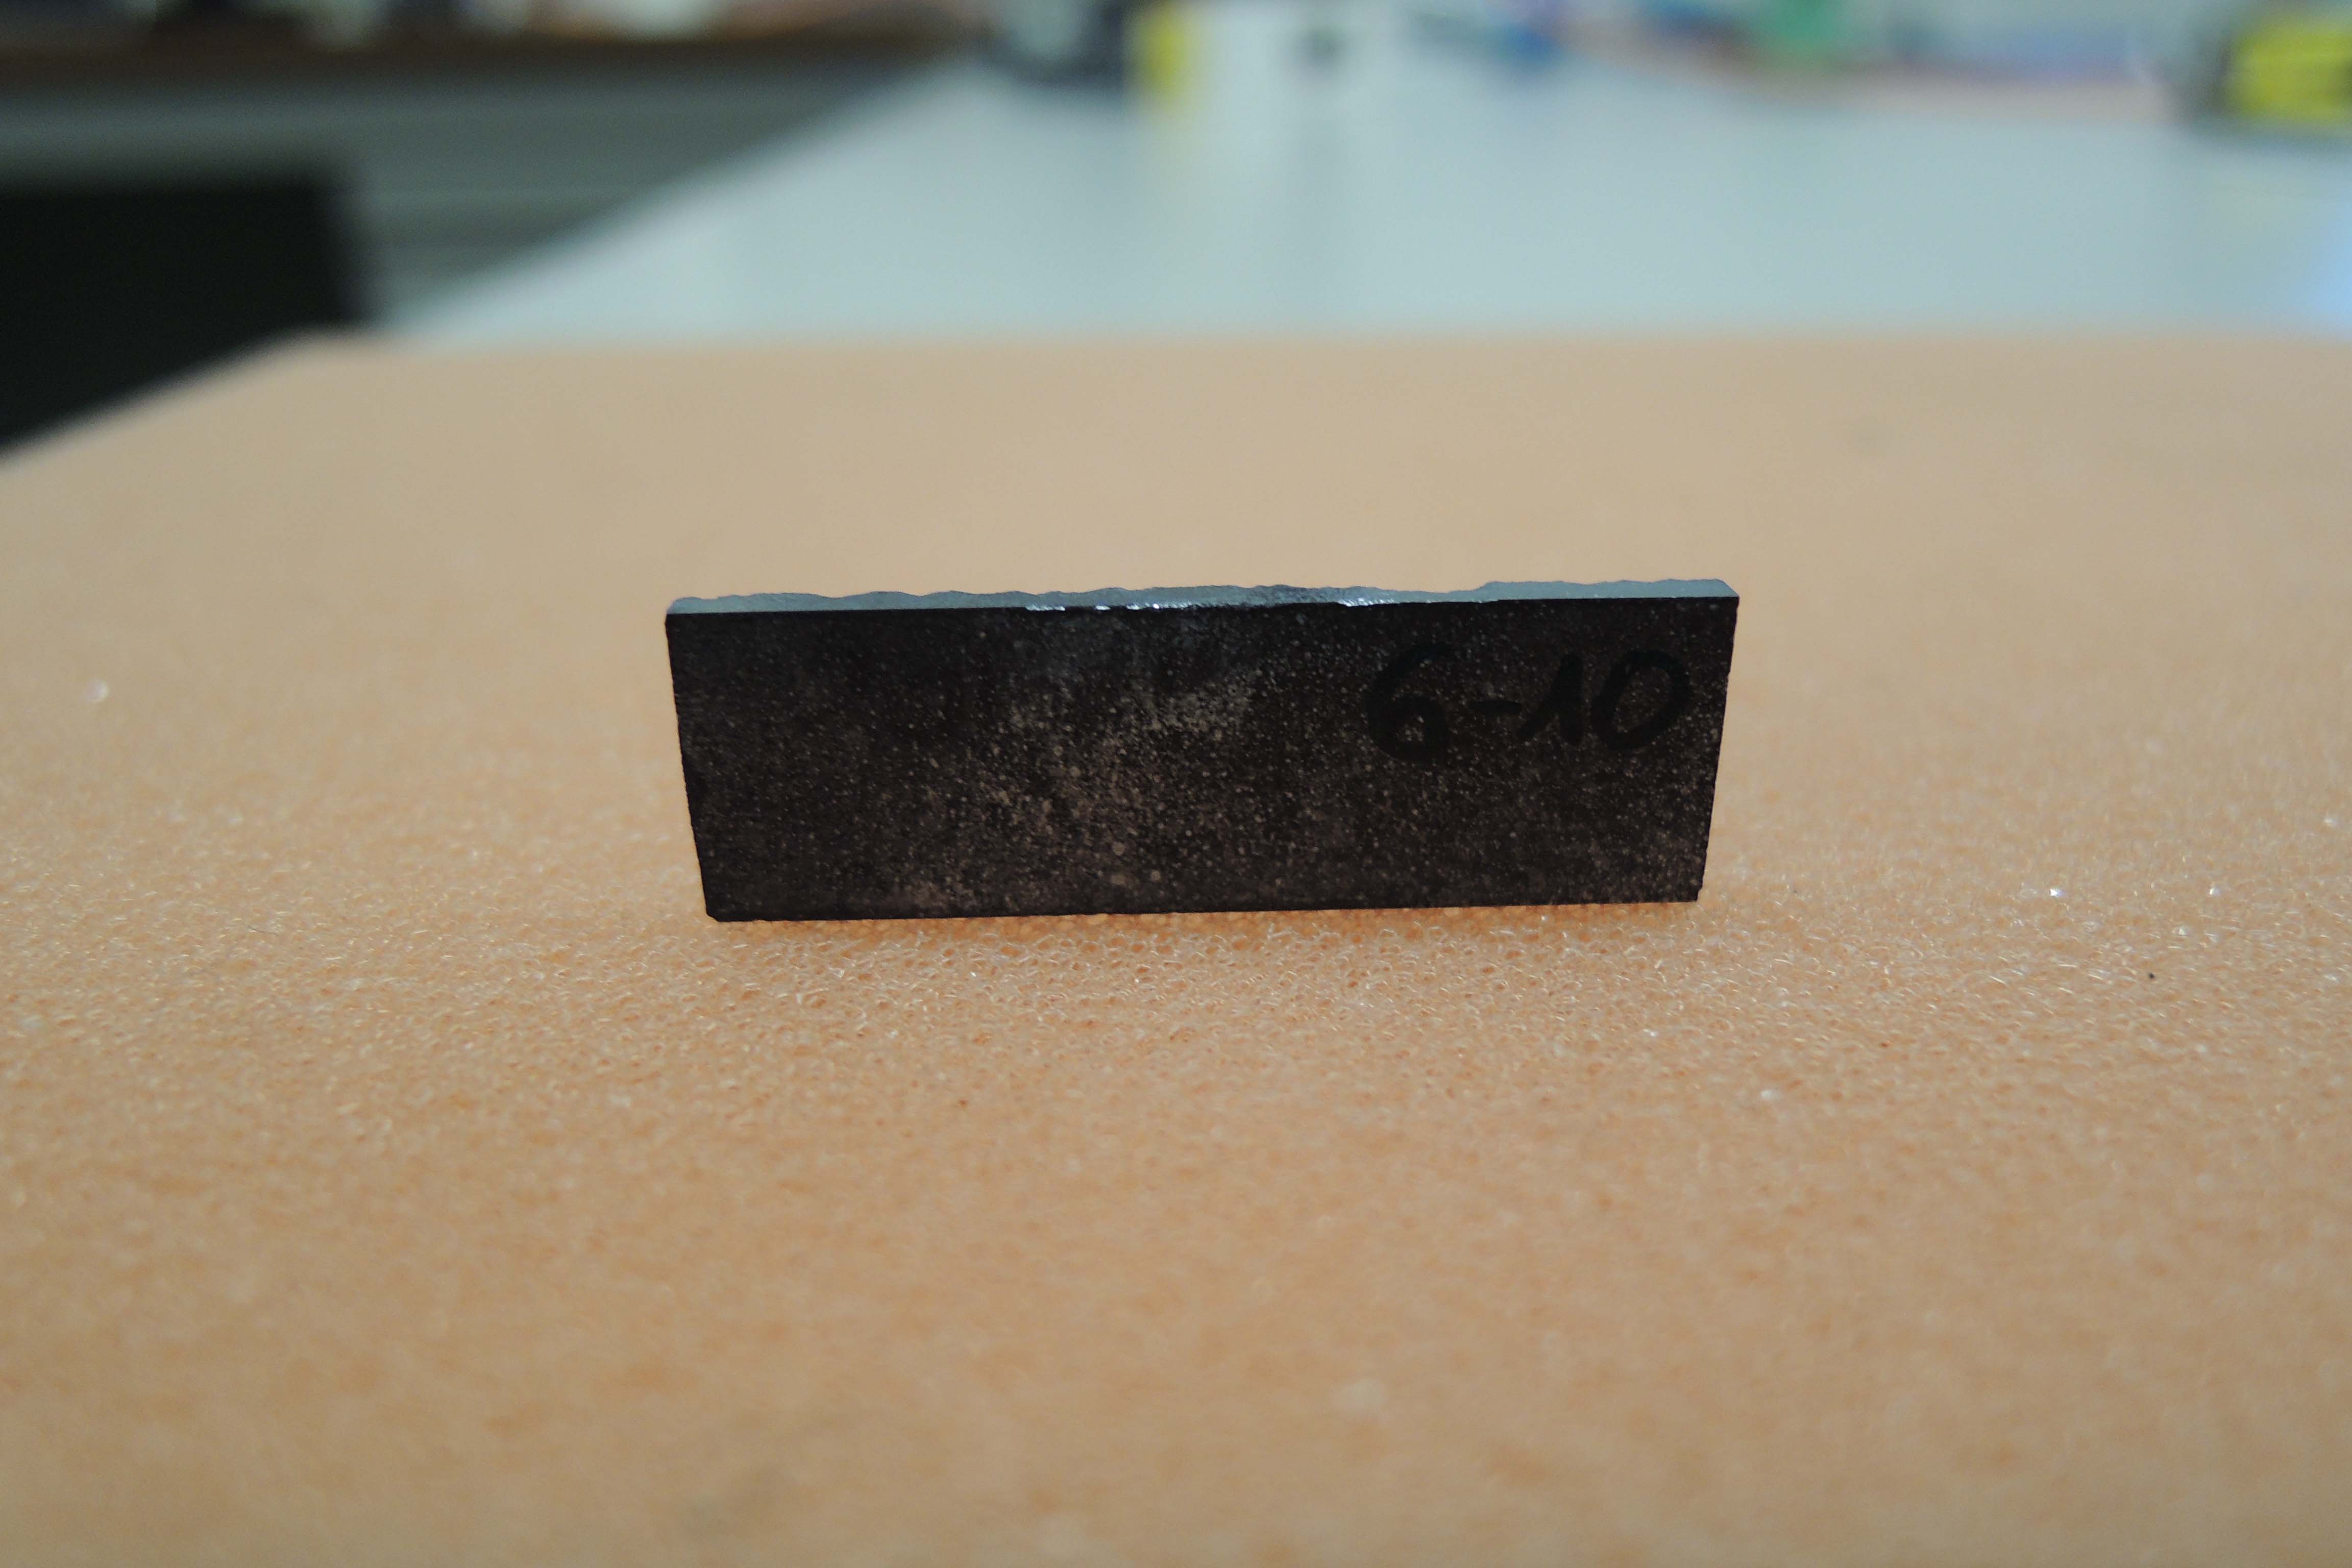
IMEM has supplied 2 sets of bent crystal tiles of GaAs (220). The first set was composed of 10 samples of GaAs (220) with variable thickness (0.450.55 mm) and square cross section (15 mm 15 mm), whose curvature was measured by themselves with a Bragg diffractometer, that makes use of a Cu K fluorescence line. This set was developed to compare the results obtained by them with those obtainable with the LARIX facility. The samples coming from the same ingot resulted to exhibit a uniform mosaicity (mosaic-spread 15-18 arcsec). Each sample resulted to show two different curvatures along the orthogonal axes and . The IMEM group was able to estimate the curvature radius with an accuracy of 5%. However, in Bragg geometry, the estimate of the curvature is based on the curvature of the shallow layers of the sample, as the deeper regions of the crystal are not irradiated by X-rays. Therefore, we decided to perform the transmission measurement in the LARIX facility in order to make a comparison with the results obtained by IMEM. The second set of 18 GaAs (220) crystals (with mosaicity of 25 arcsec) provided by IMEM, has instead the size required by the project (30 mm 10 mm 2 mm) and a variable weight (2.402.85 g), depending on the different amount of material removed by the lapping procedure.
4 Adopted method for the curvature measurement
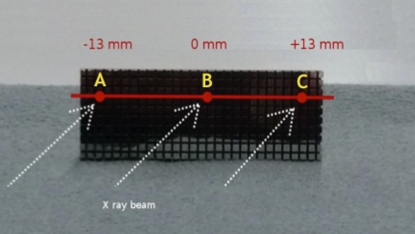
To estimate the value of the primary curvature (also called main curvature) of a sample, we adopted the following method. The sample is fixed to the moving system that allows to translate the crystal perpendicular to the direction of the incident beam, and rotate it around a vertical axis perpendicular to the beam and passing through the center of the tile itself. Then the crystal diffraction of the monochromatic radiation at 59.2 keV due to the fluorescence of the X–ray tube W anode, is analyzed in several crystal points. From the comparison of the spectra of the diffracted beams from each point it is possible to estimate the curvature.
In particular, the first step is to determine the Bragg angle , in the point A of the crystal (Fig. 3). The crystal is then moved parallel to itself so that the beam impinges on the crystal in a different point B, with distance AB well known. Since the tile is bent, the point B needs a different angle to diffract the same energy as the point A. To get the same diffracted energy (59.2 keV) in correspondence of the point B, we have to rotate the sample of an angle which represents the angular aperture between the points A and B. Applying the same procedure to a set of points along the crystal, it is possible to investigate the angular aperture with continuity along the tile, obtaining the mean curvature radius of the crystal itself.
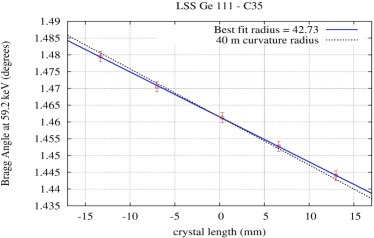
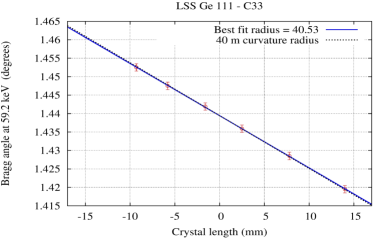
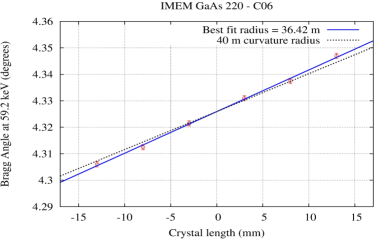
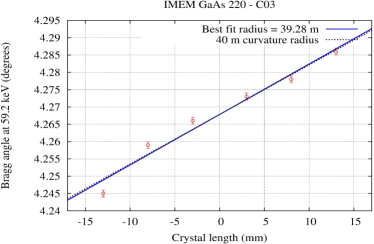
The estimation of the curvature radius is made by performing a linear fit to the different rotation angles measured. Indeed the angular coefficient of the straight line gives the curvature of the sample (Fig. 4). The uncertainty on the curvature radius is related to the error in the determination of the distance between the contiguous points where the energy of the diffracted beams are measured, and on the determination of the Bragg angle corresponding to the line as well. Being the distance between the points, and the difference between the Bragg angles of the points diffracting the same energy, the curvature radius and its uncertainty are given by:
| (1) |
The uncertainty in the estimation of the distance between the two points is related to the accuracy of the translational stage which moves the crystal and allows the beam to impinge on two adjacent points of the sample. As written above, this accuracy is 0.001 mm, whereas the typical distance between two successive points is 4-5 mm. It follows that:
| (2) |
Regarding the angular uncertainty, the actuator used has an accuracy of degrees but the Bragg angle estimation necessary to diffract the desired energy is determined by a Gaussian fit of the Rocking curve, which reduces the value of the error to 2 10-5 degrees. The variation of the angle between two adjacent points, being dependent on the distance between the points and the curvature to be measured (approximately 40 m), is of the order of 0.02∘:
| (3) |
It is evident that the main error comes from the angular uncertainty, while the translational stage error is negligible. The accuracy in determining the angle variation obviously increases if the points to be compared are farther from each other. In this case the difference between the Bragg angles relative to the points analyzed is greater, whereas the uncertainty in the determination of each point is the same, improving the estimation of the curvature radius. Based on the above considerations we can estimate the curvature radius with an error of about 2 m, for those samples which exhibit a bending radius of 40 meters.
5 Curvature measurement Results
5.1 Germanium (111) crystal tiles
All the Ge (111) crystal tiles show a bending radius extremely uniform throughout the crystal, even if in some case there is a discrepancy between the expected and the measured curvature. As regards those samples characterized by a curvature radius greater than expected, it has been experimentally demonstrated in a first stage, that by indenting again the tile increasing the grooves depth, the curvature radius decreases. On the other hand, if the curvature radius is smaller than expected, the crystals can be further exposed to an etching procedure by means it is possible to increase the curvature radius of the tile. Therefore the crystal profiles can be adjusted, with an accuracy of 5%, once the diffraction tests have been performed. Two examples of crystal curvature measurement method are given in Fig. 4.
| Crystal | Curvature | Crystal | Curvature | Crystal | Curvature |
|---|---|---|---|---|---|
| Number | Radius (m) | Number | Radius (m) | Number | Radius (m) |
| 8 | 44.7 | 29 | 43.0 | 58 | 41.8 |
| 9 | 44.2 | 30 | 40.5 | 68 | 42.8 |
| 10 | 37.4 | 31 | 37.4 | 71 | 43.7 |
| 11 | 44.3 | 32 | 26.0 | 72 | 44.7 |
| 13 | 44.7 | 33 | 40.5 | 73 | 43.1 |
| 14 | 37.3 | 34 | 43.3 | 80 | 37.9 |
| 15 | 40.5 | 35 | 42.7 | 81 | 38.4 |
| 16 | 38.5 | 36 | 38.0 | 82 | 44.2 |
| 17 | 41.8 | 37 | 33.0 | 83 | 30.4 |
| 21 | 39.5 | 47 | 54.5 | 92 | 40.9 |
| 24 | 46.4 | 48 | 45.7 | 94 | 52.6 |
| 25 | 51.1 | 49 | 39.4 | 94 | 52.6 |
| 26 | 47.7 | 50 | 41.3 | 119 | 39.3 |
| 27 | 43.5 | 51 | 42.3 | 126 | 47.0 |
| 28 | 41.5 | 56 | 41.2 | 153 | 44.3 |
5.2 Gallium Arsenide (220) crystal tiles
The first set of crystals supplied by IMEM have shown a good agreement between the results obtained using the reflection diffractometer and transmission technique adopted in the LARIX facility. Table 2 reports the results obtained by IMEM compared with those obtained in the LARIX. With the exception of the curvature along the axis measured for the crystal number 3 (whose bending radius is very small, therefore unsuitable for the project) for which we obtain a discrepancy between the two measures greater than 10%, the measured curvature radii, along both and axes, agree with each other within an uncertainty of 5%.
| Crystal | Thickness | Grain-paper | IMEM | LARIX | Deviation (%) | |||
| Rc | Rc | Rc | Rc | IMEM-LARIX | ||||
| Tile | (mm) | (m) | (m) | (m) | (m) | x-axis | y-axis | |
| 1 | 0.495 | P2500 | 13.8 | 66.7 | 14.3 | 67.9 | 3.5% | 1.8% |
| 2 | 0.440 | P600 | 6.0 | 23.3 | n.t. | 22.8 | - | 2.1% |
| 3 | 0.460 | P320 | 5.2 | 16.2 | 5.8 | n.t. | 10.9% | - |
| 4 | 0.502 | P4000 | 20.3 | 60.0 | 20.6 | 59.6 | 1.5% | 0.7% |
| 5 | 0.420 | P180 | 3.1 | 7.4 | n.t. | n.t. | - | - |
| 6 | 0.445 | P1200 | 7.4 | 29.2 | n.t. | 30.3 | - | 3.6% |
| 7 | 0.435 | P400 | 5.6 | 10.6 | n.t. | 11.0 | - | 4.1% |
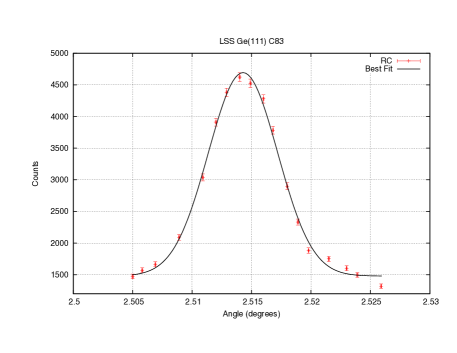
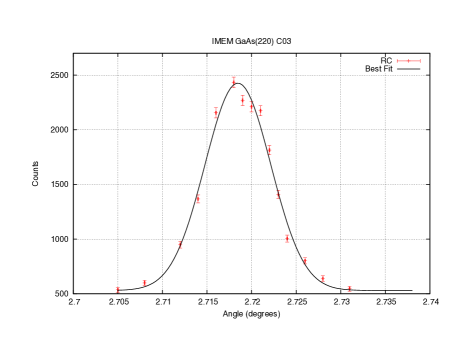
The second set of crystals provided by IMEM (see Sec. 3) satisfies the curvature required by the LAUE project. The results obtained at IMEM and LARIX laboratory are reported in Table 3. An example of rocking curve, which is used to estimate the crystal mosaicity, is shown in Fig. 7. The discrepancy between the LARIX and IMEM estimates in this case is greater. This discrepancy likely is due to the fact that IMEM measures the reflected beam, while we measure the diffracted beam in transmission geometry, and also to the non-uniform curvature of the GaAs samples due to the presence of dislocations. Furthermore, a non-uniformity for the GaAs samples is observed at the edges of the tiles, if compared to the Germanium samples (Fig. 6).
| Crystal | Weight | Rc | Rc | Deviation (%) | Mosaicity (arcsec) |
|---|---|---|---|---|---|
| Number | (g) | IMEM | LARIX | IMEM-LARIX | LARIX |
| 1 | 2.40 | 40.3 | 35.0 | 13.9% | 25.5 |
| 2 | 2.05 | 42.4 | 39.5 | 7.3% | 27.4 |
| 3 | 2.66 | 41.9 | 39.3 | 6.5% | 23.6 |
| 4 | 2.67 | 38.8 | 39.2 | 1.1% | 21.2 |
| 4.8 | 2.55 | 39.4 | 35.9 | 8.75% | - |
| 4.9 | 2.62 | 38.7 | 36.3 | 6% | - |
| 5 | 2.85 | 40.0 | 38.2 | 4.5% | 25.2 |
| 5.2 | 2.35 | 40.0 | 39.9 | 0.2% | - |
| 5.10 | 2.42 | 40.0 | 40.0 | -% | - |
| 6 | 2.60 | 40.0 | 36.5 | 9.2% | 23.4 |
| 6.4 | 2.65 | 40.0 | 38.9 | 0.2% | - |
| 6.6 | 2.62 | 42.0 | 40.5 | 3.75% | - |
| 6.10 | 2.52 | 38.8 | 36.8 | 5.0% | - |
| 6.11 | 2.60 | 38.6 | 34.7 | 9.7% | - |
| 6.12 | 2.55 | 41.1 | 42.38 | 3.2% | - |
6 Discussion and Conclusions
The performed curvature tests have shown that the production of the curvature of the crystal tiles for the lens petal prototype satisfies the requirements within 5-10% accuracy.
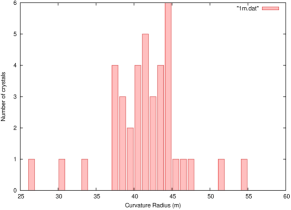
In particular, concerning Ge (111) crystal tiles, 36% of the tested tiles have a curvature radius of 40 m within 5%, while 60% of the tiles have a curvature radius of 40 m within 10%. In Figure 8 it is shown the distribution of the measured curvature radii.
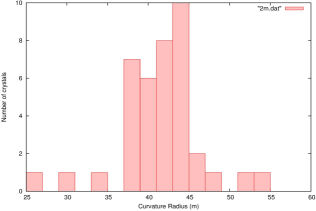
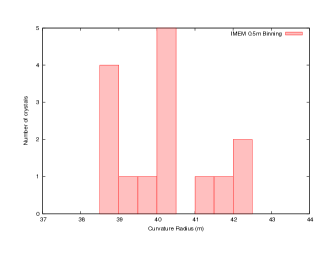
Concerning GaAs (220) crystal tiles, due to the small number of tested crystals it has not been possible to make a similar statistical analysis to make an inference about the goodness of the tiles provided (see Fig. 9). However, from the results obtained we can see that 44% of the samples tested have a curvature of 40 m (5%), whereas 83% (10%).
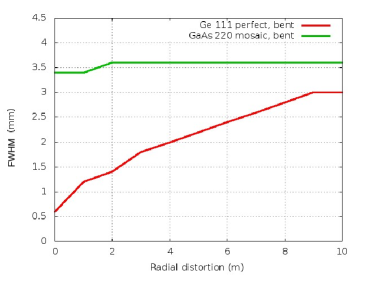
Together with the measurements of the crystal samples, a series of simulations were performed [10] in order to determine the maximum acceptable radial distortion with respect to the nominal curvature radius. In Figure 10 it is shown the dependence of the Full Width at Half Maximum (FWHM) of the Point Spread Function (PSF) on the crystal deviation from the nominal curvature (40 m), for a lens entirely made of either Ge (111) (red curve) or GaAs (220) (green curve) crystals. The simulation shows that for a distortion equal to zero (the ideal case), the FWHM is equal to 0.6 mm in the case of Ge perfect crystals, whereas it is equal to 3.4 mm using mosaic GaAs (220) tiles. Despite the Germanium PSF rapidly grows with the increasing distortion, it is always smaller than that of GaAs whose size seems to be almost constant. Therefore a small distortion is acceptable for a lens made of Ge (111) crystals.
Acknowledgements.
The authors wish acknowledge the financial support by the Italian Space Agency (ASI) through the project “LAUE - Una Lente per i raggi Gamma”under contract I/068/09/0. V.V. and V.L. are supported by the Erasmus Mundus Joint Doctorate Program by Grant Number 2010-1816 from the EACEA of the European Commission.References
- [1] F. Frontera, E. Virgilli, V. Valsan, V. Liccardo, V. Carassiti, E. Caroli, F. Cassese, L. Recanatesi, C. Ferrari, V. Guidi, S. Mottini, M. Pecora, B. Negri, L. Amati, N. Auricchio, L. Bassani, R. Campana, R. Farinelli, C. Guidorzi, C. Labanti, R. Landi, A. Malizia, M. Orlandini, V. Sguera, J. Stephen, L. Titarchuk, “Scientific prospects in soft gamma-ray astronomy thanks to the LAUE project,” in [Society of Photo-Optical Instrumentation Engineers (SPIE) Conference Series ], 8861 (2013).
- [2] Virgilli, E., Liccardo, V., Valsan, V., Frontera, F., Caroli, E., Stephen, J., Cassese, F., Recanatesi, L., and Pecora, M., “The laue project for broad band gamma-ray focusing lenses,” in [Proc. of SPIE Vol. 8147, Optics for EUV, X-Ray, and Gamma-Ray Astronomy V ], SPIE (2011).
- [3] N. Barriere, P. von Ballmoos, P. Bastie, P. Courtois, N. V. Abrosimov, K. Andersen, T. Buslaps, T. Camus, H. Halloin, M. Jentschel, J. Knödlseder, G. Roudil, D. Serreγ, G. Skinner “R&D progress on second-generation crystals for Laue lens applications” SPIE Conference Series 6688 arXiv:0808.0775 (2008).
- [4] F. Frontera and Peter von Ballmoos. “Laue gamma-ray lenses: status and prospects,“ [X-Ray Optics and Instrumentation Volume 2010], Article ID 215375, doi:10.1155/2010/215375 (2010).
- [5] V. Liccardo, E. Virgilli, F. Frontera and V. Valsan. “Characterization of bent crystals for laue lenses,” in [Society of Photo-Optical Instrumentation Engineers (SPIE) Conference Series ], 8443, SPIE (2012).
- [6] N. Barrière, V. Guidi, V. Bellucci, R. Camattari, T. Buslaps, J. Rousselle, G. Roudil, F.X. Arnaud, P. Bastie, and L. Natalucci, “High diffraction efficiency at hard X-ray energy in a silicon crystal bent by indentation,” in [Journal of Applied Crystallography 431519–1521 ], (2010).
- [7] V. Bellucci, R. Camattari, V. Guidi, I. Neri, N. Barrière, “Self-standing bent silicon crystals for very high efficiency Laue lens,” in [Experimental Astronomy 31, 45-58 ],(2011).
- [8] V. Guidi, V. Bellucci, R. Camattari, I. Neri, “Proposal for a Laue lens with quasi-mosaic crystalline tiles,” in [Journal of Applied Crystallography 44, 1255-1258],(2011).
- [9] E. Buffagni, C. Ferrari, F. Rossi, L. Marchini, A. Zappettini A., “Preparation of bent crystals as high efficiency optical elements for hard x-ray astronomy,” in [Proc. of SPIE Vol. 8147, Optics for EUV, X-Ray, and Gamma-Ray Astronomy V ], SPIE (2011).
- [10] V. Valsan, E. Virgilli, F. Frontera and Liccardo, V., “Results of the simulations of the petal/lens as part of the laue proiect,” in [Society of Photo-Optical Instrumentation Engineers (SPIE) Conference Series ], 8861 (2013).
- [11] Virgilli, E., Frontera, F., Valsan, V., Liccardo, V., Carassiti, V., Evangelisti, F., Sqerzanti, S., Parise, M., Statera, M., Guidi V., , Bellucci, V., Camattari, R., Caroli, E., Auricchio, N., Basili, A., Silvestri, S., Stephen, J. B., Cassese, F., Recanatesi, L., Ferrari, C., Zappettini, A., Buffagni, E., Mottini, S., Pecora, M., and Negri, B., “The LAUE project and its main results,” SPIE Conference Series 8861 (2013).