An Electromagnetic Calorimeter for the JLab Real Compton Scattering Experiment
Abstract
A lead-glass hodoscope calorimeter that was constructed for use in the Jefferson Lab Real Compton Scattering experiment is described. The detector provides a measurement of the coordinates and the energy of scattered photons in the GeV energy range with resolutions of 5 mm and 6%/. Features of both the detector design and its performance in the high luminosity environment during the experiment are presented.
keywords:
Calorimeters , Čerenkov detectorsPACS:
29.40Vj , 29.40.Ka ‘1 Introduction
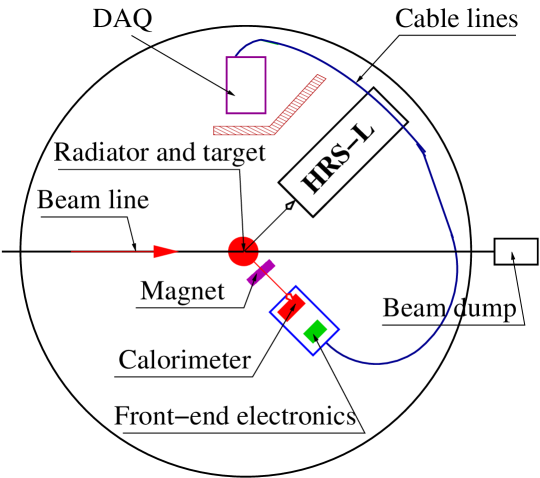
A calorimeter was constructed as part of the instrumentation of the Jefferson Lab (JLab) Hall A experiment E99-114, “Exclusive Compton Scattering on the Proton” [1], the schematic layout for which is shown in Fig. 1.
The study of elastic photon scattering provides important information about nucleon structure, which is complementary to that obtained from elastic electron scattering [2]. Experimental data on the Real Compton Scattering (RCS) process at large photon energies and large scattering angles are rather scarce, due mainly to the absence of high luminosity facilities with suitable high-resolution photon detectors. Such data are however crucial, as the basic mechanism of the RCS reaction is the subject of active debate [3, 4, 5]. The only data available before the JLab E99-114 experiment were obtained at Cornell about 30 years ago [6].
The construction of the CEBAF (Continuous Electron Beam Accelerator Facility) accelerator has led to an extension of many experiments with electron and photon beams in the GeV energy range and much improved precision. This is the result of a number of fundamental improvements to the electron beam, including a 100% duty cycle, low emittance and high polarization, in addition to new dedicated target and detector systems. The CEBAF duty factor provides an improvement of a factor of 15 compared to the best duty factor of a beam extracted from a synchrotron, at a similar instantaneous rate in the detectors.
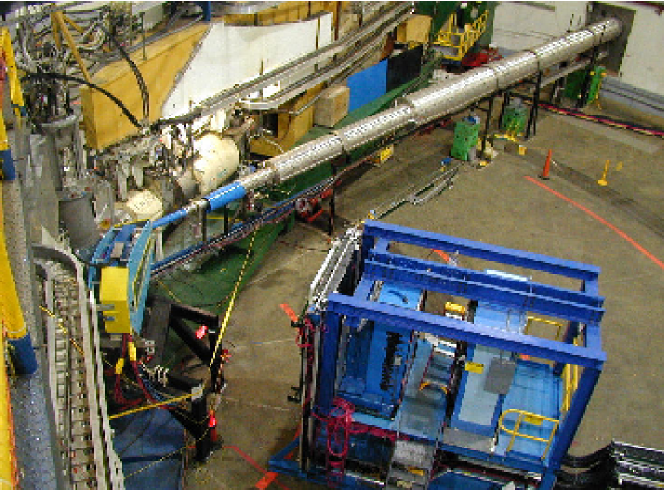
In 1994 work began on the development of a technique for an RCS experiment at JLab, leading in 1997 to the instigation of a large-scale prototyping effort. The results of the subsequent test runs in 1998 and 1999 [7] provided sufficient information for the final design of the apparatus presented in the present article. The fully realized physics experiment took place in 2002 (see Fig. 1) at a photon-nucleon luminosity which was a factor of 1300 higher than in the previous Cornell experiment. The experimental technique involves utilizing a mixed electron-photon beam which is incident on a liquid hydrogen target and passes to a beam dump. The scattered photons are detected in the calorimeter, while the recoiling protons are detected in a high resolution magnetic spectrometer (HRS-L). A magnet between the hydrogen target and the calorimeter deflects the scattered electrons, which then allows for clean separation between Compton scattering and elastic e-p scattering events. The Data Acquisition Electronics (DAQ) is shielded by a 4 inch thick concrete wall from the beam dump and the target. Figure 2 shows a photograph of the experimental set-up with the calorimeter in the center.
The experiment relied on a proton-photon time coincidence and an accurate measurement of the proton-photon kinematic correlation for event selection. The improvement in the event rate over the previous measurement was achieved through the use of a mixed electron-photon beam, which in turn required a veto detector in front of the calorimeter or the magnetic deflection of the scattered electron [1]. In order to ensure redundancy and cross-checking, both a veto and deflection magnet were designed and built. The fact that a clean photon beam was not required meant that the photon radiator could be situated very close to the hydrogen target, leading to a much reduced background near the beam line and a dramatic reduction of the photon beam size. This small beam size in combination with the large dispersion in the HRS-L proton detector system [8] resulted in very good momentum and angle resolution for the recoiling proton without the need for a tracking detector near the target, where the background rate is high.
Good energy and coordinate resolutions were key features of the photon detector design goals, both of which were significantly improved in the JLab experiment as compared to the Cornell one. An energy resolution of at least 10% is required to separate cleanly RCS events from electron bremsstrahlung and neutral pion events. In order to separate further the background from neural pion photo-production, which is the dominant component of the high-energy background in this measurement, a high angular resolution between proton and photon detectors is crucial. This was achieved on the photon side by constructing a highly segmented calorimeter of 704 channels. The RCS experiment was the first instance of a calorimeter being operated at an effective electron-nucleon luminosity of cm2/s [9, 10] (a 40 A electron beam on a 6% Cu radiator upstream of a 15 cm long liquid hydrogen target). It was observed in the test runs that the counting rate in the calorimeter fell rapidly as the threshold level was increased, which presented an opportunity to maintain a relatively low trigger rate even at high luminosity. However, on-line use of the calorimeter signal required a set of summing electronics and careful equalizing and monitoring of the individual channel outputs during the experiment.
As the RCS experiment represented the first use of such a calorimeter at very high luminosity, a detailed study of the calorimeter performance throughout the course of the experiment has been conducted. This includes a study of the relationship between luminosity, trigger rate, energy resolution and ADC pedestal widths. An observed fall-off in energy resolution as the experiment progressed allowed for characterization of radiation damage sustained by the lead-glass blocks. It was possible to mitigate this radiation damage after the experiment by annealing, with both UV curing and heating proving effective.
We begin by discussing the various components which make up the calorimeter and the methods used in their construction. This is followed by a description of veto hodoscopes which were used for particle identification purposes. An overview of the high-voltage and data acquisition systems is then presented, followed, finally, by a discussion on the performance of the calorimeter in the unique high-luminosity environment during the RCS experiment.
2 Calorimeter
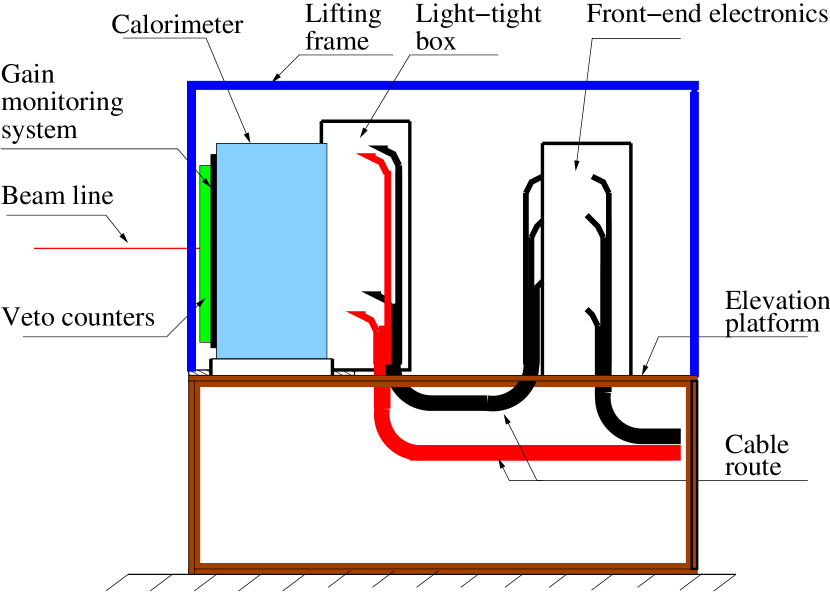
The concepts and technology associated with a fine-granularity lead-glass Čerenkov electromagnetic calorimeter (GAMS) were developed by Yu. Prokoshkin and collaborators at the Institute of High Energy Physics (IHEP) in Serpukhov, Russia [11]. The GAMS type concept has since been employed for detection of high-energy electrons and photons in several experiments at JLab, IHEP, CERN, FNAL and DESY (see for example [12]). Many of the design features of the calorimeter presented in this article are similar to those of Serpukhov. A schematic showing the overall design of the RCS calorimeter can be seen in Fig. 3. The main components are:
-
1.
the lead-glass blocks;
-
2.
a light-tight box containing the PhotoMultiplier Tubes (PMTs);
-
3.
a gain-monitoring system;
-
4.
a doubly-segmented veto hodoscopes;
-
5.
the front-end electronics;
-
6.
an elevated platform;
-
7.
a lifting frame.
The calorimeter frame hosts a matrix of 2232 lead-glass blocks together with their associated PMTs and High Voltage (HV) dividers. Immediately in front of the lead-glass blocks is a sheet of UltraViolet-Transmitting (UVT) Lucite, which is used to distribute calibration light pulses for gain-monitoring purposes uniformly among all 704 blocks. The light-tight box provides protection of the PMTs from ambient light and contains an air-cooling system as well as the HV and signal cable systems. Two veto hodoscopes, operating as Čerenkov counters with UVT Lucite as a radiator, are located in front of the calorimeter. The front-end electronics located a few feet behind the detector were assembled in three relay racks. They are comprised of 38 analog summers, trigger logic and patch panels. The elevated platform was needed to bring the calorimeter to the level of the beam line, while the lifting frame was used to re-position the calorimeter in the experimental hall by means of an overhead crane. This procedure, which took on average around two hours, was performed more than 25 times during the course of the experiment.
2.1 Calorimeter Design
The main frame of the calorimeter is made of 10 inch wide steel C-channels. A thick flat aluminum plate was bolted to the bottom of the frame, with a second plate installed vertically and aligned to 90∘ with respect to the first one by means of alignment screws (see Fig. 4).
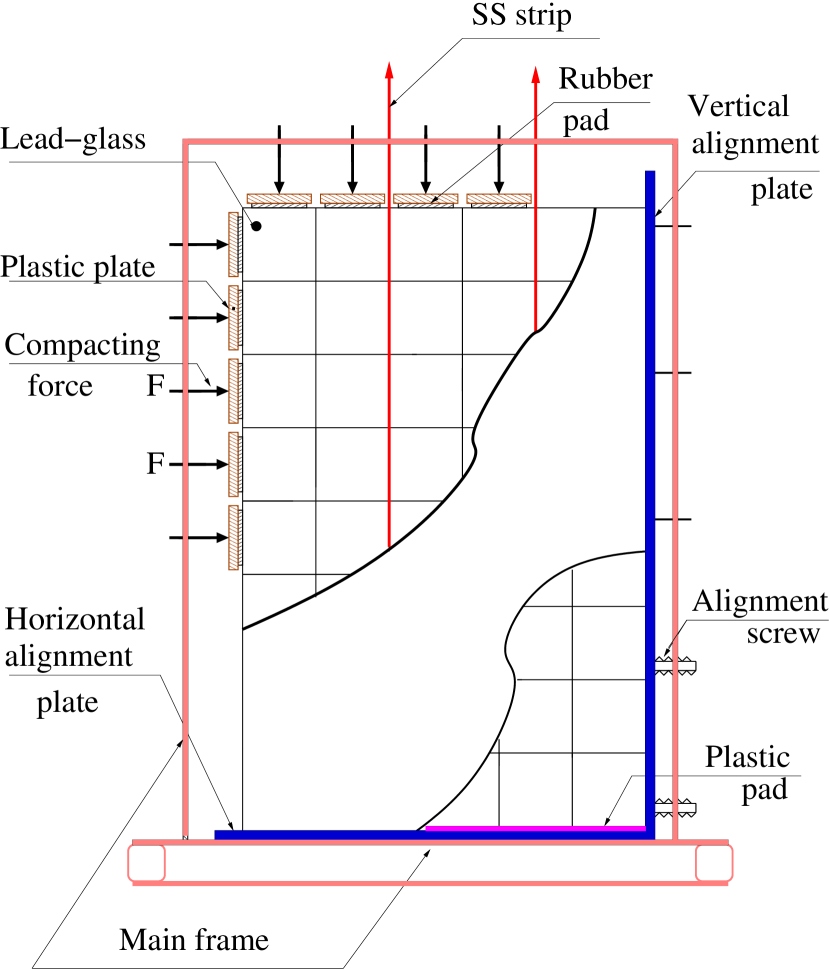
Another set of screws, mounted inside and at the top of the main frame on the opposite side of the vertical alignment plate, was used to compress all gaps between the lead-glass modules and to fix their positions. The load was applied to the lead-glass blocks through 1 inch 1 inch 0.5 inch plastic plates and a 0.125 inch rubber pad. In order to further assist block alignment, 1 inch wide stainless steel strips of 0.004 inch thickness running from top to bottom of the frame were inserted between every two columns of the lead-glass modules.
2.1.1 Air Cooling
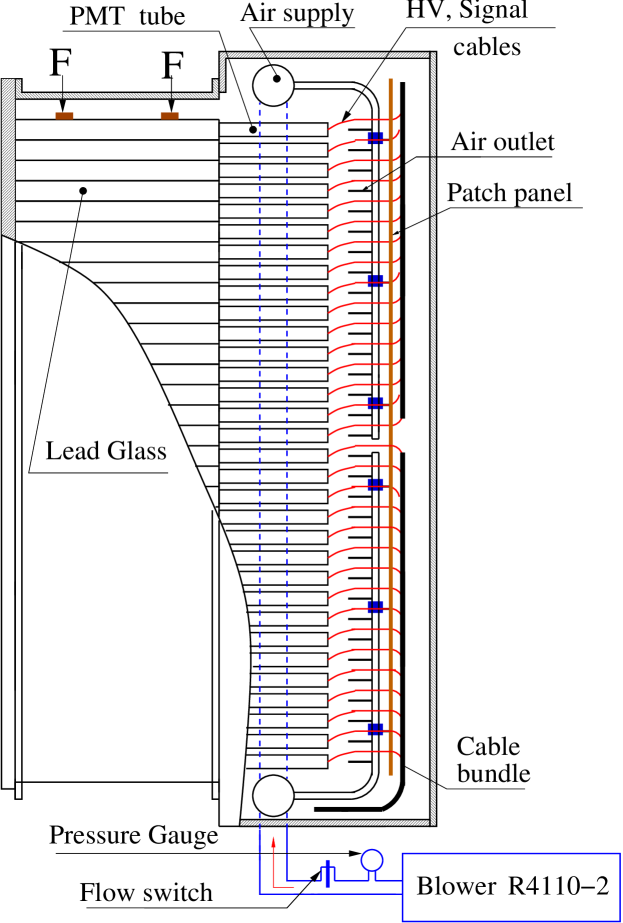
All PMTs and HV dividers are located inside a light-tight box, as shown in Fig. 5. As the current on each HV divider is 1 mA, simultaneous operation of all PMTs would, without cooling, lead to a temperature rise inside the box of around 50-70∘C. An air-cooling system was developed to prevent the PMTs from overheating, and to aid the stable operation of the calorimeter. The air supply was provided by two parallel oil-less regenerative blowers of R4110-2 type777Manufactured by S&F Supplies, Brooklyn, NY 11205, USA., which are capable of supplying air at a maximum pressure of 52 inches water and a maximum flow of 92 CFM. The air is directed toward the HV divider via vertical collector tubes and numerous outlets. When the value on any one of the temperature sensors installed in several positions inside the box exceeds a preset limit, the HV on the PMTs is turned off by an interlock system. The air line is equipped with a flow switch of type FST-321-SPDT which was included in the interlock system. The average temperature inside the box during the entire experimental run did not exceed the preset limit of 55∘C.
2.1.2 Cabling System
A simple and reliable cabling system is one of the key features of multichannel detectors, with easy access to the PMTs and HV dividers for installation and repair being one of the key features. The cabling system includes:
-
1.
1 foot long HV and signal pig-tails soldered to the HV divider;
-
2.
patch panels for Lemo and HV connectors;
-
3.
10 feet long cables from those patch panels to the front-end electronics and the HV distribution boxes;
-
4.
the HV distribution boxes themselves;
-
5.
BNC-BNC patch panels for the outputs of the front-end modules;
-
6.
BNC-BNC patch panels on the DAQ side for the analog signals;
-
7.
BNC-Lemo patch panels on the DAQ side for the veto-counter lines.
Figure 6 shows the cabling arrangement inside the PMT box. The patch panels, which are custom-built and mounted on the air supply tubes, have the ability to swing to the side in order to allow access to the PMTs and the HV dividers. The box has two moving doors, the opening of which leads to activation of an interlock system connected to the HV supply.
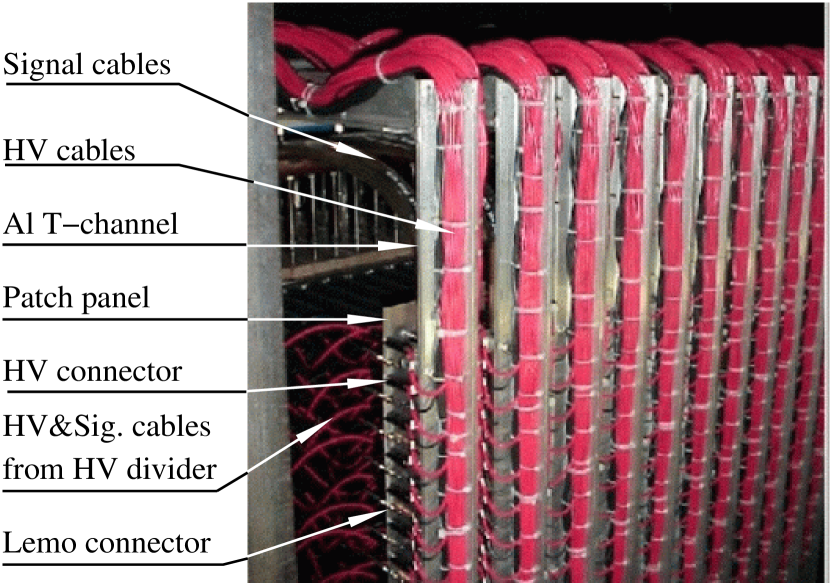
In order to reduce the diameter of the cable bundle from the PMT box, RG-174 cable (diameter 0.1 inch) was used for the PMT signals, and a twisted pair for the HV connection (two individually insulated inner 26 AWG conductors with an overall flame-retardant PVC jacket, part number 001-21803 from the General Wire Product company). The box patch panels used for the HV lines each convert 24 of the above twisted pairs (single HV line) to the multi-wire HV cables (the part 001-21798 made by General Wire Product), which run to the HV power supply units located in the shielded area near DAQ racks.
2.2 Lead-Glass Counter
The basic components of the segmented calorimeter are the TF-1 lead-glass blocks and the FEU 84-3 PMTs. In the 1980s the Yerevan Physics Institute (YerPhI) purchased a consignment of TF-1 lead-glass blocks of 4 cm 4 cm40 cm and FEU 84-3 PMTs of 34 mm diameter (with an active photo-cathode diameter of 25 mm) for the construction of a calorimeter to be used in several experiments at the YerPhI synchrotron. In January of 1998 the RCS experiment at JLab was approved and soon after these calorimeter components were shipped from Yerevan to JLab. This represented the YerPhi contribution to the experiment, as the properties of the TF-1 lead-glass met the requirements of the experiment in terms of photon/electron detection with reasonable energy and position resolution and radiation hardness. The properties of TF-1 lead-glass [12, 13] are given in Table 1.
| Density | |
|---|---|
| Refractive Index | |
| Radiation Length | |
| Moliére Radius | |
| Critical Energy |
All PMTs had to pass a performance test with the following selection criteria: a dark current less than 30 nA, a gain of 106 with stable operation over the course of the experiment (2 months), a linear dependence of the PMT response (within 2 %) on an incident optical pulse of 300 to 30000 photons. 704 PMTs out of the 900 available were selected as a result of these performance tests. Furthermore, the dimensional tolerances were checked for all lead-glass blocks, with strict requirements demanded on the length (4002 mm) and transverse dimensions (400.2 mm).
2.2.1 Design of the Counter
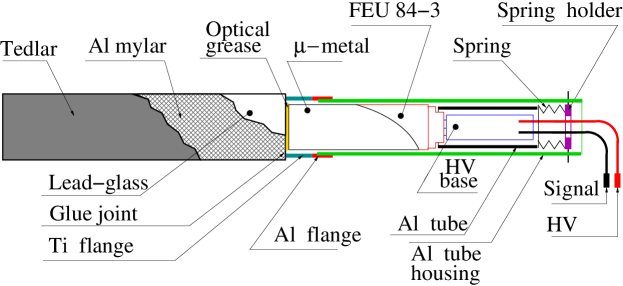
In designing the individual counters for the RCS calorimeter, much attention was paid to reliability, simplicity and the possibility to quickly replace a PMT and/or HV divider. The individual counter design is shown in Fig. 7. A titanium flange is glued to one end of the lead-glass block by means of EPOXY-190. Titanium was selected because its thermal expansion coefficient is very close to that of the lead glass. The PMT housing, which is bolted to the Ti flange, is made of an anodized Al flange and an Al tube. The housing contains the PMT and a -metal shield, the HV divider, a spring, a smaller Al tube which transfers a force from the spring to the PMT, and a ring-shaped spring holder. The optical contact between the PMT and the lead-glass block is achieved by use of optical grease, type BC-630 (Bicron), which was found to increase the amount of light detected by the PMT by 30-40% compared to the case without grease. The PMT is pressed to the lead-glass block by means of a spring, which pushes the HV base with a force of 0.5-1 lbs. Such a large force is essential for the stability of the optical contact over time at the elevated temperature of the PMTs. The glue-joint between the lead glass and the Ti flange, which holds that force, failed after several months in a significant fraction (up to 5%) of the counters. An alternative scheme of force compensation was realized in which the force was applied to the PMT housing from the external bars placed horizontally between the PMT housing and the patch-panel assembly. Each individual lead-glass block was wrapped in aluminized Mylar film and black Tedlar (a polyvinyl fluoride film from DuPont) for optimal light collection and inter-block isolation. Single-side aluminized Mylar film was used with the Al layer on the opposite side of the glass. Such an orientation of the film limits the diffusion of Al atoms into the glass and the non-oxidized surface of aluminum, which is protected by Mylar, provides a better reflectivity. The wrapping covers the side surface of the lead-glass block, leaving the front face open for the gain monitoring. The signal and the HV cables are each one foot long. They are soldered to the HV divider on one end and terminated with Lemo©00 and circular plastic connectors (cable mount receptacle from Hypertronics) on the other end. The cables leave the PMT housing through the open center of the spring holder.
2.2.2 HV Divider
At the full luminosity of the RCS experiment ( cm2/s) and at a distance of 6 m from the target the background energy load per lead-glass block reaches a level of 108 MeVee (electron equivalent) per second, which was found from the average value of anode current in the PMTs and the shift of the ADC pedestals for a 150 ns gate width. At least 30% of this energy flux is due to high energy particles which define the counting rate. The average energy of the signals for that component, according to the observed rate distribution, is in the range of 100-300 MeVee, depending on the beam energy and the detector angle. The corresponding charge in the PMT pulse is around 5-15 pC collected in 10-20 ns. The electronic scheme and the selected scale of 1 MeV per ADC channel (50 fC) resulted in an average anode current of 5 A due to background load. A high-current HV base (1 mA) was therefore chosen to reduce the effect of the beam intensity variation on the PMT amplitude and the corresponding energy resolution to the level of 1%. The scheme of the HV base is shown in Fig. 8. According to the specification data for the FEU 84-3 PMTs the maximum operation voltage is 1900 V. Therefore a nominal voltage value of 1800 V and a current value in the voltage divider of 1 mA were chosen.

2.3 Electronics
The calorimeter electronics were distributed over two locations; see the block diagram in Fig. 9.

The first group of modules (front-end) is located in three racks mounted on the calorimeter platform in close vicinity to the lead-glass blocks. These are the trigger electronics modules which included a mix of custom-built and commercially available NIM units:
-
1.
38 custom-built analog summing modules used for level-one signal summing 888This module was designed by S. Sherman, Rutgers University.;
-
2.
14 linear fan-in/fan-out modules (LeCroy model 428F) for a second-level signal summation;
-
3.
4 discriminator units (Phillips Scientific model 706);
-
4.
a master OR circuit, realized with Phillips Scientific logic units (four model 755 and one model 757 modules);
-
5.
several additional NIM modules used to provide auxiliary trigger signals for the calorimeter calibration with cosmics and for the PMT gain-monitoring system.
The second group of electronic modules, which include charge and time digitizers as well as equipment for the Data Acquisition, High Voltage supply and slow-control systems, is placed behind a radiation-protecting concrete wall. All 704 lead-glass PMT signals and 56 SUM-32 signals are digitized by LeCroy 1881M FastBus ADC modules. In addition, 56 SUM-32 discriminator pulses are directed to scalers and to LeCroy 1877 FastBus TDCs. Further detailed information about the electronics is presented in Section 5.
The signals between these locations are transmitted via patch-panels and coaxial cables, consisting of a total number of 1040 signal and 920 HV lines. The length of the signal cables is about 100 m, which serve as delay lines allowing the timing of the signals at the ADC inputs to be properly set with respect to the ADC gate, formed by the experiment trigger. The width of the ADC gate (150 ns) was made much wider than the duration of PMT pulse in order to accommodate the wider pulses caused by propagation in the 500 ns delay RG-58 signal cables. The cables are placed on a chain of bogies, which permits the calorimeter platform to be moved in the experimental hall without disconnecting the cables. This helped allow for a quick change of kinematics.
2.3.1 Trigger Scheme
The fast on-line photon trigger is based on PMT signals from the calorimeter counters. The principle of its operation is a simple constant-threshold method, in which a logic pulse is produced if the energy deposition in the calorimeter is above a given magnitude. Since the Molière radius of the calorimeter material is cm, the transverse size of the electromagnetic shower in the calorimeter exceeds the size of a single lead-glass block. This enables a good position sensitivity of the device, while at the same time making it mandatory for the trigger scheme to sum up signals from several adjacent counters to get a signal proportional to the energy deposited in the calorimeter.
From an electronics point of view, the simplest realization of such a trigger would be a summation of all blocks followed by a single discriminator. However, such a design is inappropriate for a high-luminosity experiment due to the very high background level. The opposing extreme approach would be to form a summing signal for a small group including a single counter hit and its 8 adjacent counters, thus forming a 3 3 block structure. This would have to be done for every lead-glass block, except for those at the calorimeter’s edges, leading to an optimal signal-to-background ratio, but an impractical 600 channels of analog splitteranalog summerdiscriminator circuitry followed by a 600-input fan-in module. The trigger scheme that was adopted and is shown in Fig. 10 is a trade-off between the above extreme cases. This scheme contains two levels of analog summation followed by appropriate discriminators and an OR-circuit. It involved the following functions:
-
1.
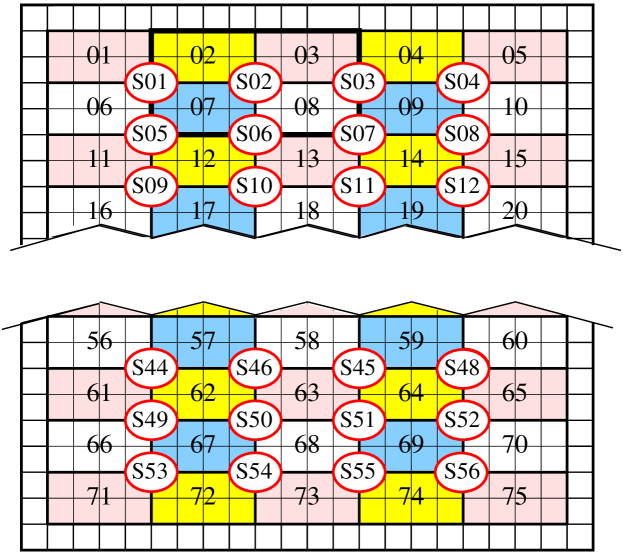
the signals from each PMT in the 75 24 sub-arrays of adjacent lead-glass blocks, excluding the outer-most blocks, are summed in a custom-made analog summing module to give a SUM-8 signal (this module duplicates the signals from the PMTs with less then 1% integral nonlinearity);
-
2.
these signals, in turn, are further summed in overlapping groups of four in LeCroy LRS428F NIM modules to produce 56 SUM-32 signals. Thus, each SUM-32 signal is proportional to the energy deposition in a subsection of the calorimeter of 4 blocks high and 8 blocks wide, i.e. 1632 cm2. Although this amounts to only 5% of the calorimeter acceptance, for any photon hit (except for those at the edges) there will be at least one segment which contains the whole electromagnetic shower.
-
3.
the SUM-32 signals are sent to constant-threshold discriminators, from which the logical pulses are OR-ed to form the photon singles trigger T1 (see Section 5). The discriminator threshold is remotely adjustable, and was typically set to around half of the RCS photon energy for a given kinematic setting.
2.4 Gain Monitoring System
The detector is equipped with a system that distributes light pulses to each calorimeter module. The main purpose of this system is to provide a quick way to check the detector operation and to calibrate the dependence of the signal amplitudes on the applied HV. The detector response to photons of a given energy may drift with time, due to drifts in the PMT gains and to changes in the glass transparency caused by radiation damage. For this reason, the gain monitoring system also allowed measurements of the relative gains of all detector channels during the experiment. In designing the gain-monitoring system ideas developed for a large lead-glass calorimeter at BNL[14] were used.
The system includes two components: a stable light source and a system to distribute the light to all calorimeter modules. The light source consists of an LN300 nitrogen laser999 Manufactured by Laser Photonics, Inc, FL 32826, USA., which provides 5 ns long, 300 J ultraviolet light pulses of 337 nm wavelength. The light pulse coming out of the laser is attenuated, typically by two orders of magnitude, and monitored using a silicon photo-diode S1226-18BQ101010Manufactured by Hamamatsu Photonics, Hamamatsu, Japan. mounted at 150∘ to the laser beam. The light passes through an optical filter, several of which of varying densities are mounted on a remotely controlled wheel with lenses, before arriving at a wavelength shifter. The wavelength shifter used is a 1 inch diameter semi-spherical piece of plastic scintillator, in which the ultraviolet light is fully absorbed and converted to a blue ( 425 nm) light pulse, radiated isotropically. Surrounding the scintillator about 40 plastic fibers (2 mm thick and 4 m long) are arranged, in order to transport the light to the sides of a Lucite plate. This plate is mounted adjacent to the front face of the lead-glass calorimeter and covers its full aperture (see Fig.11). The light passes through the length of the plate, causing it to glow due to light scattering in the Lucite. Finally, in order to eliminate the cross-talk between adjacent counters a mask is inserted between the Lucite plate and the detector face. This mask, which reduces the cross-talk by at least a factor of 100, is built of 12.7 mm thick black plastic and contains a 2 cm 2 cm hole in front of each module.
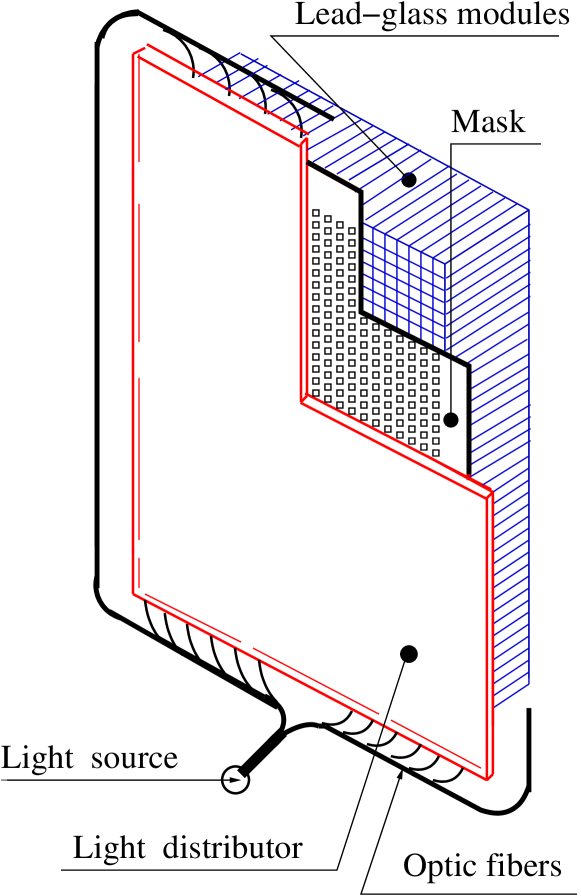
Such a system was found to provide a rather uniform light collection for all modules, and proved useful for detector testing and tuning, as well as for troubleshooting during the experiment. However, it was found that monitoring over extended periods of time proved to be less informative than first thought. The reason for this is due to the fact that the main radiation damage to the lead-glass blocks occurred at a depth of about 2-4 cm from the front face. The monitoring light passes through the damaged area, while an electromagnetic shower has its maximum at a depth of about 10 cm. Therefore, as a result of this radiation damage the magnitude of the monitoring signals drops relatively quicker than the real signals. Consequently, the resulting change in light-output during the experiment was characterized primarily through online analysis of dedicated elastic e-p scattering runs. This data was then used for periodic re-calibration of the individual calorimeter gains.
3 Veto Hodoscopes
In order to ensure clean identification of the scattered photons through rejection of high-energy electrons in the complicated environment created by the mixed electron-photon beam, a veto detector which utilizes UVT Lucite as a Čerenkov radiator was developed. This veto detector proved particularly useful for low luminosity runs, where its use made it possible to take data without relying on the deflection magnet (see Fig. 1). The veto detector consists of two separate hodoscopes located in front of the calorimeter’s gain monitoring system. The first hodoscope has 80 counters oriented vertically, while the second has 110 counters oriented horizontally as shown in Fig. 12. The segmentation scheme for the veto detector was chosen so that it was consistent with the position resolution of the lead-glass calorimeter. An effective dead time of an individual counter is about 100 ns due to combined double-pulse resolution of the PMT, the front-end electronics, the TDC, and the ADC gate-width.
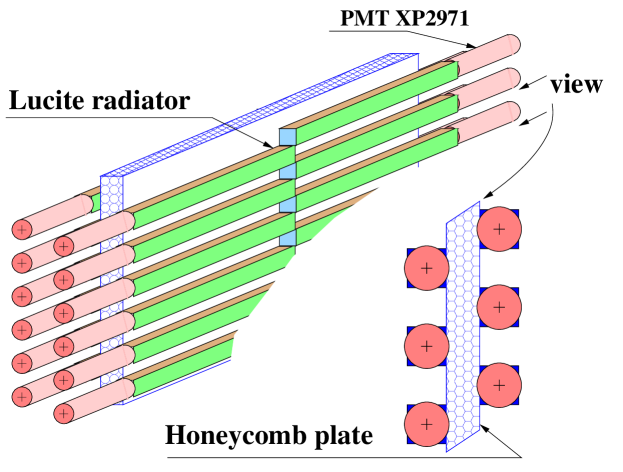
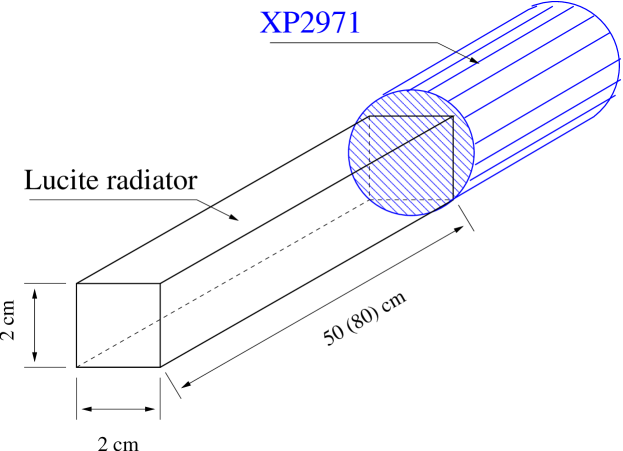
Each counter is made of a UVT Lucite bar with a PMT glued directly to one of its end, which can be seen in Fig. 13. The Lucite bar of 22 cm2 cross section was glued to a XP2971 PMT and wrapped in aluminized Mylar and black Tedlar.
Counters are mounted on a light honeycomb plate via an alignment groove and fixed by tape. The counters are staggered in such a way so as to allow for the PMTs and the counters to overlap.
The average PMT pulse generated by a high-energy electron corresponds to 20 photo-electrons. An amplifier, powered by the HV line current, was added to the standard HV divider, in order that the PMT gain could be reduced by a factor of 10 [15, 16]. After gain-matching by using cosmic ray data a good rate uniformity was achieved, as can be seen in the experimental rate distribution of the counters shown in Fig. 14. The regular variation in this distribution reflects the shielding effect resulting from the staggered arrangement of the counters.
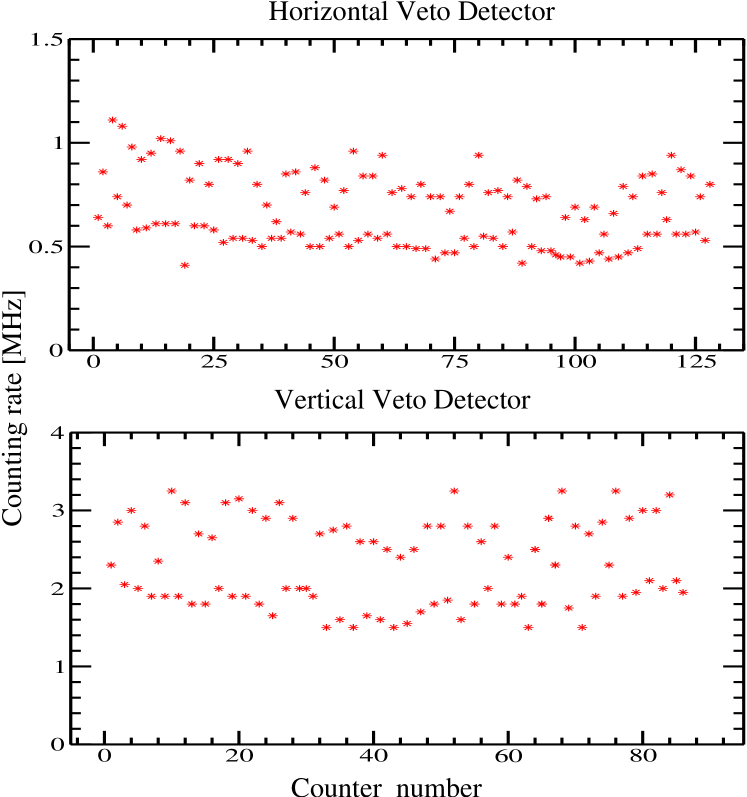
A significant reduction of the rate (by a factor of 5) was achieved by adding a 2 inch polyethylene plate in front of the hodoscopes. Such a reduction as a result of this additional shielding is consistent with the observed variation of the rate (see Fig. 14) and indicates that the typical energy of the dominant background is around a few MeV. The veto plane efficiency measured for different beam intensities is shown in Table 2. It drops significantly at high rate due to electronic dead-time, which limited the beam intensity to 3-5 A in data-taking runs with the veto.
| Run | Beam | Rate of the | Efficiency | Efficiency |
|---|---|---|---|---|
| current | counter V12 | horizontal | vertical | |
| [A] | [MHz] | hodoscope | hodoscope | |
| 1811 | 2.5 | 0.5 | 96.5% | 96.8% |
| 1813 | 5.0 | 1.0 | 95.9% | 95.0% |
| 1814 | 7.5 | 1.5 | 95.0% | 94.0% |
| 1815 | 10. | 1.9 | 94.4% | 93.0% |
| 1816 | 14. | 2.5 | 93.4% | 91.0% |
| 1817 | 19 | 3.2 | 92.2% | 89.3% |
An analysis of the experimental data with and without veto detectors showed that the deflection of the electrons by the magnet provided a sufficiently clean photon event sample. As a result the veto hodoscopes were switched off during most high luminosity data-taking runs, although they proved important in analysis of low luminosity runs and in understanding various aspects of the experiment.
4 High Voltage System
Each PMT high-voltage supply was individually monitored and controlled by the High Voltage System (HVS). The HVS consists of six power supply crates of LeCroy type 1458 with high-voltage modules of type 1461N, a cable system, and a set of software programs. The latter allows to control, monitor, download and save the high-voltage settings and is described below in more detail. Automatic HV monitoring provides an alarm feature with a verbal announcement and a flashing signal on the terminal. The controls are implemented over an Ethernet network using TCP/IP protocol. A Graphical User Interface (GUI) running on a Linux PC provides access to all features of the LeCroy system, loading the settings and saving them in a file. A sample distribution of the HV settings is shown in Fig. 15.

The connections between the outputs of the high-voltage modules and the PMT dividers were arranged using 100 m long multi-wire cables. The transition from the individual HV supply outputs to a multi-wire cable and back to the individual PMT was arranged via high-voltage distribution boxes that are located inside the DAQ area and front-end patch panels outside the PMT box. These boxes have input connectors for individual channels on one side and two high-voltage multi-pin connectors (27 pins from FISCHER part number D107 A051-27) on the other. High-voltage distribution boxes were mounted on the side of the calorimeter stand and on the electronics rack.
5 Data Acquisition System
Since the calorimeter was intended to be used in Hall A at JLab together with the standard Hall A detector devices, the Data Acquisition System of the calorimeter is part of the standard Hall A DAQ system. The latter uses CODA (CEBAF On-line Data Acquisition system) [17] developed by the JLab data-acquisition group.

The calorimeter DAQ includes one Fastbus crate with a single-board VME computer installed using a VME-Fastbus interface and a trigger supervisor module [18], which synchronizes the read-out of all the information in a given event. The most important software components are a Read-Out Controller (ROC), which runs on the VME computer under the VxWorks OS, and an Event Builder and Event Recorder which both run on a Linux workstation. For a detailed description of the design and operation of the Hall A DAQ system see [8] and references therein.
All 704 PMT signals and 56 SUM-32 signals are digitized by LeCroy 1881M FastBus ADC modules. The 56 SUM-32 discriminator pulses are also read-out by scalers and LeCroy 1877 FastBus TDCs. During the RCS experiment the calorimeter was operating in conjunction with one of the High Resolution Spectrometers (HRS), which belong to the standard Hall A detector equipment [8]. The Hall A Data Acquisition System is able to accumulate data involving several event types simultaneously. In the RCS experiment there were 8 types of trigger signals and corresponding event types. Trigger signals from the HRS are generated by three scintillator planes: S0, S1 and S2 (see Fig. 8 in [8]). In the standard configuration the main single arm trigger in the spectrometer is formed by a coincidence of signals from S1 and S2. An alternative trigger, logically described by (S0 AND S1) OR (S0 AND S2), is used to measure the trigger efficiency. In the RCS experiment one more proton arm trigger was used, defined as being a single hit in the S0 plane. As this is the fastest signal produced in the proton arm, it was better suited to form a fast coincidence trigger with the photon calorimeter.
The logic of the Photon Arm singles trigger was described in detail in Section 2.3. Besides this singles trigger there are two auxiliary triggers that serve to monitor the calorimeter blocks and electronics. The first is a photon arm cosmics trigger, which was defined by a coincidence between signals from two plastic scintillator paddles, placed on top and under the bottom of the calorimeter. The other trigger is the light-calibration (laser) trigger which was used for gain monitoring purposes.
The two-arm coincidence trigger is formed by a time overlap of the main calorimeter trigger and the signal from the S0 scintillator plane in the HRS. The width of the proton trigger pulse is set to 100 ns, while the photon trigger pulse, which is delayed in a programmable delay line, is set to 10 ns. As a result, the coincidence events are synchronized with the photon trigger, and a correct timing relation between trigger signals from two arms is maintained for all 25 kinematic configurations of the RCS experiment. Finally, a 1024 Hz puls generator signal forms a pulser trigger, which was used to measure the dead time of the electronics.
All 8 trigger signals are sent to the Trigger Supervisor module which starts the DAQ readout. Most inputs of the Trigger Supervisor can be individually pre-scaled. Triggers which are accepted by the DAQ are then re-timed with the scintillators of a corresponding arm to make gates for ADCs and TDCs. This re-timing removes trigger time jitter and ensures the timing is independent of the trigger type. Table 3 includes information on the trigger and event types used in the RCS experiment and shows typical pre-scale factors used during the data-taking. A schematic diagram of the overall RCS experiment DAQ trigger logic is shown in Fig.16.
| Trigger | Trigger Description | pre-scale |
| ID | factor | |
| T1 | Photon arm singles trigger | 100,000 |
| T2 | Photon arm cosmics trigger | 100,000 |
| T3 | Main Proton arm trigger: (S1 AND S2) | 1 |
| T4 | Additional Proton arm trigger: (S0 AND S1) OR (S0 AND S2) | 10 |
| T5 | Coincidence trigger | 1 |
| T6 | Calorimeter light-calibration trigger | 1 |
| T7 | Signal from the HRS S0 scintillator plane | 65,000 |
| T8 | 1024 Hz pulser trigger | 1,024 |
6 Calorimeter Performance
The calorimeter used in the RCS experiment had three related purposes. The first purpose is to provide a coincidence trigger signal for operation of the DAQ.
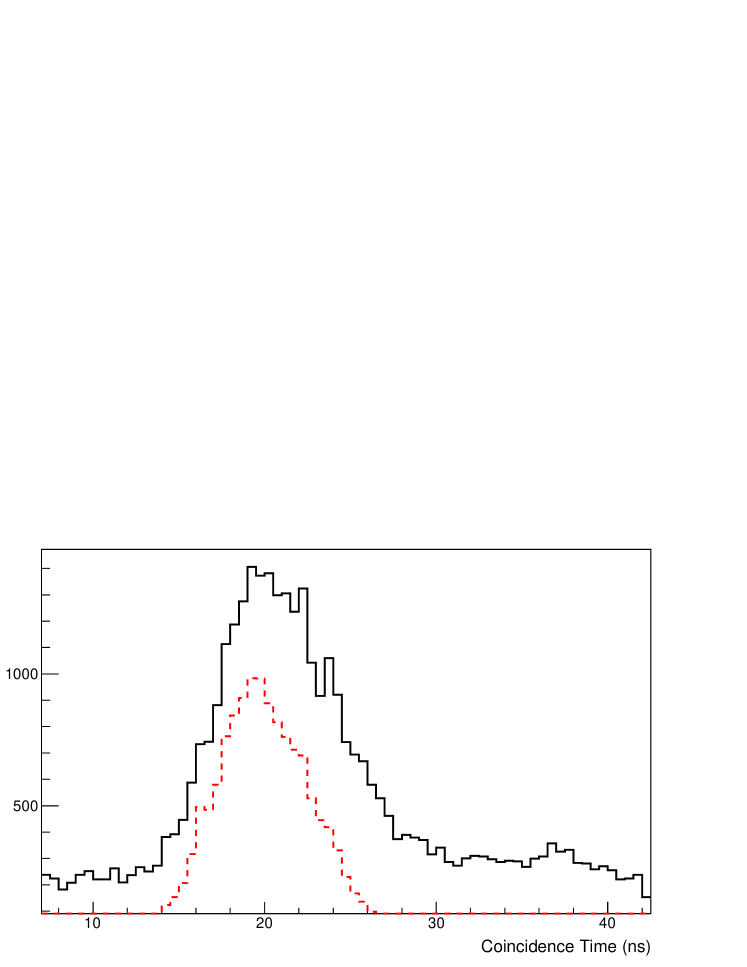
Fig. 17 shows the coincidence time distribution, where one can see a clear relation between energy threshold and time resolution. The observed resolution of around 8 ns (FWHM) was sufficient to identify cleanly coincidence events over the background, which meant that no off-line corrections were applied for variation of the average time of individual summing modules. The second purpose is determination of the energy of the scattered photon/electron to within an accuracy of a few percent, while the third is reasonably accurate reconstruction of the photon/electron hit coordinates in order that kinematic correlation cuts between the scattered photon/electron and the recoil proton can be made. The off-line analysis procedure and the observed position and energy resolutions are presented and discussed in the following two sections.
6.1 Shower Reconstruction Analysis and Position Resolution
The off-line shower reconstruction involves a search for clusters and can be characterized by the following definitions:
-
1.
a cluster is a group of adjacent blocks;
-
2.
a cluster occupies 9 () blocks of the calorimeter;
-
3.
the distribution of the shower energy deposition over the cluster blocks (the so-called shower profile) satisfies the following conditions:
-
(a)
the maximum energy deposition is in the central block;
-
(b)
the energy deposition in the corner blocks is less than that in each of two neighboring blocks;
-
(c)
around 50% of the total shower energy must be deposited in the central row (and column) of the cluster.
-
(a)
For an example in which the shower center is in the middle of the central block, around 84% of the total shower energy is in the central block, about 14% is in the four neighboring blocks, and the remaining 2% is in the corner blocks. Even at the largest luminosity used in the RCS experiment the probability of observing two clusters with energies above 50% of the elastic value was less than 10%, so for the 704 block hodoscope a two-cluster overlap was very unlikely.
The shower energy reconstruction requires both hardware and software calibration of the calorimeter channels. On the hardware side, equalization of the counter gains was initially done with cosmic muons, which produce 20 MeV energy equivalent light output per 4 cm path (muon trajectories perpendicular to the long axis of the lead-glass blocks). The calibration was done by selecting cosmic events for which the signals in both counters above and below a given counter were large. The final adjustment of each counter’s gain was done by using calibration with elastic e-p events. This calibration provided PMT gain values which were on average different from the initial cosmic set by 20%
The purpose of the software calibration is to define the coefficients for transformation of the ADC amplitudes to energy deposition for each calorimeter module. These calibration coefficients are obtained from elastic e-p data by minimizing the function:
where:
— number of the selected calibration event;
— number of the block, included in the cluster;
— set of the blocks’ numbers, in the cluster;
— amplitude into the -th block;
— pedestal of the -th block;
— known energy of electron;
— calibration coefficients, which need to be fitted.
The scattered electron energy is calculated by using the energy of the
primary electron beam and the scattered electron angle.
A cut on the proton momentum-angle correlation is used to select
clean elastic events.
Following calculation of the calibration coefficients, the total energy deposition , as well as the and coordinates of the shower center of gravity are calculated by the formulae:
where is the set of blocks numbers which make up the cluster, is the energy deposition in the -th block, and and are the coordinates of the -th block center. The coordinates calculated by this simple center of gravity method are then used for a more accurate determination of the incident hit position. This second iteration was developed during the second test run [7], in which a two-layer MWPC was constructed and positioned directly in front of the calorimeter. This chamber had 128 sensitive wires in both X and Y directions, with a wire spacing of 2 mm and a position resolution of 1 mm. In this more refined procedure, the coordinate of the shower center of gravity inside the cell (relative to the cell’s low boundary) is used. An estimate of the coordinate can be determined from a polynomial in this coordinate ():
For symmetry reasons, only odd degrees of the polynomial are used. The coefficients are calculated by minimizing the functional:
where:
— number of event;
— coordinate of the shower center of gravity inside
the cell;
— coordinate of the track (MWPC)
on the calorimeter plane;
— coordinate transformation
coefficients to be fitted.
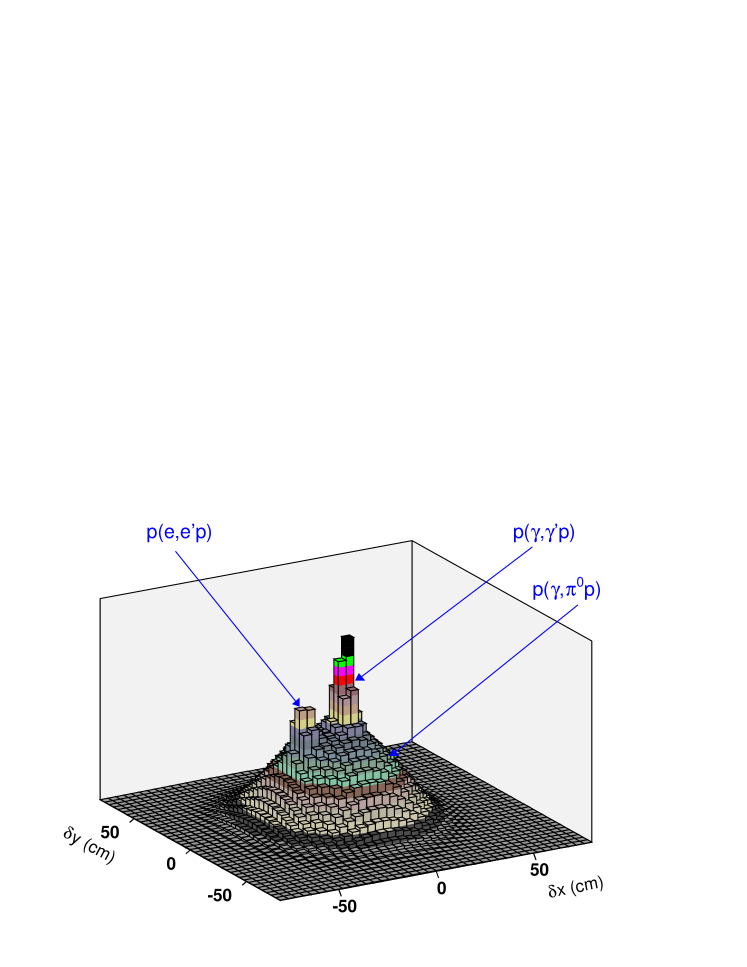
The resulting resolution obtained from such a fitting procedure was found to be around 5.5 mm for a scattered electron energy of 2.3 GeV. For the case of production data, where the MWPC was not used, Fig. 18 shows a scatter plot of events on the front face of the calorimeter. The parameter plotted is the differences between the observed hit coordinates in the calorimeter and the coordinates calculated from the proton parameters and an assumed two-body kinematic correlation. The dominant contribution to the widths of the RCS and e-p peaks that can be seen in this figure is from the angular resolution of the detected proton, which is itself dominated by multiple scattering. As the calorimeter distance varied during the experiment between 5.5 m and 20 m, the contribution to the combined angular resolution from the calorimeter position resolution of a few millimeters was minimal.
6.2 Trigger Rate and Energy Resolution
At high luminosity, when a reduction of the accidental coincidences in the raw trigger rate is very important, the trigger threshold should be set as close to the signal amplitude for elastic RCS photons as practical. However, the actual value of the threshold for an individual event has a significant uncertainty due to pile-up of the low-amplitude signals, fluctuations of the signal shape (mainly due to summing of the signals from the PMTs with different HV and transit time), and inequality of the gain in the individual counters. Too high a threshold, therefore, can lead to a loss in detection efficiency.
The counting rate of the calorimeter trigger, , which defines a practical level of operational luminosity has an exponential dependence on the threshold, as can be seen in Fig. 19. It can be described by a function of :
where is the maximum energy of an elastically scattered photon/electron for a given scattering angle, an angle-dependent constant, and a universal constant .
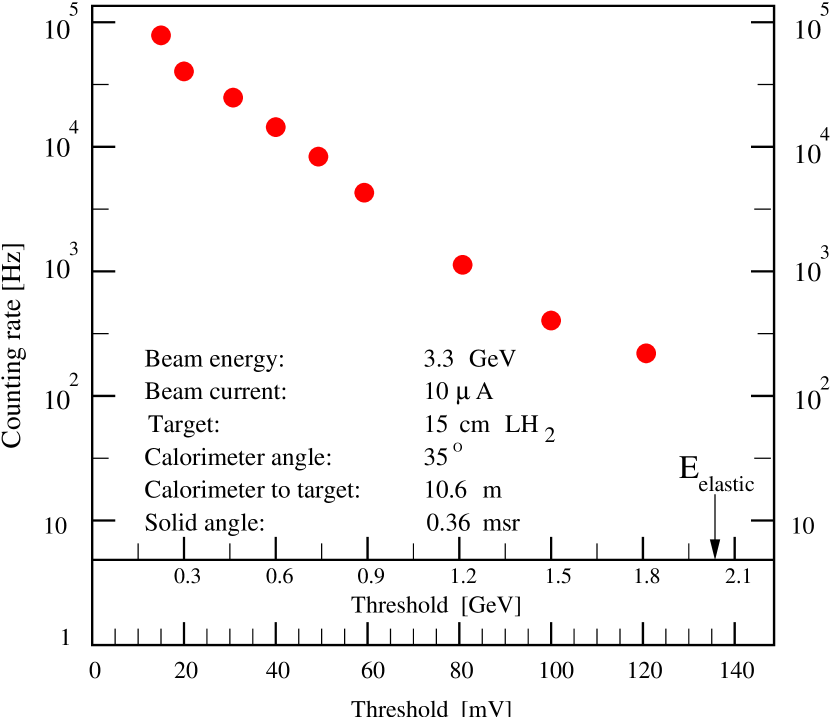
The angular variation of the constant , after normalization to a fixed luminosity and the calorimeter solid angle, is less than a factor of 2 for the RCS kinematics. The threshold for all kinematics was chosen to be around half of the elastic energy, thereby balancing the need for a low trigger rate without affecting the detection efficiency.
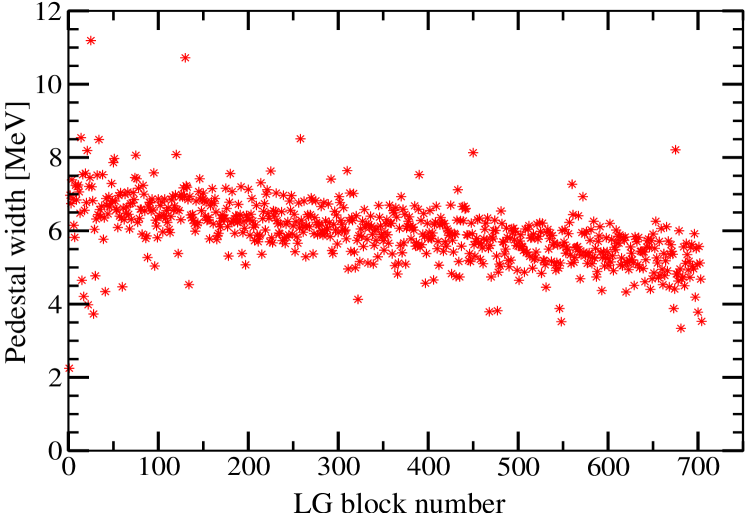
In order to ensure proper operation and to monitor the performance of each counter the widths of the ADC pedestals were used (see Fig. 20). One can see that these widths vary slightly with block number, which reflects the position of the block in the calorimeter and its angle with respect to the beam direction. This pedestal width also allows for an estimate of the contribution of the background induced base-line fluctuations to the overall energy resolution. For the example shown in Fig. 20 the width of 6 MeV per block leads to energy spectrum noise of about 20 MeV because a 9-block cluster is used in the off-line analysis.
The energy resolution of the calorimeter was measured by using elastic e-p scattering. Such data were collected many times during the experiment for kinematic checks and calorimeter gain calibration. Table 4 presents the observed resolution and the corresponding ADC pedestal widths over the course of the experiment. For completeness, the pedestal widths for cosmic and production data are also included.
| Runs | eff | Beam Current | Accumulated | Detected | at Eγ=1 GeV | |||
| ( cm-2/s) | (A) | Beam Charge (C) | (GeV) | (%) | (%) | (degrees) | (MeV) | |
| 1517 (c) | - | - | - | - | - | - | - | 1.5 |
| 1811 (e) | 0.1 | 2.5 | 2.4 | 2.78 | 4.2 | 7.0 | 30 | 1.7 |
| 1488 (e) | 0.2 | 5 | 0.5 | 1.32 | 4.9 | 5.5 | 46 | 1.75 |
| 2125 (e) | 1.0 | 25 | 6.6 | 2.83 | 4.9 | 8.2 | 34 | 2.6 |
| 2593 (e) | 1.5 | 38 | 14.9 | 1.32 | 9.9 | 11.3 | 57 | 2.0 |
| 1930 (e) | 1.6 | 40 | 4.4 | 3.39 | 4.2 | 7.7 | 22 | 3.7 |
| 1938 () | 1.8 | 15 | 4.5 | 3.23 | - | - | 22 | 4.1 |
| 2170 () | 2.4 | 20 | 6.8 | 2.72 | - | - | 34 | 4.0 |
| 1852 () | 4.2 | 35 | 3.0 | 1.63 | - | - | 50 | 5.0 |
At high luminosity the energy resolution degrades due to fluctuations of the base line (pedestal width) and the inclusion of more accidental hits during the ADC gate period. However, for the 9-block cluster size used in the data analysis the contribution of the base line fluctuations to the energy resolution is just 1-2%. The measured widths of ADC pedestals confirmed the results of Monte Carlo simulations and test runs that the radiation background is three times higher with the 6% Cu radiator upstream of the target than without it.
The resolution obtained from e-p calibration runs was corrected for the drift of the gains so it could be attributed directly to the effect of lead glass radiation damage. It degraded over the course of the experiment from 5.5% (for a 1 GeV photon energy) at the start to larger than 10% by the end. It was estimated that this corresponds to a final accumulated radiation dose of about 3-10 kRad, which is in agreement with the known level of radiation hardness of the TF-1 lead glass [19]. This observed radiation dose corresponds to a 500 hour experiment with a 15 cm LH2 target and 50 A beam.
6.3 Annealing of the radiation damage
The front face of the calorimeter during the experiment was protected by plastic material with an effective thickness of 10 g/cm2. For the majority of the time the calorimeter was located at a distance of 5-8 m and an angle of 40-50∘ with respect to the electron beam direction. The transparency of 20 lead-glass blocks was measured after the experiment, the results of which are shown in Fig. 21. This plot shows the relative transmission through 4 cm of glass in the direction transverse to the block length at different locations. The values were normalized to the transmission through similar lead-glass blocks which were not used in the experiment. The transmission measurement was done with a blue LED ( of 430 nm) and a Hamamatsu photo-diode (1226-44).
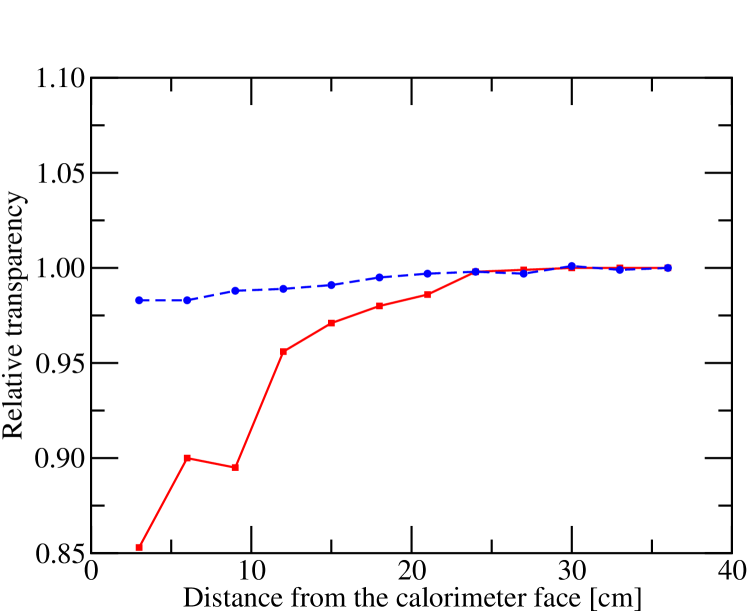
A UV technique was developed and used in order to cure radiation damage. The UV light was produced by a 10 kW total power 55-inch long lamp111111Type A94551FCB manufactured by American Ultraviolet, Lebanon, IN 46052, USA, which was installed vertically at a distance of 45 inches from the calorimeter face and a quartz plate (C55QUARTZ) was used as an infrared filter. The intensity of the UV light at the face of the lead-glass blocks was found to be 75 mW/cm2 by using a UVX digital radiometer121212 Manufactured by UVP, Inc., Upland, CA 91786, USA. In situ UV irradiation without disassembly of the lead-glass stack was performed over an 18 hour period. All PMTs were removed before irradiation to ensure the safety of the photo-cathode. The resultant improvement in transparency can be seen in Fig. 21. An alternative but equally effective method to restore the lead-glass transparency, which involved heating of the lead-glass blocks to 250∘C for several hours, was also tested. The net effect of heating on the transparency of the lead-glass was similar to the UV curing results.
In summary, operation of the calorimeter at high luminosity, particularly when the electron beam was incident on the bremsstrahlung radiator, led to a degradation in energy resolution due to fluctuations in the base-line and a higher accidental rate within the ADC gate period. For typical clusters this effect was found to be around a percent or two. By far the largest contributor to the observed degradation in resolution was radiation damage sustained by the lead-glass blocks, which led to the resolution being a factor of two larger at the end of the experiment. The resulting estimates of the total accumulated dose were consistent with expectations for this type of lead-glass. Finally, it was found that both UV curing and heating of the lead-glass were successful in annealing this damage.
7 Summary
The design of a segmented electromagnetic calorimeter which was used in the JLab RCS experiment has been described. The performance of the calorimeter in an unprecedented high luminosity, high background environment has been discussed. Good energy and position resolution enabled a successful measurement of the RCS process over a wide range of kinematics.
8 Acknowledgments
We acknowledge the RCS collaborators who helped to operate the detector and the JLab technical staff for providing outstanding support, and specially D. Hayes, T. Hartlove, T. Hunyady, and S. Mayilyan for help in the construction of the lead-glass modules. We appreciate S. Corneliussen’s careful reading of the manuscript and his valuable suggestions. This work was supported in part by the National Science Foundation in grants for the University of Illinois University and by DOE contract DE-AC05-84ER40150 under which the Southeastern Universities Research Association (SURA) operates the Thomas Jefferson National Accelerator Facility for the United States Department of Energy.
References
- [1] C. Hyde-Wright, A. Nathan, and B. Wojtsekhowski, spokespersons, JLab experiment E99-114.
- [2] Charles Hyde-Wright and Kees de Jager Ann.Rev.Nucl.Part.Sci. 54, 217 (2004).
- [3] A.V. Radyushkin, Phys. Rev. D 58, 114008 (1998).
- [4] H.W. Huang, P. Kroll, T. Morii, Eur. Phys. J. C 23, 301 (2002); erratum ibid., C 31, 279 (2003).
- [5] R. Thompson, A. Pang, Ch.-R. Ji, Phys. Rev. D 73, 054023 (2006).
- [6] M.A. Shupe et al., Phys. Rev. D 19, 1929 (1979).
- [7] E. Chudakov et al., Study of Hall A Photon Spectrometer. Hall A internal report, 1998.
- [8] J. Alcorn et al., Nucl. Instr. Meth. A 522, (2004) 294.
- [9] D.J. Hamilton et al., Phys. Rev. Lett. 94, 242001 (2005).
- [10] A. Danagoulian et al., Phys. Rev. Lett. 98, 152001 (2007).
- [11] Yu.D. Prokoshkin et al., Nucl. Instr. Meth. A 248, 86102 (1986).
- [12] M.Y. Balatz et al., Nucl. Instr. Meth. A 545, 114 (2005).
- [13] R.G. Astvatsaturov et al., Nucl. Instr. Meth. 107, 105 (1973).
- [14] R.R. Crittenden et al., Nucl. Instr. Meth. A 387, 377 (1997).
- [15] V. Popov et al., Proceedings of IEEE 2001 Nuclear Science Symposium (NSS) And Medical Imaging Conference (MIC). Ed. J.D. Valentine IEEE (2001) p. 634-637.
- [16] V. Popov, Nucl. Instr. Meth. A 505, 316 (2003).
- [17] W.A. Watson et al., CODA: a scalable, distributed data acquisition system, in: Proceedings of the Real Time 1993 Conference, p. 296;
- [18] E. Jastrzembski et al., The Jefferson Lab trigger supervisor system, 11th IEEE NPSS Real Time 1999 Conference, JLab-TN-99-13, 1999.
- [19] A.V. Inyakin et al., Nucl. Instr. Meth. 215, 103 (1983).